Showing results for arctic arctic

Grade 6

Unit 1: Numbers

GO Math!Desmos Math 6–A1
Module 4: Operations with Fractions
Lesson 4.1: Applying GCF and LCM to Fraction OperationsUnit 4
Lesson 6: Fill the Gap [Free lesson]
Lesson 7: Break It Down
Lesson 4.2: Dividing FractionsUnit 4
Lesson 8: Potting Soil
Lesson 9: Division Challenges
Lesson 10: Swap Meet (Print available)
Practice Day
Lesson 4.3: Dividing Mixed NumbersUnit 4
Lesson 8: Potting Soil
Lesson 10: Swap Meet
Practice Day
Lesson 4.4: Solving Multistep Problems with Fractions and Mixed NumbersUnit 4
Lesson 11: Classroom Comparisons
Lesson 12: Puzzling Areas [Free lesson]
Lesson 13: Volume Challenges
Lesson 14: Planter Planner
Module 5: Operations with Decimals
Lesson 5.1: Dividing Whole NumbersUnit 5
Lesson 9: Long Division Launch
Lesson 10: Return of Long Division
Lesson 5.2: Adding and Subtracting DecimalsUnit 5
Lesson 1: Dishing Out Decimals [Free lesson]
Lesson 2: Decimal Diagrams [Free lesson]
Lesson 3: Fruit by the Pound
Lesson 4: Missing Digits
Lesson 5.3: Multiplying DecimalsUnit 5
Lesson 5: Decimal Multiplication
Lesson 6: Multiplying With Areas
Lesson 7: Multiplication Methods
Lesson 5.4: Dividing DecimalsUnit 5
Lesson 8: Division Diagrams
Lesson 10: Return of Long Division
Lesson 11: Movie Time [Free lesson]
Lesson 5.5: Applying Operations with Rational NumbersUnit 5
Practice Day 1
Lesson 12: Budget Vehicles
Lesson 13: Grocery Prices

Unit 2: Number Operations

Module 4: Operations with Fractions
Lesson 4.1: Applying GCF and LCM to Fraction OperationsUnit 4
Lesson 6: Fill the Gap [Free lesson]
Lesson 7: Break It Down
Lesson 4.2: Dividing FractionsUnit 4
Lesson 8: Potting Soil
Lesson 9: Division Challenges
Lesson 10: Swap Meet (Print available)
Practice Day (Print available)
Lesson 4.3: Dividing Mixed NumbersUnit 4
Lesson 8: Potting Soil
Lesson 10: Swap Meet (Print available)
Practice Day
Lesson 4.4: Solving Multistep Problems with Fractions and Mixed NumbersUnit 4
Lesson 11: Classroom Comparisons
Lesson 12: Puzzling Areas (Print available) [Free lesson]
Lesson 13: Volume Challenges
Lesson 14: Planter Planner (Print available)
Module 5: Operations with Decimals
Lesson 5.1: Dividing Whole NumbersUnit 5
Lesson 9: Long Division Launch (Print available)
Lesson 10: Return of Long Division
Lesson 5.2: Adding and Subtracting DecimalsUnit 5
Lesson 1: Dishing Out Decimals (Print available) [Free lesson]
Lesson 2: Decimal Diagrams [Free lesson]
Lesson 3: Fruit by the Pound
Lesson 4: Missing Digits
Lesson 5.3: Multiplying DecimalsUnit 5
Lesson 5: Decimal Multiplication
Lesson 6: Multiplying With Areas
Lesson 7: Multiplication Methods (Print available)
Lesson 5.4: Dividing DecimalsUnit 5
Lesson 8: Division Diagrams
Lesson 10: Return of Long Division (Print available)
Lesson 11: Movie Time [Free lesson]
Lesson 5.5: Applying Operations with Rational NumbersUnit 5
Practice Day 1 (Print available)
Lesson 12: Budget Vehicles (Print available)
Lesson 13: Grocery Prices (Print available)

Unit 3: Proportionality, Ratios, and Rates

Module 6: Representing Ratios and Rates
Lesson 6.1: RatiosUnit 2
Lesson 1: Pizza Maker [Free lesson]
Lesson 2: Ratio Rounds (Print available)
Lesson 3: Rice Ratios (Print available)
Lesson 7:  Mixing Paint, Part 1
Lesson 12: Mixing Paint, Part 2
Lesson 6.2: Rates Unit 2
Lesson 8: World Records (Print available)
Unit 3
Lesson 4: Model Trains
Lesson 5: Soft Serve [Free lesson]
Lesson 6: Welcome to the Robot Factory (Print available)
Lesson 7: More Soft Serve
Lesson 13: A County as a Village
Lesson 6.3: Using Ratios and Rates to Solve ProblemsUnit 2
Lesson 4: Fruit Lab [Free lesson]
Lesson 5: Balancing Act
Lesson 6: Product Prices (Print available)
Lesson 9: Disaster Preparation [Free lesson]
Lesson 10: Balloons
Lesson 11: Community Life (Print available)
Lesson 13:City Planning
Lesson 14: Lunch Waste (Print available)
Module 7: Applying Ratios and Rates
Lesson 7.1: Ratios, Rates, Tables, and GraphsUnit 2
Lesson 4: Fruit Lab [Free lesson]
Lesson 6: Product Prices (Print available)
Lesson 9: Disaster Preparation [Free lesson]
Unit 3
Lesson 5: Soft Serve [Free lesson]
Lesson 6: Welcome to the Robot Factory
Lesson 7.2: Solving Problems with Proportions
Lesson 7.3: Converting Within Measurement SystemsUnit 3
Lesson 2: Counting Classrooms
Lesson 7.4: Converting Between Measurement SystemsUnit 3
Lesson 3: Pen Pals
Module 8:  Percents
Lesson 8.1 Understanding Percent.Unit 3
Lesson 8: Lucky Duckies [Free lesson]
Lesson 9: Bicycle Goals
Lesson 8.2: Percents, Fractions, and Decimals.Unit 3
Lesson 11: Cost Breakdown
Lesson 12: More Bicycle Goals
Lesson 13: A Country as a Village
Lesson 8.3: Solving Percent ProblemsUnit 3
Lesson 9: Bicycle Goals
Lesson 10: What’s Missing? (Print available)
Lesson 11: Cost Breakdown
Lesson 12: More Bicycle Goals
Lesson 13: A Country as a Village

Unit 4: Equivalent Expressions

Module 9: Generating Equivalent Numerical Expressions
Lesson 9.1: ExponentsUnit 6
Lesson 10: Powers
Lesson 11: Exponent Expressions (Print available)
Lesson 12: Squares and Cubes
Lesson 9.2: Prime Factorization
Lesson 9.3: Order of Operations
Module 10: Generating Equivalent Algebraic Expressions
Lesson 10.1: Modeling and Writing Expressions
Lesson 10.2: Evaluating Expressions
Unit 6
Lesson 6: Vari-apples
Lesson 8: Products and Sums [Free lesson]
Lesson 9: Products, Sums, and Differences (Print available)
Lesson 10.3: Generating Equivalent ExpressionsUnit 6
Lesson 7: Border Tiles
Lesson 8: Products and Sums [Free lesson]
Lesson 9: Products, Sums, and Differences (Print available)

Unit 5: Equations and Inequalities

Unit 6: Relationships in Geometry

Unit 7: Measurement and Data

Grade 7

Unit 1: The Number System

GO Math!Desmos Math 6–A1
Module 1:  Adding and Subtracting Integers
Lesson 1.1: Adding Integers With the Same Sign
Lesson 1.2: Adding Integers With Different Signs
Lesson 1.3: Subtracting Integers
Unit 5
Lesson 1: Floats and Anchors [Free lesson]
Lesson 2: More Floats and Anchors
Lesson 3: Bumpers
Lesson 4: Draw Your Own (Print available) [Free lesson]
Lesson 5: Number Puzzles
Lesson 9: Expressions (Print available)
Lesson 10: Integer Puzzles [Free lesson]
Lesson 1.4:  Applying Addition and Subtraction of IntegersUnit 5
Lesson 11: Changing Temperatures
Lesson 12: Arctic Sea Ice (Print available)
Lesson 13: Solar Panels and More (Print available)
Module 2: Multiplying and Dividing Integers
Lesson 2.1: Multiplying Integers Unit 5
Lesson 6: Floating in Groups
Lesson 7: Back in Time
Lesson 10: Integer Puzzles [Free lesson]
Lesson 2.2: Dividing IntegersUnit 5
Lesson 6: Floating in Groups
Lesson 10: Integer Puzzles [Free lesson]
Lesson 2.3: Applying Integer OperationsUnit 5
Lesson 8: Speeding Turtles
Lesson 12: Arctic Sea Ice (Print available)
Lesson 13: Solar Panels and More (Print available)
Module 3:  Rational Numbers
Lesson 3.1: Rational Numbers and Decimals
Lesson 3.2: Adding Rational Numbers
Lesson 3.3: Subtracting Rational Numbers
Unit 5
Lesson 2: More Floats and Anchors
Lesson 3: Bumpers
Lesson 4: Draw Your Own (Print available) [Free lesson]
Lesson 5: Number Puzzles
Lesson 3.4: Multiplying Rational NumbersUnit 5
Lesson 6: Floating in Groups
Lesson 7: Back in Time
Lesson 3.5: Dividing Rational Numbers Unit 5
Lesson 6: Floating in Groups
Lesson 3.6: Applying Rational Number OperationsUnit 5
Lesson 8: Speeding Turtles
Lesson 12: Arctic Sea Ice (Print available)
Lesson 13: Solar Panels and More (Print available)

Unit 2: Ratios and Proportional Relationships

Module 4:  Rates and Proportionality
Lesson 4.1: Unit RatesUnit 2
Lesson 3: Sugary Drinks (Print available)
Lesson 5: Snapshots
Lesson 6: Two and Two (Print available) [Free lesson]
Lesson 9: Gallon Challenge
Unit 4
Lesson 2: Peach Cobbler (Print available)
Lesson 3: Sticker Sizes
Lesson 4.2: Constant Rates of ChangeUnit 2
Lesson 1: Paint [Free lesson]
Lesson 2: Balloon Float
Lesson 3: Sugary Drinks (Print available)
Lesson 4:  Robot Factory
Lesson 5: Snapshots
Lesson 6: Two and Two (Print available) [Free lesson]
Lesson 7: All Kinds of Equations
Lesson 4.3:  Proportional Relationships and GraphsUnit 2
Lesson 1: Paint [Free lesson]
Lesson 2: Balloon Float
Lesson 3: Sugary Drinks (Print available)
Lesson 4: Robot Factory
Lesson 5: Snapshots
Lesson 6: Two and Two (Print available) [Free lesson]
Lesson 7: All Kinds of Equations
Lesson 8: DinoPops [Free lesson]
Lesson 9: Gallon Challenge
Lesson 10: Three Turtles
Lesson 11: Four Representations (Print available)
Lesson 12: Water Efficiency
Unit 4
Lesson 3: Sticker Sizes
Module 5:  Proportions and Percent
Lesson 5.1: Percent Increase and DecreaseUnit 4
Lesson 1: Mosaics [Free lesson]
Lesson 4: More and Less
Lesson 5: All the Equations
Lesson 7: Percent Machines [Free lesson]
Lesson 9: Minimum Wage (Print available)
Lesson 13: Decimal Deep Dive (Print available)
Lesson 5.2: Rewriting Percent ExpressionsUnit 4
Lesson 9: Minimum Wage
Lesson 5.3: Applications of PercentUnit 4
Lesson 6: 100% (Print available)
Lesson 8: Tax and Tip
Lesson 9: Minimum Wage (Print available)
Lesson 10: Cost of College (Print available)
Lesson 11: Bookcase Builder
Lesson 12: Posing Percent Problems [Free lesson]

Unit 3: Expressions, Equations, and Inequalities

Unit 4: Geometry

Module 8: Modeling Geometric Figures
Lesson 8.1: Similar Shapes and Scale DrawingsUnit 1
Lesson 1: Scaling Machines [Free lesson]
Lesson 2: Scaling Robots
Lesson 3: Make It Scale
Lesson 4: Scale Factor Challenges
Lesson 5: Tiles
Lesson 6: Introducing Scale
Lesson 7: Will It Fit? (Print available) [Free lesson]
Lesson 8: Scaling States (Print available)
Lesson 9: Scaling Buildings
Lesson 10: Room Redesign (Print available)
Unit 7
Lesson 5: Can You Build It? [Free lesson]
Lesson 6: Is It Enough?
Lesson 7: More Than One?
Lesson 8.2: Geometric DrawingsUnit 1
Lesson 6: Introducing Scale
Lesson 7: Will It Fit? (Print available) [Free lesson]
Lesson 8: Scaling States (Print available)
Lesson 9: Scaling Buildings
Lesson 10: Room Redesign (Print available)
Unit 7
Lesson 8:  Can You Draw It? (Print available)
Lesson 8.3: Cross SectionsUnit 7
Lesson 9: Slicing Solids
Lesson 8.4Angle RelationshipsUnit 7
Lesson 1: Pinwheels
Lesson 2: Friendly Angles [Free lesson]
Lesson 3: Angle Diagrams
Lesson 4: Missing Measures (Print available) [Free lesson]
Module 9:  Circumference, Area, and Volume
Lesson 9.1: CircumferenceUnit 3
Lesson 3: Measuring Around [Free lesson]
Lesson 9.2: Area of CirclesUnit 3
Lesson 5: Area Strategies
Lesson 6: Radius Squares (Print available)
Lesson 7: Why Pi?
Lesson 8: Area Challenges [Free lesson]
Lesson 9: Circle vs. Square
Lesson 9.3: Area of Composite FiguresUnit 3
Lesson 5: Area Strategies
Lesson 8: Area Challenges [Free lesson]
Lesson 9.4: Solving Surface Area ProblemsUnit 7
Lesson 12: Surface Area Strategies (Print available)
Lesson 13: Popcorn Possibilities
Lesson 9.5: Solving Volume ProblemsUnit 7
Lesson 10: Simple Prisms
Lesson 11: More Complicated Prisms
Lesson 13: Popcorn Possibilities

Unit 5: Statistics

Module 10: Random Samples and
Populations
Lesson 10.1: Populations and SamplesUnit 8
Lesson 10: Crab Island [Free lesson]
Lesson 11: Headlines
Lesson 12: Flower Power
Lesson 13: Plots and Samples
Lesson 14: School Newspaper (Print available)
Lesson 15: Asthma Rates (Print available)
Lesson 10.2: Making Inferences from a Random Sample
Lesson 10.3: Generating Random Samples
Unit 8
Lesson 13: Plots and Samples
Lesson 15: Asthma Rate (Print available)
Module 11: Analyzing and Comparing Data
Lesson 11.1: Comparing Data Displayed in Dot PlotsUnit 8
Lesson 14: School Newspaper (Print available)
Lesson 15: Asthma Rates (Print available)
Lesson 11.2: Comparing Data Displayed in Box PlotsUnit 8
Lesson 13: Plots and Samples
Lesson 15: Asthma Rates (Print available)
Lesson 11.3: Using Statistical Measures to Compare PopulationsUnit 8
Lesson 9: Car, Bike, or Train? (Print available)
Lesson 10: Crab Island [Free lesson]
Lesson 15: Asthma Rates (Print available)

Unit 6: Probability

Module 12: Experimental Probability
Lesson 12.1: ProbabilityUnit 8
Lesson 1: How Likely? (Print available) [Free lesson]
Lesson 2: Prob-bear-bilities [Free lesson]
Lesson 12.2: Experimental Probability of Simple EventsUnit 8
Lesson 3: Mystery Bag
Lesson 4: Spin Class
Lesson 5: Is It Fair?
Lesson 12.3: Experimental Probability of Compound EventsUnit 8
Lesson 7: Weather or Not
Lesson 12.4: Making Predictions with Experimental ProbabilityUnit 8
Lesson 3: Mystery Bag
Lesson 5: Is It Fair?
Module 13: Theoretical Probability and
Simulations
Lesson 13.1: Theoretical Probability of Simple EventsUnit 8
Lesson 1: How Likely? (Print available) [Free lesson]
Lesson 2: Prob-bear-bilities [Free lesson]
Lesson 13.2: Theoretical Probability of Compound EventsUnit 8
Lesson 6: Fair Games
Lesson 13.3: Making Predictions with Theoretical ProbabilityUnit 8
Lesson 8: Simulate It! (Print available)
Lesson 13.4: Using Technology to Conduct a SimulationUnit 8
Lesson 7: Weather or Not
Lesson 8: Simulate It! (Print available)

Grade 8

Unit 1: Real Numbers, Exponents, and Scientific Notation

GO Math!Desmos Math 6–A1
Module 1: Real Numbers
Lesson 1.1: Rational and Irrational Numbers
Lesson 1.2: Sets of Real Numbers
Unit 8
Lesson 12: Fractions to Decimals
Lesson 13: Decimals to Fractions
Lesson 14: Hit the Target
Lesson 1.3: Ordering Real NumbersUnit 8
Lesson 4: Root Down [Free lesson]
Module 2: Exponents and Scientific
Notation
Lesson 2.1: Integer ExponentsUnit 7
Lesson 1: Circles [Free lesson]
Lesson 2: Combining Exponents
Lesson 3: Power Pairs (Print available) [Free lesson]
Lesson 4: Rewriting Powers
Lesson 5: Zero and Negative Exponents
Lesson 6: Write a Rule (Print available)
Lesson 2.2: Scientific Notation with Positive Powers of 10Unit 7
Lesson 7: Scales and Weights
Lesson 8: Point Zapper
Lesson 9: Use Your Powers
Lesson 2.3: Scientific Notation with Negative Powers of 10Unit 7
Lesson 8: Point Zapper
Lesson 9: Use Your Powers
Lesson 2.4: Operations with Scientific NotationUnit 7
Lesson 10: Solar System [Free lesson]
Lesson 11: Balance the Scale [Free lesson]
Lesson 12: City Lights
Lesson 13: Star Power 

Unit 2: Proportional and Nonproportional Relationships and Functions

Module 3: Proportional Relationships
Lesson 3.1: Representing Proportional Relationships.Unit 3
Lesson 1: Turtle Time Trials [Free lesson]
Lesson 2: Water Tank
Lesson 3: Posters
Lesson 3.2: Rate of Change and SlopeUnit 2
Lesson 9: Water Slide
Lesson 10: Points on a Line
Unit 3
Lesson 4: Stacking Cups
Lesson 5: Flags [Free lesson]
Lesson 7: Water Cooler
Lesson 8: Landing Planes
Lesson 9: Coin Capture
Unit 5
Lesson 5: The Tortoise and the Hare [Free lesson]
Lesson 3.3: Interpreting the Unit Rate as SlopeUnit 3
Lesson 2: Water Tank
Lesson 3: Posters
Module 4: Nonproportional Relationships
Lesson 4.1: Representing Linear Nonproportional RelationshipsUnit 3
Lesson 4: Stacking Cups
Lesson 5: Flags [Free lesson]
Lesson 4.2: Determining Slope and y-interceptUnit 3
Lesson 5: Flags [Free lesson]
Lesson 4.3: Graphing Linear Nonproportional Relationships using Slope and y-intercept.Unit 3
Lesson 4: Stacking Cups
Lesson 5: Flags [Free lesson]
Lesson 6: Translations
Lesson 9: Coin Capture
Lesson 4.4: Proportional and Nonproportional SituationsUnit 3
Lesson 1: Turtle Time Trials [Free lesson]
Module 5: Writing Linear Equations
Lesson 5.1: Writing Linear Equations from Situations and GraphsUnit 3
Lesson 5: Flags [Free lesson]Lesson 9: Coin Capture
Lesson 5.2: Writing Linear Equations from a Table
Lesson 5.3: Linear Relationships and Bivariate DataUnit 6
Lesson 1: Click Bait
Lesson 2: Wing Span
Lesson 3: Robots [Free lesson]
Lesson 4: Dapper Cats [Free lesson]
Lesson 5: Fit Fights [Free lesson]
Lesson 6: Interpreting Slopes
Lesson 7: Scatter Plot City
Lesson 8: Animal Brains
Module 6: Functions
Lesson 6.1: Identifying and Representing FunctionsUnit 5
Lesson 2: Guess My Rule [Free lesson]
Lesson 3: Function or Not?
Lesson 4: Window Frames
Lesson 5: The Tortoise and the Hare [Free lesson]
Lesson 6.2: Describing FunctionsUnit 5
Lesson 3: Function or Not?
Lesson 7: Feel the Burn (Print available) [Free lesson]
Lesson 8: Charge! (Print available)
Lesson 6.3: Comparing FunctionsUnit 5
Lesson 5: The Tortoise and the Hare [Free lesson]
Lesson 6: Graphing Stories
Lesson 7: Feel the Burn (Print available) [Free lesson]
Lesson 6.4: Analyzing GraphsUnit 5
Lesson 1: Turtle Crossing [Free lesson]
Lesson 3: Function or Not?
Lesson 5: The Tortoise and the Hare [Free lesson]
Lesson 6: Graphing Stories
Lesson 7: Feel the Burn (Print available) [Free lesson]
Lesson 8: Charge! (Print available)
Lesson 9: Piecing It Together

Unit 3: Solving Equations and Systems of Equations

Module 7:  Solving Linear Equations
Lesson 7.1: Equations with the Variable on Both SidesUnit 4
Lesson 2: Keep It Balanced
Lesson 3: Balanced Moves
Lesson 4: More Balanced Moves (Print available)
Lesson 5: Equation Roundtable (Print available) [Free lesson]
Lesson 6: Strategic Solving (Print available)
Lesson 7: All, Some, or None?
Lesson 8: When Are They the Same?
Lesson 7.2: Equations with Rational NumbersUnit 4
Lesson 6: Strategic Solving (Print available)
Lesson 7.3: Equations with the Distributive PropertyUnit 4
Lesson 4: More Balanced Moves (Print available)
Lesson 5: Equation Roundtable (Print available) [Free lesson]
Lesson 6: Strategic Solving (Print available)
Lesson 7: All, Some, or None?
Lesson 7.4: Equations with Many Solutions or No SolutionUnit 4
Lesson 7:  All, Some, or None?
Module 8:  Solving Systems of Linear Equations
Lesson 8.1: Solving Systems of Linear Equations by Graphing.Unit 4
Lesson 9: On or Off the Line?
Lesson 10: On Both Lines
Lesson 11: Make Them Balance [Free lesson]
Lesson 12: Line Zapper [Free lesson]
Lesson 8.2: Solving Systems by SubstitutionUnit 4
Lesson 13: All, Some, or None? Part 2
Lesson 14: Strategic Solving, Part 2 (Print available)
Lesson 8.3: Solving Systems by Elimination
Lesson 8.4: Solving Systems by Elimination with Multiplication
Lesson 8.5: Solving Special SystemsUnit 4
Lesson 13: All, Some, or None? Part 2

Unit 4: Transformational Geometry

Unit 5: Measurement Geometry

Module 11: Angle Relationships in Parallel Lines and Triangles
Lesson 11.1: Parallel Lines Cut by a Transversal.Unit 1
Lesson 10: Transforming Angles
Lesson 12: Puzzling It Out [Free lesson]
Lesson 11.2: Angle Theorems for TrianglesUnit 1
Lesson 11: Tearing It Up (Print available)
Lesson 12: Puzzling It Out [Free lesson]
Lesson 11.3: Angle-Angle SimilarityUnit 2
Lesson 3: Match My Dilation
Lesson 6: Social Scavenger Hunt (Print available) [Free lesson]
Lesson 7: Are Angles Enough?
Module 12: Pythagorean Theorem
Lesson 12.1: The Pythagorean TheoremUnit 8
Lesson 6: The Pythagorean Theorem
Lesson 7: Pictures to Prove It
Lesson 8: Triangle-Tracing Turtle [Free lesson]
Lesson 10: Taco Truck [Free lesson]
Lesson 12.2: Converse of the Pythagorean TheoremUnit 8
Lesson 9: Make It Right
Lesson 12.3: Distance Between Two PointsUnit 8
Lesson 11: Pond Hopper
Module 13: Volume
Lesson 13.1: Volume of CylindersUnit 5
Lesson 10: Volume Lab
Lesson 11: Cylinders [Free lesson]
Lesson 12: Scaling Cylinders
Lesson 14: Missing Dimensions (Print available)
Lesson 13.2: Volume of ConesUnit 5
Lesson 10: Volume Lab
Lesson 13: Cones [Free lesson]
Lesson 14: Missing Dimensions (Print available)
Lesson 13.3: Volume of SpheresUnit 5
Lesson 10: Volume Lab
Lesson 15: Spheres

Unit 6: Statistics

Module 14: Scatter Plots
Lesson 14.1: Scatter Plots and AssociationUnit 6
Lesson 1: Click Battle
Lesson 2: Wing Span
Lesson 3: Robots [Free lesson]
Lesson 6: Interpreting Slopes
Lesson 7: Scatter Plot City
Lesson 8: Animal Brains
Lesson 14.2: Trend Lines and PredictionsUnit 6
Lesson 4: Dapper Cats [Free lesson]
Lesson 5: Fit Fights [Free lesson]
Lesson 8: Animal Brains
Module 15: Two-Way Tables
Lesson 15.1: Two-Way Frequency TablesUnit 6
Lesson 9: Tasty Fruit
Lesson 15.2: Two-Way Relative Frequency TablesUnit 6
Lesson 10: Finding Associations [Free lesson]
Lesson 11: Federal Budgets

Grade 6

Chapter 1: Use Positive Rational Numbers

enVision MathDesmos Math 6–A1
Lesson 1: Fluently Add, Subtract, and Multiply DecimalsUnit 5
Lesson 1: Dishing Out Decimals (Print available) [Free lesson]
Lesson 2: Decimal Diagrams [Free lesson]
Lesson 3: Fruit by the Pound
Lesson 4: Missing Digits
Lesson 5: Decimal Multiplication
Lesson 12: Budget Vehicles (Print available)
Practice Day 1 (Print available)
Lesson 2: Fluently Divide Whole Numbers and DecimalsUnit 5
Lesson 8: Division Diagrams
Lesson 9: Long Division Launch (Print available)
Lesson 10: Return of the Long Division (Print available)
Lesson 11: Movie Time [Free lesson]
Lesson 12: Budget Vehicles (Print available)
Practice Day 2
Lesson 3: Multiply FractionsUnit 4
Lesson 12: Puzzling Areas (Print available) [Free lesson]
Lesson 13: Volume Challenges
Lesson 14: Planter Planner (Print available)
Lesson 4: Understand Division with FractionsUnit 4
Lesson 1: Cookie Cutter
Lesson 2: Making Connections (Print available)
Lesson 3: Flour Planner [Free lesson]
Lesson 4: Flower Planters
Practice Day (Print available)
Lesson 5: Divide Fractions by fractionsUnit 4
Lesson 5: Garden Bricks (Print available)
Lesson 7: Break It Down
Lesson 8: Potting Soil
Lesson 9: Division Challenges
Lesson 14: Planter planner (Print available)
Practice Day (Print available)
Lesson 6: Divide Mixed NumbersUnit 4
Lesson 5 Garden Bricks (Print available)
Lesson 6 Fill the Gap [Free lesson]
Lesson 11 Classroom Comparisons
Lesson 7: Solve Problems with Rational NumbersLesson 3: Flour Planner [Free lesson]
Lesson 4: Flower Planters
Lesson 5: Garden Bricks (Print available)
Lesson 10: Swap Meet (Print available)

Chapter 2: Integers and Rational Numbers

Lesson 1: Understand IntegersUnit 7
Lesson 1: Can You Dig it In [Free lesson]
Lesson 4 Sub-Zero
Lesson 2: Represent Rational Numbers on the Number LineUnit 7
Lesson 2: Digging Deeper
Lesson 3: Order in the Class (Print available) [Free lesson]
Practice Day 1
Lesson 3: Absolute Values of Rational NumbersUnit 7
Lesson 5: Distance on the Number Line
Practice Day 1 (Print available)
Lesson 4: Represent Rational Numbers on the Coordinate Plane 
Lesson 5: Find Distances on the Coordinate Plane
Lesson 6: Represent Polygons on the Coordinate Plane
Unit 7
Lesson 11: Polygon Maker

Chapter 3: Numeric and Algebraic Expressions

Chapter 4: Represent and Solve Equations and Inequalities

Lesson 1: Understand Equations and SolutionsUnit 6
Lesson 1: Weight for It [Free lesson]
Lesson 3: Hanging Around
Lesson 13: Turtles All the Way
Lesson 2: Apply Properties of Equality
Lesson 3: Write and Solve Addition and Subtraction Equations
Lesson 4: Write and Solve Multiplication and Division Equations
Unit 6
Lesson 3: Hanging Around
Lesson 4: Hanging It Up
Lesson 5: Swap and Solve (Print available)
Practice Day 1 (Print Available)
Lesson 5: Write and Solve Equations with Rational NumbersUnit 6
Lesson 4; Hanging It Up
Lesson 5: Swap and Solve (Print available)
Lesson 6: Understand and Write InequalitiesUnit 7
Lesson 6: Tunnel Travel [Free lesson]
Lesson 7: Comparing Weights
Lesson 7: Solve InequalitiesUnit 7
Lesson 8: Shira’s Solutions
Lesson 8: Understand Dependent and Independent VariablesUnit 6
Lesson 13: Turtles All the Way
Lesson 9: Use Patterns to Write and Solve Equations
Lesson 10: Relate Tables, Graphs, and Equations
Unit 6
Lesson 13: Turtles All the Way
Lesson 14: Representing Relationships
Lesson 15: Connecting Representations (Print available)
Lesson 16: Subway Fares (Print available) [Free lesson]
Practice Day 2 (Print available)

Chapter 5: Understand and Use Ratio and Rate

Chapter 6: Understand and Use Percent

Lesson 1: Understand PercentUnit 3
Lesson 8: Lucky Duckies [Free lesson]
Lesson 2: Relate Fractions, Decimals, and PercentsUnit 5
Lesson 13: Grocery Prices (Print available)
Lesson 3: Represent Percents Greater Than 100 or Less than 1 
Lesson 4: Estimate to Find Percent 
Lesson 5: Find the Percent of a Number
Lesson 6: Find the Whole Given a Part and the Percent
Unit 3
Lesson 9: Bicycle Goals
Lesson 10: What’s Missing?
Lesson 11: Cost Breakdown
Lesson 12: More Bicycle Goals
Practice Day 2 (Print Available)

Chapter 7: Solve Area, Surface Area, and Volume Problems

Chapter 8: Display, Describe, and Summarize data

Grade 7

Chapter 1: Rational Number Operations

enVision MathDesmos Math 6–A1
Lesson 1: Relate Integers and Their OppositesUnit 5
Lesson 1: Floats and Anchors [Free lesson]
Lesson 2: Understand Rational NumbersUnit 4
Lesson 13: Decimal Deep Dive (Print available)
Lesson 3: Add Integers
Lesson 4: Subtract Integers
Unit 5
Lesson 2: More Floats and Anchors
Lesson 4: Draw Your Own (Print available) [Free lesson]
Lesson 5: Number Puzzles
Lesson 10: Integer Puzzles [Free lesson]
Lesson 11: Changing Temperatures
Lesson 13: Solar Panels and More (Print available)
Lesson 5: Add and Subtract Rational NumbersUnit 5
Lesson 3: Bumpers
Lesson 4: Draw Your Own (Print available) [Free lesson]
Lesson 5: Number Puzzles
Lesson 10: Integer Puzzles [Free lesson]
Lesson 11: Changing Temperatures
Lesson 13: Solar Panels and More (Print available)
Practice Day 1 (Print available)
Lesson 6: Multiply IntegersUnit 5
Lesson 6: Floating in Groups
Lesson 7: Back in Time
Lesson 8: Speeding Turtles
Lesson 10: Integer Puzzles [Free lesson]
Practice Day 2 (Print available)
Lesson 7: Multiply Rational NumbersUnit 5
Lesson 8: Speeding Turtles
Lesson 10: Integer Puzzles [Free lesson]
Lesson 12: Arctic Sea Ice (Print available)
Lesson 13: Solar Panels and More (Print available)
Practice Day 2 (Print available)
Lesson 8: Divide IntegersUnit 5
Lesson 8: Speeding Turtles
Lesson 9: Divide Rational NumbersUnit 5
Lesson 8: Speeding Turtles
Lesson 10: Integer Puzzles [Free lesson]
Lesson 12: Arctic Sea Ice (Print available)
Lesson 13: Solar Panels and More (Print available)
Practice Day 2 (Print available)
Lesson 10 Solve Problems with Rational NumbersUnit 5
Lesson 11: Changing Temperatures
Lesson 12: Arctic Sea Ice (Print available)
Lesson 13: Solar Panels and More (Print available)

Chapter 2: Analyze and Use Proportional Relationships

Lesson 1: Connect Ratios, Rates, and Unit Rates 
Lesson 2: Determine Unit Rates with Ratios of Fractions 
Lesson 3: Understand Proportional Relationships: Equivalent RatiosUnit 2
Lesson 1: Paint [Free lesson]
Lesson 2: Balloon Float
Lesson 4: Describe Proportional Relationships: Constant of ProportionalityUnit 2
Lesson 3: Sugary Drinks (Print available)
Lesson 4: Robot Factory
Lesson 5: Snapshots
Lesson 6: Two and Two (Print available) [Free lesson]
Lesson 7: All Kinds of Equations
Lesson 10: Three Turtles
Practice Day (Print available)
Unit 3
Lesson 1 Circumference of a Circle
Lesson 5: Graph Proportional RelationshipsUnit 2
Lesson 8: Dino Pops [Free lesson]
Lesson 9: Gallon Challenge
Lesson 10: Three Turtles
Lesson 11: Four Representations (Print available)
Lesson 6: Apply Proportional Reasoning to Solve ProblemsUnit 2
Lesson 11: Four Representations (Print available)
Lesson 12: Water Efficiency

Chapter 3: Analyze and Solve Percent Problems

Chapter 4: Generate Equivalent Expressions

Chapter 5: Solve Problems Using Equations and Inequalities

Chapter 6: Use Sampling to Draw Inferences About Populations

Chapter 7: Probability

Lesson 1: Understand Likelihood and ProbabilityUnit 8
Lesson 1 How Likely? (Print available) [Free lesson]
Lesson 2 Prob-bear-bilities [Free lesson]
Lesson 3 Mystery Bag
Lesson 2: Understand Theoretical Probability
Lesson 3: Understand Experimental Probability
Unit 8
Lesson 4: Spin Class
Lesson 5: Is It Fair?
Lesson 6: Fair Games
Lesson 4: Use Probability ModelsUnit 8
Lesson 6: Fair Games
Lesson 7: Weather or Not
Lesson 8: Simulate It
Lesson 9: Car, Bike, or Train? (Print available)
Lesson 5: Determine Outcomes of Compound EventsUnit 8
Lesson 9: Car, Bike, or Train? (Print available)
Lesson 6: Find Probabilities of Compound Events
Lesson 7: Simulate Compound Events
Unit 8
Lesson 8: Simulate It
Lesson 9: Car, Bike, or Train? (Print available)
Practice Day 1 (Print Available)

Chapter 8: Solve Problems Involving Geometry

Lesson 1: Solve Problems Involving Scale DrawingsUnit 1 Lesson 1: Scaling Machines [Free lesson] Lesson 2: Scaling Robots Lesson 3: Make It Scale Lesson 4: Scale Factor Challenges Lesson 5: Tiles Lesson 6: Introducing Scale Lesson 7: Will It Fit? [Free lesson] Lesson 8: Scaling States Lesson 9: Scaling Buildings Lesson 10: Room Redesign Practice Day 1 Practice Day 2   Unit 3 Lesson 1: Toothpicks   Unit 4 Lesson 3: Sticker Sizes
Lesson 2: Draw Geometric FiguresUnit 7
Lesson 6: Is It Enough?
Lesson 3: Draw Triangles with Given ConditionsUnit 7
Lesson 5: Can You Build It? [Free lesson]
Lesson 6: Is It Enough?
Lesson 7: More Than One
Lesson 8: Can You Draw It?
Practice Day 1
Lesson 4: Solve Problems Using Angle RelationshipsUnit 7
Lesson 1: Pinwheels
Lesson 2: Friendly Angles [Free lesson]
Lesson 3: Angle Diagrams
Lesson 4: Missing Measures [Free lesson]
Lesson 5: Solve Problems Involving Circumference of a CircleUnit 3
Lesson 2: Is It a Circle?
Lesson 3: Measuring Around [Free lesson]
Lesson 4: Perimeter Challenges
Practice Day 1 (Print available) [Free lesson]
Lesson 6: Solve Problems Involving Area of a CircleUnit 3
Lesson 5: Area Strategies
Lesson 6: Radius Squares
Lesson 7: Why Pi?
Lesson 8: Area Challenges [Free lesson]
Lesson 9: Circle vs. Square
Practice Day 2
Lesson 7: Describe Cross SectionsUnit 7
Lesson 9: Slicing Solids
Lesson 8: Solve Problems Involving Surface AreaUnit 7
Lesson 10: Simple Prisms
Lesson 11: More Complicated Prisms
Lesson 12: Surface Area Strategies
Lesson 13: Popcorn Possibilities
Lesson 9: Solve Problems Involving VolumeUnit 7
Lesson 10: Simple Prisms
Lesson 11: More Complicated Prisms
Lesson 13: Popcorn Possibilities
Practice Day 2

Grade 8

Chapter 1: Real Numbers

enVision MathDesmos Math 6–A1
Lesson 1: Rational Numbers as DecimalsUnit 8
Lesson 12: Fractions to Decimals
Lesson 13: Decimals to Fractions
Lesson 2: Understand Irrational NumbersUnit 8
Lesson 14: Hit the Target
Lesson 3: Compare and Order Real Numbers 
Lesson 4: Evaluate Square Roots and Cube RootsUnit 8
Lesson 2: From Squares to Roots
Lesson 3: Between Squares
Lesson 4: Root Down [Free lesson]
Lesson 5: Solve Equations Using Square Roots and Cube RootsUnit 8
Lesson 5: Filling Cubes
Practice Day 1 (Print available)
Lesson 6: Use Properties of Integer ExponentsUnit 7  
Lesson 2: Combining Exponents
Lesson 3: Power Pairs (Print available) [Free lesson]
Lesson 4: Rewriting Powers
Practice Day 1 (Print available)
Lesson 7: More Properties of Integer ExponentsUnit 7  
Lesson 5: Zero and Negative Exponents
Lesson 6: Write a Rule (Print available)
Lesson 8: Use Powers of 10 to Estimate QuotientsUnit 7  
Lesson 7: Scales and Weights
Lesson 8: Point Zapper
Lesson 9: Use Your Powers
Lesson 9: Understand Scientific NotationUnit 7  
Lesson 10: Solar System [Free lesson]
Lesson 11: Balance the Scales [Free lesson]
Lesson 13: Star Power
Practice Day 2 (Print available)

Chapter 2: Analyze and Solve Linear Equations

Lesson 1: Combine Like Terms to Solve EquationsUnit 4
Lesson 2: Keep It Balanced
Lesson 2: Solve Equations with Variables on Both SidesUnit 4
Lesson 3: Balanced Moves
Lesson 4: More Balanced Moves (Print available)
Lesson 3: Solve Multi-Step EquationsUnit 4
Lesson 3: Balanced Moves
Lesson 4: More Balanced Moves (Print available)
Lesson 5: Equation Roundtable (Print available) [Free lesson]
Lesson 6: Strategic Solving (Print available)
Lesson 4: Equations with No Solutions or Infinitely Many SolutionsUnit 4
Lesson 7: All, Some, or None?
Lesson 5: Compare Proportional RelationshipsUnit 3
Lesson 1: Turtle Time Trials [Free lesson]
Lesson 2: Water Tank
Lesson 3: Posters
Lesson 6: Connect proportional Relationships and SlopeUnit 2
Lesson 9: Water Slide
Lesson 10: Points on a Plane
Practice Day 
 
Unit 3
Lesson 2: Water Tank
Lesson 4: Stacking Cups
Lesson 5: Flags [Free lesson]
Lesson 7: Water Cooler
Lesson 8: Landing Planes
Lesson 9: Coin Capture
Lesson 7: Analyze Linear Equations: y = mxUnit 3
Lesson 3: Posters
Lesson 6: Translations
Lesson 8: Understand the y-intercept of a LineUnit 3
Lesson 5: Flags [Free lesson]
Lesson 6: Translations
Lesson 9: Analyze Linear Equations: y = mx + bUnit 3  
Lesson 6: Translations
Lesson 7: Water Cooler
Practice Day 

Chapter 3: Use Functions to Model Relationships

Lesson 1: Understand Relations and FunctionsUnit 5
Lesson 1: Turtle Crossing [Free lesson]
Lesson 2: Guess My Rule [Free lesson]
Lesson 2: Connect Representations of FunctionsUnit 5
Lesson 3: Function or Not?
Lesson 5: The Tortoise and the Hare [Free lesson]
Lesson 3: Compare Linear and Nonlinear FunctionsUnit 5
Lesson 4: Window Frames
Lesson 4: Construct Functions to Model Linear RelationshipsUnit 5
Lesson 6: Graphing Stories
Lesson 7: Feel the Burn (Print available) [Free lesson]
Lesson 8: Charge! (Print available)
Lesson 5: Intervals of Increase and DecreaseUnit 5
Lesson 1: Turtle Crossing [Free lesson]
Lesson 6: Graphing Stories
Lesson 6: Sketch Functions from Verbal DescriptionsUnit 5  
Lesson 6: Graphing Stories

Chapter 4: Investigate Bivariate Data

Lesson 1: Construct and Interpret Scatter PlotsUnit 6  
Lesson 1: Click Battle
Lesson 2: Wing Span
Lesson 3: Robots [Free lesson]
Practice Day 1 (Print available) [Free lesson]
Lesson 2: Analyze Linear AssociationUnit 6  
Lesson 4: Dapper Cats [Free lesson]
Lesson 5: Fit Fights [Free lesson]
Lesson 7: Scatter Plot City
Lesson 3: Use Linear Models to Make PredictionsUnit 6  
Lesson 6: Interpreting Slopes
Lesson 8: Animal Brains
Practice Day 2 (Print available)
Lesson 4: Interpret Two-Way Frequency TablesUnit 6
Lesson 9: Tasty Fruit
Lesson 5: Interpret Two-Way Relative Frequency TablesUnit 6
Lesson 10: Finding Associations [Free lesson]
Lesson 11: Federal Budgets
Practice Day 3

Chapter 5: Analyze and Solve Systems of Linear Equations

Chapter 6: Congruence and Similarity

Chapter 7: Understand and Apply the Pythagorean Theorem

Lesson 1: Understand the Pythagorean TheoremUnit 8
Lesson 6: The Pythagorean Theorem
Lesson 7: Pictures to Prove It
Lesson 8: Triangle-Tracing Turtle [Free lesson]
Lesson 2: Understand the Converse of the Pythagorean TheoremUnit 8
Lesson 9: Make It Right
Lesson 3: Apply the Pythagorean Theorem to Solve ProblemsUnit 8
Lesson 10: Taco Truck [Free lesson]
Practice Day 2 (Print available)
Lesson 4: Find Distance in the Coordinate PlaneUnit 8
Lesson 11: Pond Hopper

Chapter 8: Solve Problems Involving Surface Area and Volume

Lesson 1: Find Surface Area of Three-Dimensional Figures 
Lesson 2: Find Volume of CylindersUnit 5
Lesson 10: Volume Lab
Lesson 11: Cylinders [Free lesson]
Lesson 14: Missing Dimensions (Print available)
Lesson 3: Find Volume of ConesUnit 5
Lesson 13: Cones [Free lesson]
Lesson 14: Missing Dimensions (Print available)
Lesson 4: Find Volume of SpheresUnit 5
Lesson 15: Spheres
Practice Day 2 (Print available)

What instructional coherence really looks like

What instructional coherence really looks like

To view this protected page, enter the password below:


Grade 6

Module 1: Ratios and Rates

Module 2: Fractions, Decimals, and Percents

Lesson 1: Understand PercentsUnit 3Lesson 8: Lucky Duckies [Free lesson]Lesson 9: Bicycle Goals
Lesson 2: Percents Greater Than 100% and Less Than 1% 
Lesson 3: Relate Fractions, Decimals, and PercentsUnit 5Lesson 2: Decimal Diagrams [Free lesson]Lesson 13: Grocery Prices (Print available)
Lesson 4: Find the Percent of a NumberUnit 3Lesson 10: What’s Missing? (Print available)Lesson 11: Cost Breakdown
Lesson 5: Estimate the Percent of a Number 
Lesson 6: Find the WholeUnit 3Lesson 10: What’s Missing? (Print available)

Module 3: Compute with Multi-Digit Numbers and Fractions

Module 4: Integers, Rational Numbers, and the Coordinate Plane

Lesson 1: Represent IntegersUnit 7Lesson 1: Can You Dig It [Free lesson]Lesson 4: Sub-Zero
Lesson 2: Opposites and Absolute ValueUnit 7Lesson 5: Distance on the Number Line
Lesson 3: Compare and Order IntegersUnit 7Lesson 2: Digging DeeperLesson 3: Order in the Class (Print available) [Free lesson]
Lesson 4: Rational NumbersUnit 7Lesson 2: Digging Deeper
Lesson 5: The Coordinate PlaneUnit 7Lesson 9: Sand Dollar SearchLesson 10: The A-maze-ing Coordinate Plane
Lesson 6: Graph Reflections of Points
Lesson 7: Absolute Value and DistanceUnit 7Lesson 5: Distance on the Number Line

Module 5: Numerical and Algebraic Expressions

Module 6: Relationships in Geometry

Module 7: Relationships Between Two Variables

Module 8: Area

Module 9: Volume and Surface Area

Module 10: Statistical Measures and Displays

Grade 7

Module 1: Proportional Relationships

Module 2: Solve Percent Problems

Module 3: Operations with Integers

Module 4: Operations with Rational Numbers

Module 5: Simplify Algebraic Expressions

Module 6: Write and Solve Equations

Lesson 1: Write and Solve One-Step EquationsUnit 6Lesson 3: EquationsLesson 4: Seeing Structure (Print available)Lesson 14: Unbalanced HangersLesson 15: BudgetingLesson 16: Shira the Sheep [Free lesson]Lesson 17: Write Them and Solve Them (Print available)
Lesson 2: Solve Two-Step Equations: px + q = r
Lesson 3: Write and Solve Two-Step Equations: px + q = r
Lesson 4: Solve Two-Step Equations: p(x + q) = r
Lesson 5: Write and Solve Two-Step Equations: p(x + q) = r
Unit 6Lesson 4: Seeing Structure (Print available)Lesson 6: Balancing EquationsLesson 7: Keeping It True (Print available)Lesson 12: Community Day (Print available)Practice Day 1 (Print available)

Module 7: Write and Solve Inequalities

Lesson 1: Solve One-Step Addition and Subtraction Inequalities
Lesson 2: Write and Solve One-Step Addition and Subtraction Inequalities
Lesson 3: Solve One-Step Multiplication and Division Inequalities
Lesson 4: Solve One-Step Multiplication and Division Inequalities with Negative Coefficients
Unit 6Lesson 14: Unbalanced HangersLesson 15: Budgeting (Print available)Lesson 16: Shira the SheepLesson 17: Write Them and Solve Them (Print available)
Lesson 5: Write and Solve One-Step Multiplication and Division InequalitiesUnit 6Lesson 15: Budgeting (Print available)
Lesson 6: Write and Solve Two-Step InequalitiesUnit 6Lesson 15: Budgeting (Print available)Lesson 16: Shira the Sheep [Free lesson]Lesson 17: Write Them and Solve Them (Print available)Practice Day 2 (Print available)

Module 8: Geometric Figures

Module 9: Measure Figures

Module 10: Probability

Lesson 1: Find Likelihoods
Lesson 2: Relative Frequency of Simple Events
Lesson 3: Theoretical Probability of Events
Unit 8Lesson 1: How Likely? (Print available) [Free lesson]Lesson 2: Prob-bear-bilities [Free lesson]Lesson 3: Mystery Bag
Lesson 4: Compare Probabilities of Simple EventsUnit 8Lesson 4: Spin ClassLesson 5: Is It Fair?
Lesson 5: Probability of Compound EventsUnit 8Lesson 6: Fair GamesLesson 7: Weather or NotLesson 8: Simulate It
Lesson 6: Simulate Chance EventsUnit 8Lesson 8: Simulate ItPractice Day 1 (Print available)

Module 11: Sampling and Statistics

Grade 8

Module 1: Exponents and Scientific Notation

Module 2: Real Numbers

Lesson 1: Terminating and Repeating DecimalsUnit 8
Lesson 12: Fractions to Decimals
Lesson 13: Decimals to Fractions
Lesson 2: RootsUnit 8
Lesson 2: From Squares to Roots
Lesson 3: Between Squares
Lesson 4: Root Down [Free lesson]
Practice Day 1 (Print available)
Lesson 3: Real NumbersUnit 8
Lesson 14: Hit the Target
Lesson 4: Estimate Irrational NumbersUnit 8
Lesson 3: Between Squares
Lesson 5: Compare and Order Real NumbersUnit 8
Lesson 14: Hit the Target

Module 3: Solve Equations with Variables on Each Side

Module 4: Linear Relationships and Slope

Module 5: Functions

Module 6: Systems of Linear Equations

Lesson 1: Solve Systems of Equations by GraphingUnit 4 
Lesson 9: On or Off the Line?
Lesson 10: On Both Lines
Lesson 11: Make Them Balance [Free lesson]
Lesson 12: Line Zapper
Lesson 13: All, Some, or None? Part 2
(Print available)Practice Day 2 
Lesson 2: Determine Number of SolutionsUnit 4 
Lesson 13: All, Some, or None? Part 2
Lesson 3: Solve Systems of Equations by Substitution
Lesson 4: Solve Systems of Equations by Elimination
Lesson 5: Write and Solve Systems of EquationsUnit 4 
Lesson 14: Strategic Solving, Part 2 (Print available)

Module 7: Triangles and the Pythagorean Theorem

Lesson 1: Angle Relationships and Parallel LinesUnit 1 Lesson 10: Transforming Angles
Lesson 2: Angle Relationships and TrianglesUnit 1 Lesson 10: Transforming Angles Lesson 11: Tearing It Up (Print available)Lesson 12: Puzzling It Out [Free lesson]
Lesson 3: The Pythagorean TheoremUnit 8Lesson 6: The Pythagorean TheoremLesson 7: Pictures to Prove It
Lesson 4: Converse of the Pythagorean TheoremUnit 8Lesson 9: Make It Right
Lesson 5: Distance on the Coordinate PlaneUnit 8Lesson 11: Pond HopperPractice day 2 (Print available)

Module 8: Transformations

Module 9: Congruence and Similarity

Lesson 1: Congruence and Transformations
Lesson 2: Congruence and Corresponding Parts
Unit 1 Lesson 7: Are They the Same?Lesson 9: Are They Congruent?
Lesson 3: Similarity and TransformationsUnit 2Lesson 5: Transformations Golf with DilationsLesson 6: Social Scavenger Hunt (Print available) [Free lesson]
Lesson 4: Similarity and Corresponding PartsUnit 2Lesson 7: Are Angles Enough?Lesson 8: Shadows
Lesson 5: Indirect MeasurementUnit 2Lesson 8: Shadows

Module 10: Volume

Lesson 1: Volume of CylindersUnit 5Lesson 10: Volume LabLesson 11: Cylinders [Free lesson]Lesson 12: Scaling Cylinders
Lesson 2: Volume of ConesUnit 5Lesson 10: Volume LabLesson 13: Cones [Free lesson]Lesson 14: Missing Dimensions (Print available)
Lesson 3: Volume of SpheresUnit 5Lesson 15: Spheres
Lesson 4: Finding Missing DimensionsUnit 5Lesson 14: Missing Dimensions (Print available)
Lesson 5: Volume of Composite SolidsUnit 5Lesson 15: Spheres

Module 11: Scatter Plots and Two-Way Tables

Grade 6

Module 1: Ratios and Unit Rates

Eureka MathDesmos Math 6–A1
Topic A Representing and Reasoning About Ratios 
Lesson 1: Ratios
Lesson 2: Ratios
Unit 2
Lesson 1: Pizza Maker [Free lesson]
Lesson 2: Ratio Rounds (Print available)
Lesson 3: Equivalent Ratios
Lesson 4: Equivalent Ratios
Unit 2
Lesson 3: Rice Ratios
Lesson 4: Fruit Lab [Free lesson]
Lesson 5: Balancing Act
Lesson 7: Mixing Paint, Part 1
Lesson 8 World Records (Print available)
Lesson 11 Community Life (Print available)
Practice Day 1 (Print available)
Lesson 5: Solving Problems by Finding Equivalent Ratios
Lesson 6: Solving Problems by Finding Equivalent Ratios
Unit 2
Lesson 5 Balancing Act
 
Lesson 7: Associated Ratios and the Value of a Ratio
Lesson 8: Equivalent Ratios Defined Through the Value of a Ratio
Unit 2
Lesson 6: Product Prices (Print available)
Lesson 7: Mixing Paint, Part 1
Topic B Collections of Equivalent Ratios 
Lesson 9: Tables of Equivalent RatiosUnit 2
Lesson 6: Product Prices (Print available)
Lesson 7: Mixing Paint, Part 1
Lesson 10: The Structure of Ratio Tables-Additive and MultiplicativeUnit 2
Lesson 10: Balloons
Lesson 11: Community Life (Print available)
Lesson 11: Comparing Ratios Using Ratio TablesUnit 2
Lesson 10: Balloons
Lesson 12: From Ratio Tables to Double Number Line DiagramsUnit 2
Lesson 6: Product Prices (Print available)
Lesson 8: World Records (Print available)
Lesson 12: Mixing Paint, Part 2
Lesson 14: Lunch Waste (Print available)
Practice Day 2 (Print available)
Lesson 13: From Ratio Tables to Equations Using the Value of a Ratio 
Lesson 14: From Ratio Tables, Equations, and Double Number Line Diagrams to Plots on the Coordinate Plane 
Lesson 15: A Synthesis of Representations of Equivalent Ratio Collections 
Topic C Unit Rates 
Lesson 16: From Ratio to RatesUnit 2
Lesson 8: World Records (Print available)
 
Unit 3
Lesson 4: Model Trains
Lesson 5: Soft Serve [Free lesson]
Lesson 6: Welcome to the Robot Factory
Lesson 17: From Rates to Ratios 
Lesson 18: Finding a Rate by Dividing Two QuantitiesUnit 3
Lesson 4: Model Trains
Lesson 5: Soft Serve [Free lesson]
Lesson 6: Welcome to the Robot Factory
Lesson 7: More Soft Serve
Lesson 19: Comparison Shopping-Unit Price and Related Measurement Conversions
Lesson 20: Comparison Shopping-Unit Price and Related Measurement Conversions
Lesson 21: Getting the Job Done—Speed, Work, and Measurement Units
Lesson 22: Getting the Job Done—Speed, Work, and Measurement Units
Unit 3
Lesson 2: Counting Classrooms
Lesson 3: Pen Pals
Lesson 23: Problem-Solving Using Rates, Unit Rates, and Conversions.Unit 3
Lesson 13: A Country as a Village
Topic D Percent 
Lesson 24: Percent and Rates per 100Unit 3
Lesson 8: Lucky Duckies [Free lesson]
Lesson 9: Bicycle Goals
Lesson 25: A Fraction as a Percent 
Lesson 26: Percent of a Quantity.Unit 3
Lesson 10: What´s Missing? (Print available)
Lesson 11: Cost Breakdown
Lesson 27: Solving Percent Problems
Lesson 28: Solving Percent Problems
Lesson 29: Solving Percent Problems
Unit 3
Lesson 10: What´s Missing? (Print available)
Lesson 11: Cost Breakdown
Lesson 12: More Bicycle Goals
Lesson 13: A Country as a Village
Practice Day 2 (Print available)

Module 2: Arithmetic Operations Including Division of Fractions

Lesson 1: Interpreting Division of a Fraction by a Whole Number—Visual Models.Unit 4
Lesson 2: Making Connections (Print available)
Lesson 2: Interpreting Division of a Whole Number by a Fraction —Visual Models.Unit 4
Lesson 1: Cookie Cutter
Lesson 3: Flour Planner [Free lesson]
Lesson 4: Flower Planters
Lesson 5: Garden Bricks (Print available)
Lesson 3: Interpreting and Computing Division of a Fraction by a Fraction—More Models
Lesson 4: Interpreting and Computing Division of a Fraction by a Fraction—More Models
Unit 4
Lesson 5: Garden Bricks
Lesson 6: Fill the Gap [Free lesson]
Lesson 7: Break It Down
Lesson 8: Potting Soil
Lesson 9: Division Challenges
Lesson 10: Swap Meet (Print available)
Practice Day
Lesson 5: Creating Division Stories. 
Lesson 6: More Division Stories. 
Lesson 7: The Relationship Between Visual Fraction Models and Equations 
Lesson 8: Dividing Fractions and Mixed NumbersUnit 4
Lesson 5: Garden Bricks (Print available)
Lesson 6: Fill the Gap [Free lesson]
Topic B Multi-Digit Decimal Operations—Adding, Subtracting, and Multiplying
Lesson 9: Sums and Differences of DecimalsUnit 5
Lesson 2: Decimal Diagrams [Free lesson]
Lesson 3: Fruit by the Pound
Lesson 4: Missing Digits
Lesson 10: The Distributive Property and the Products of DecimalsUnit 5
Lesson 5: Decimal Multiplication
Lesson 6: Multiplying with Areas
Lesson 7: Multiplication Methods (Print available)
Lesson 11: Fraction Multiplication and the Products of DecimalsUnit 5
Lesson 7: Multiplication Methods (Print available)
Topic C Dividing Whole Numbers and Decimals
Lesson 12: Estimating Digits in a Quotient 
Lesson 13: Dividing Multi-Digit Numbers Using the AlgorithmUnit 5
Lesson 9: Long Division Launch
Practice Day 1 (Print available)
Practice Day 2 (Print available)
Lesson 14: The Division Algorithm—Converting Decimal Division into Whole Number Division Using Fractions. 
Lesson 15: The Division Algorithm—Converting Decimal Division into Whole Number Division Using Mental Math 
Topic D Number Theory—Thinking Logically About Multiplicative Arithmetic 
Lesson 16: Even and Odd Numbers 
Lesson 17: Divisibility Tests for 3 and 9 
Lesson 18: Least Common Multiple and Greatest Common FactorUnit 5
Lesson 14: Common Multiples
Lesson 15: Common Factors
Practice Day 2 (Print available)
Lesson 19: The Euclidean Algorithm as an Application of the Long Division Algorithm 

Module 3: Rational Numbers

Lesson 1: Positive and Negative Numbers on the Number Line—Opposite Direction and ValueUnit 7Lesson 2: Digging Deeper
Lesson 2: Real-World Positive and Negative Numbers and Zero.
Lesson 3: Real-World Positive and Negative Numbers and Zero.
Unit 7 Lesson 4: Sub-Zero
Lesson 4: The Opposite of a Number
Lesson 5: The Opposite of a Number’s Opposite
Lesson 6: Rational Numbers on the Number Line
Unit 7Lesson 2: Digging Deeper
Topic B Order and Absolute Value
Lesson 7: Ordering Integers and Other Rational Numbers
Lesson 8: Ordering Integers and Other Rational Numbers
Lesson 9: Comparing Integers and Other Rational Numbers
Unit 7Lesson 3: Order in the Class (Print available) [Free lesson]
Lesson 10: Writing and Interpreting Inequality Statements Involving Rational Numbers 
Lesson 11: Absolute Value—Magnitude and Distance
Lesson 12: The Relationship Between Absolute Value and Order
Unit 7Lesson 5: Distance on the Number Line
Lesson 13: Statements of Order in the Real World. 
Topic C Rational Numbers and the Coordinate Plane 
Lesson 14: Ordered Pairs
Lesson 15: Locating Ordered Pairs on the Coordinate Plane
Unit 7Lesson 9: Sand Dollar SearchLesson 10: The A-maze-ing Coordinate PlaneLesson 11: Polygon Maker
Lesson 16: Symmetry in the Coordinate Plane. 
Lesson 17: Drawing the Coordinate Plane and Points on the PlaneLesson 10: The A-maze-ing Coordinate Plane
Lesson 18: Distance on the Coordinate PlaneUnit 7Lesson 11: Polygon Maker
Lesson 19: Problem Solving and the Coordinate PlaneUnit 7Lesson 12: Graph Telephone (Print available)Practice Day 2 (Print available)

Module 4: Expressions and Equations

Topic A Relationships of the Operations 
Lesson 1: The Relationship of Addition and Subtraction 
Lesson 2: The Relationship of Multiplication and Division 
Lesson 3: The Relationship of Multiplication and Addition. 
Lesson 4: The Relationship of Division and Subtraction 
Topic B Special Notations of Operations 
Lesson 5: ExponentsUnit 6Lesson 10: PowersLesson 11: Exponent Expressions (Print available)Practice Day 2 (Print available)
Lesson 6: The Order of Operations 
Topic C Replacing Letters and Numbers 
Lesson 7: Replacing Letters with Numbers
Lesson 8: Replacing Numbers with Letters
Unit 6Lesson 7: Border TilesLesson 12: Squares and Cubes
Topic D Expanding, Factoring, and Distributing Expressions 
Lesson 9: Writing Addition and Subtraction ExpressionsUnit 6Lesson 6: Vari-applesLesson 8: Products and Sums [Free lesson]Lesson 9: Products, Sums, and Differences
Lesson 10: Writing and Expanding Multiplication Expressions
Lesson 11: Factoring Expressions
Lesson 12: Distributing Expressions
Unit 6Lesson 8: Products and Sums [Free lesson]Lesson 9: Products, Sums, and Differences
Lesson 13: Writing Division Expressions 
Lesson 14: Writing Division Expressions 
Topic E Expressing Operations in Algebraic Form 
Lesson 15: Read Expressions in Which Letters Stand for Numbers
Lesson 16: Write Expressions in Which Letters Stand for Numbers
Lesson 17: Write Expressions in Which Letters Stand for Numbers
Unit 6Lesson 6: Vari-applesLesson 7: Border Tiles
Topic F Writing and Evaluating Expressions and Formulas 
Lesson 18: Writing and Evaluating Expressions—Addition and Subtraction
Lesson 19: Substituting to Evaluate Addition and Subtraction Expressions
Lesson 20: Writing and Evaluating Expressions—Multiplication and Division
Lesson 21: Writing and Evaluating Expressions—Multiplication and Addition
Unit 6Lesson 7: Border TilesLesson 8: Products and Sums [Free lesson]Lesson 9: Products, Sums, and DifferencesLesson 12: Squares and Cubes
Lesson 22: Writing and Evaluating Expressions—ExponentsUnit 6Lesson 10: PowersLesson 11: Exponent Expressions (Print available)Lesson 12: Squares and CubesPractice Day 2 (Print available)
Topic G Solving Equations 
Lesson 23: True and False Number Sentences
Lesson 24: True and False Number Sentences
Unit 6Lesson 1: Weight for It [Free lesson]
Lesson 25: Finding Solutions to Make Equations TrueUnit 6Lesson 1: Weight for It [Free lesson]Lesson 2: Five Equations
Lesson 26: One-Step Equations—Addition and SubtractionUnit 6Lesson 1: Weight for It [Free lesson]Lesson 2: Five EquationsLesson 3: Hanging Around
Lesson 27: One-Step Equations—Multiplication and Division
Lesson 28: Two-Step Problems—All Operations
Lesson 29: Multi-Step Problems—All Operations
Unit 6Lesson 3: Hanging AroundLesson 4: Hanging It UpLesson 5: Swap and Solve
Topic H Applications of Equations 
Lesson 30: One-Step Problems in the Real World
Lesson 31: Problems in Mathematical TermsLesson Lesson 32: Multi-Step Problems in the Real World
Unit 6Lesson 3: Hanging AroundLesson 4: Hanging It UpLesson 5: Swap and SolvePractice Day 1 (Print available)
Lesson 33: From Equations to Inequalities
Lesson 34: Writing and Graphing Inequalities in Real-World Problems
Unit 7Lesson 6: Tunnel Travel [Free lesson]Lesson 7: Comparing WeightsLesson 8: Shira´s Solutions

Module 5: Area, Surface Area, and Volume Problems

Topic A: Area of Triangles, Quadrilaterals, and Polygons
Lesson 1: The Area of Parallelograms Through Rectangle FactsUnit 1Lesson 3: Exploring Parallelograms (Print available) [Free lesson]Lesson 4: Off the Grid
Lesson 2: The Area of Right Triangles
Lesson 3: The Area of Acute Triangles Using Height and Base
Unit 1Lesson 5: Exploring Triangles (Print available)Lesson 6: Triangles and ParallelogramsLesson 7: Off the Grid, Part 2
Lesson 4: The Area of All Triangles Using Height and BaseUnit 1Lesson 6: Triangles and ParallelogramsLesson 7: Off the Grid, Part 2
Lesson 5: The Area of Polygons Through Composition and DecompositionUnit 1Lesson 2: LettersLesson 8: Pile of PolygonsPractice Day 1 (Print available)
Lesson 6: Area in the Real World 
Topic B Polygons on the Coordinate Plane 
Lesson 7: Distance on the Coordinate PlaneUnit 1Lesson 8: Pile of Polygons
Lesson 8: Drawing Polygons in the Coordinate PlaneUnit 7Lesson 11: Polygon Maker
Lesson 9: Determining Perimeter and Area of Polygons on the Coordinate PlaneUnit 1Lesson 8: Pile of Polygons
Lesson 10: Distance, Perimeter, and Area in the Real World 
Topic C Volume of Right Rectangular Prisms 
Lesson 11: Volume with Fractional Edge Lengths and Unit CubesUnit 4Lesson 11: Classroom ComparisonsLesson 12: Puzzling Areas (Print available) [Free lesson]Lesson 13: Volume ChallengesLesson 14: Planter Planner (Print available)
Lesson 12: From Unit Cubes to the Formulas for Volume  
Lesson 13: The Formulas for Volume 
Lesson 14: Volume in the Real WorldUnit 4Lesson 14: Planter Planner (Print available)
Topic D Nets and Surface Area 
Lesson 15: Representing Three-Dimensional Figures Using Nets
Lesson 16: Constructing Nets
Lesson 17: From Nets to Surface Area
Unit 1Lesson 10: Plenty of PolyhedraLesson 11: Nothing But Nets (Print available)Lesson 13: Take It To Go (Print available)
Lesson 18: Determining Surface Area of Three-Dimensional FiguresUnit 1Lesson 9: Renata´s Stickers [Free lesson]Lesson 10: Plenty of PolyhedraLesson 11: Nothing But Nets (Print available)Lesson 13: Take It To Go (Print available)Practice Day 2 (Print available)
Lesson 19: Surface Area and Volume in the Real World 
Lesson 19a: Addendum Lesson for Modeling―Applying Surface Area and Volume to Aquariums 
Lesson 3: The Area of Acute Triangles Using Height and BaseUnit 1Lesson 5 Exploring TrianglesLesson 6 Triangles and ParallelogramsLesson 7 Off the Grid, Part 2

Module 6: Statistics

Topic A Understanding Distributions 
Lesson 1: Posing Statistical QuestionsUnit 8 Lesson 1: Screen TimeLesson 2: Dot Plots
Lesson 2: Displaying a Data Distribution
Lesson 3: Creating a Dot Plot
Unit 8 Lesson 2: Dot PlotsLesson 3: Minimum Wage (Print available) [Free lesson]Lesson 4: Lots More Dots
Lesson 4: Creating a Histogram
Lesson 5: Describing a Distribution Displayed in a Histogram
Unit 8Lesson 5: The Plot Thickens [Free lesson]Lesson 6: DIY Histograms (Print available)
Topic B Summarizing a Distribution That Is Approximately Symmetric Using the Mean and Mean Absolute Deviation 
Lesson 6: Describing the Center of a Distribution Using the Mean
Lesson 7: The Mean as a Balance Point
Unit 8Lesson 7: Snack Time
Lesson 8: Variability in a Data DistributionUnit 8Lesson 8: Pop It!
Topic 9: The Mean Absolute Deviation (MAD).Unit 8Lesson 9: Hoops
Lesson 10: Describing Distributions Using the Mean and MAD
Lesson 11: Describing Distributions Using the Mean and MAD
Unit 8Lesson 10 Hollywood Part 1Practice Day 1 (Print available)
Topic C Summarizing a Distribution That Is Skewed Using the Median and the Interquartile Range 
Lesson 12: Describing the Center of a Distribution Using the MedianUnit 8Lesson 11: Toy Cars [Free lesson]Lesson 12: In the News
Lesson 13: Describing Variability Using the Interquartile Range (IQR)Unit 8Lesson 13: Pumpkin Patch
Lesson 14: Summarizing a Distribution Using a Box Plot
Lesson 15: More Practice with Box Plots
Unit 8Lesson 14: Car, Plane, Bus, or Train? (Print available)
Lesson 16: Understanding Box PlotsUnit 8Lesson 14: Car, Plane, Bus, or Train? (Print available)Lesson 15: Hollywood Part 2Lesson 16: Hollywood Part 3 (Print available)Practice Day 2 (Print available)
Topic D Summarizing and Describing Distributions 
Lesson 17: Developing a Statistical Project 
Lesson 18: Connecting Graphical Representations and Numerical SummariesUnit 8Lesson 5: The Plot Thickens [Free lesson]
Lesson 19: Comparing Data DistributionsUnit 8Lesson 15: Hollywood Part 2
Lesson 20: Describing Center, Variability, and Shape of a Data Distribution from a Graphical Representation
Lesson 21: Summarizing a Data Distribution by Describing Center, Variability, and Shape
Unit 8Lesson 16: Hollywood Part 3 (Print available)
Lesson 22: Presenting a Summary of a Statistical Project 
Lesson 3: Creating a Dot PlotUnit 8Lesson 2 Dot PlotsLesson 3 Minimum Wage [Free lesson]Lesson 4 Lots More Dots

Grade 7

Module 1: Ratios and Proportional Relationships

Eureka MathDesmos Math 6–A1
Topic A Proportional Relationships 
Lesson 1: An Experience in Relationships as Measuring RateUnit 2
Lesson 1: Paint [Free lesson]
Lesson 2: Balloon Float
 
Unit 4
Lesson 1: Mosaics [Free lesson]
Lesson 2: Peach Cobbler (Print available)
Lesson 2: Proportional RelationshipsUnit 2  
Lesson 2: Balloon Float
Lesson 3: Sugary Drinks (Print available)
 
Unit 4
Lesson 3: Sticker Sizes
Lesson 3: Identifying Proportional and Non-Proportional Relationships in Tables
Lesson 4: Identifying Proportional and Non-Proportional Relationships in Tables
Unit 2
Lesson 2: Balloon Float
Lesson 3: Sugary Drinks (Print available)
Lesson 4: Robot Factory
Lesson 5: Identifying Proportional and Non-Proportional Relationships in Graphs
Lesson 6: Identifying Proportional and Non-Proportional Relationships in Graphs
Unit 2
Lesson 8: Dino Pops [Free lesson]
Lesson 9: Gallon Challenge
Lesson 10: Three Turtles
Lesson 11: Four Representations (Print available)
Lesson 12: Water Efficiency
Topic B Unit Rate and the Constant of Proportionality 
Lesson 7: Unit Rate as the Constant of ProportionalityUnit 2
Lesson 2: Balloon Float
Lesson 8: Representing Proportional Relationships with Equations
Lesson 9: Representing Proportional Relationships with Equations
Unit 2
Lesson 4: Robot Factory
Lesson 5: Snapshots
Lesson 6: Two and Two (Print available) [Free lesson]
Lesson 7: All Kinds of Equations
Lesson 10: Interpreting Graphs of Proportional RelationshipsUnit 2
Lesson 8: Dino Pops [Free lesson]
Lesson 9: Gallon Challenge
Lesson 10: Three Turtles
Lesson 11: Four Representations (Print available)
Lesson 12: Water Efficiency
Topic C Ratios and Rates Involving Fractions 
Lesson 11: Ratios of Fractions and Their Unit Rates
Lesson 12: Ratios of Fractions and Their Unit Rates
Unit 2
Lesson 3: Sugary Drinks (Print available)
Lesson 4: Robot Factory
Lesson 5: Snapshots
Lesson 6: Two and Two [Free lesson]
Lesson 13: Finding Equivalent Ratios Given the Total QuantityUnit 2  
Lesson 2: Balloon Float
Lesson 3: Sugary Drinks (Print available)
Lesson 14: Multi-Step Ratio Problems 
Lesson 15: Equations of Graphs of Proportional Relationships Involving FractionsUnit 2
Lesson 8: Dino Pops [Free lesson]
Lesson 9: Gallon Challenge
Lesson 10: Three Turtles
Lesson 11: Four Representations
Lesson 12: Water Efficiency
Topic D Ratios of Scale Drawings 
Lesson 16: Relating Scale Drawings to Ratios and RatesUnit 1
Lesson 1: Scaling Machines [Free lesson]
Lesson 17: The Unit Rate as the Scale FactorUnit 1
Lesson 2: Scaling Robots
Lesson 3: Make It Scale
Lesson 4: Scale Factor Challenges
Practice Day 1 (Print available)
Lesson 18: Computing Actual Lengths from a Scale DrawingUnit 1
Lesson 6: Introducing Scale
Lesson 7: Will It Fit? (Print available) [Free lesson]
Lesson 19: Computing Actual Areas from a Scale DrawingUnit 1
Lesson 5: Tiles
Lesson 6: Introducing Scale
Lesson 7: Will It Fit? (Print available) [Free lesson]
Lesson 8: Scaling States (Print available)
Lesson 20: An Exercise in Creating a Scale Drawing
Lesson 21: An Exercise in Changing Scales
Lesson 22: An Exercise in Changing Scales
Unit 1
Lesson 8: Scaling States (Print available)
Lesson 9: Scaling Buildings
Lesson 10: Room Redesign (Print available)
Practice Day 2 (Print available)

Module 2: Rational Numbers

Topic A Addition and Subtraction of Integers and Rational Numbers 
Lesson 1: Opposite Quantities Combine to Make ZeroUnit 5
Lesson 1: Floats and Anchors [Free lesson]
Lesson 2: Using the Number Line to Model the Addition of Integers
Lesson 3: Understanding Addition of Integers
Lesson 4: Efficiently Adding Integers and Other Rational Numbers
Lesson 5: Understanding Subtraction of Integers and Other Rational Numbers
Unit 5
Lesson 2: More Floats and Anchors
Lesson 4: Draw Your Own (Print available) [Free lesson]
Lesson 5: Number Puzzles
Lesson 10: Integer Puzzles [Free lesson]
Lesson 11: Changing Temperatures
Lesson 13: Solar Panels and More (Print available)
Lesson 6: The Distance Between Two Rational Numbers 
Lesson 7: Addition and Subtraction of Rational NumbersUnit 5
Lesson 3: Bumpers
Lesson 4: Draw Your Own (Print available) [Free lesson]
Lesson 5: Number Puzzles
Lesson 10; Integer Puzzles [Free lesson]
Lesson 11: Changing Temperatures
Lesson 13: Solar Panels and More (Print available)
Practice Day 1 (Print available)
Lesson 8: Applying the Properties of Operations to Add and Subtract Rational Numbers 
Lesson 9: Applying the Properties of Operations to Add and Subtract Rational Numbers 
Topic B Multiplication and Division of Integers and Rational Numbers 
Lesson 10: Understanding Multiplication of Integers
Lesson 11: Develop Rules for Multiplying Signed Numbers
Unit 5
Lesson 6: Floating in Groups
Lesson 7: Back in Time
Lesson 8: Speeding Turtles
Lesson 10: Integer Puzzles [Free lesson]
Practice Day 2 (Print available)
Lesson 12: Division of IntegersUnit 5
Lesson 8: Speeding Turtles
Lesson 13: Converting Between Fractions and Decimals Using Equivalent Fractions 
Lesson 14: Converting Rational Numbers to Decimals Using Long DivisionUnit 4
Lesson 13: Decimal Deep Dive (Print available)
Lesson 15: Multiplication and Division of Rational NumbersUnit 5
Lesson 8: Speeding Turtles
Lesson 10: Integer Puzzles [Free lesson]
Lesson 12: Arctic Sea Ice (Print available)
Lesson 13: Solar Panels and More (Print available)
Practice Day 2 (Print available)
Lesson 16: Applying the Properties of Operations to Multiply and Divide Rational Numbers 
Topic C Applying Operations with Rational Numbers to Expressions and Equations 
Lesson 17: Comparing Tape Diagram Solutions to Algebraic SolutionsUnit 6
Lesson 2: Smudged Receipts
Lesson 3: Equations
Lesson 4: Seeing Structure (Print available)
Lesson 18: Writing, Evaluating, and Finding Equivalent Expressions with Rational Numbers
Lesson 19: Writing, Evaluating, and Finding Equivalent Expressions with Rational Numbers
Unit 5
Lesson 9 Expressions
Lesson 20: Investments—Performing Operations with Rational Numbers
Lesson 21: If-Then Moves with Integer Number Cards
Lesson 22: Solving Equations Using Algebra
Lesson 23: Solving Equations Using Algebra
Unit 6
Lesson 3: Equations
Lesson 4: Seeing Structure (Print available)
Lesson 6: Balancing Equations
Lesson 7: Keeping It True (Print available)
Lesson 12: Community Day (Print available)
 
Unit 5
Lesson 3: Bumpers

Module 3: Expressions and Equations

Topic A Use Properties of Operations to Generate Equivalent Expressions 
Lesson 1: Generating Equivalent Expressions
Lesson 2: Generating Equivalent Expressions
Unit 5 Lesson 9: Expressions (Print available)Unit 6Lesson 9: Always-Equal MachinesLesson 11: Equation Roundtable (Print available)
Lesson 3: Writing Products as Sums and Sums as Products
Lesson 4: Writing Products as Sums and Sums as Products
Unit 6 Lesson 2: Smudged ReceiptsLesson 6: Balancing EquationsLesson 7: Keeping It True (Print available)Lesson 8: Factoring and ExpandingLesson 9: Always-Equal MachinesLesson 10: Collect the Squares [Free lesson]Lesson 11: Equation Roundtable (Print available)Lesson 12: Community Day (Print available)
Lesson 5: Using the Identity and Inverse to Write Equivalent Expressions 
Lesson 6: Collecting Rational Number Like Terms 
Topic B Solve Problems Using Expressions, Equations, and Inequalities 
Lesson 7: Understanding EquationsUnit 6Lesson 2: Smudged ReceiptsLesson 5: Balancing MovesLesson 6: Balancing Equations
Lesson 8: Using If-Then Moves in Solving Equations
Lesson 9: Using If-Then Moves in Solving Equations
Unit 6Lesson 2: Smudged ReceiptsLesson 6: Balancing EquationsLesson 7: Keeping It True (Print available)Lesson 8: Factoring and Expanding (Print available)Lesson 9: Always-Equal MachinesLesson 10: Collect the Squares [Free lesson]Lesson 11: Equation Roundtable (Print available)Lesson 12: Community Day (Print available)Practice Day 1 (Print available)
Lesson 10: Angle Problems and Solving EquationsUnit 7Lesson 2: Friendly Angles [Free lesson]Lesson 3: Angle DiagramsLesson 4: Missing Measures (Print available) [Free lesson]
Lesson 11: Angle Problems and Solving Equations 
Lesson 12: Properties of Inequalities
Lesson 13: Inequalities
Lesson 14: Solving Inequalities
Unit 6Lesson 14: Unbalanced HangersLesson 15: Budgeting (Print available)Lesson 16: Shira the Sheep [Free lesson]Lesson 17: Write Them and Solve Them (Print available)
Lesson 15: Graphing Solutions to InequalitiesUnit 6Lesson 13: I Saw the SignsPractice Day 2 (Print available)
Topic C Use Equations and Inequalities to Solve Geometry Problems 
Lesson 16: The Most Famous Ratio of AllUnit 3Lesson 2: Is It a Circle?Lesson 3: Measuring Around [Free lesson]
Lesson 17: The Area of a CircleUnit 3Lesson 5: Area StrategiesLesson 6: Radius Squares (Print available)Lesson 7: Why Pi? (Print available)Lesson 8: Area Challenges [Free lesson]Lesson 9: Circle vs. SquarePractice Day 2 (Print available)
Lesson 18: More Problems on Area and CircumferenceUnit 3Lesson 4: Perimeter ChallengesLesson 5: Area StrategiesLesson 6: Radius Squares (Print available)Lesson 7: Why Pi? (Print available)Lesson 8: Area Challenges [Free lesson]Lesson 9: Circle vs. Square
Lesson 19: Unknown Area Problems on the Coordinate Plane
Lesson 20: Composite Area Problems
Unit 3Lesson 4: Perimeter ChallengesPractice Day 2 (Print available)
Lesson 21: Surface Area
Lesson 22: Surface Area
Lesson 23: The Volume of a Right Prism
Lesson 24: The Volume of a Right Prism
Unit 7Lesson 10: Simple PrismsLesson 11: More Complicated Prisms Lesson 12: Surface Area Strategies (Print Available)Lesson 13: Popcorn PossibilitiesPractice Day 2 (Print available)
Lesson 25: Volume and Surface Area
Lesson 26: Volume and Surface Area
Unit 7Lesson 13: Popcorn PossibilitiesPractice Day 2

Module 4: Percent and Proportional Relationships

Topic A Finding the Whole 
Lesson 1: PercentUnit 4Lesson 1: Mosaics [Free lesson]Lesson 2: Peach Cobbler (Print available)Lesson 3: Sticker Sizes
Lesson 2: Part of a Whole as a PercentUnit 4Lesson 1: Mosaics [Free lesson]Lesson 2: Peach Cobbler (Print available)
Lesson 3: Comparing Quantities with PercentUnit 4Lesson 1: Mosaics [Free lesson]Lesson 2: Peach Cobbler (Print available)Lesson 3: Sticker Sizes
Lesson 4: Percent Increase and DecreaseUnit 4Lesson 4: More and LessLesson 5: All the EquationsLesson 6: 100% (Print available)Lesson 7: Percent machines [Free lesson]Lesson 8: Tax and TipLesson 9: Minimum Wage (Print available)Lesson 10: Cost of College (Print available)Lesson 11: Bookcase BuilderLesson 12: Posing Percent Problems [Free lesson]
Lesson 5: Finding One Hundred Percent Given Another Percent 
Lesson 6: Fluency with PercentsUnit 4Lesson 7: Percent machines [Free lesson]Lesson 8: Tax and TipLesson 9: Minimum Wage (Print available)Lesson 10: Cost of College (Print available)Lesson 11: Bookcase BuilderLesson 12: Posing Percent Problems [Free lesson]
Topic B Percent Problems Including More Than One Whole 
Lesson 7: Markup and Markdown ProblemsUnit 4Lesson 7: Percent machines [Free lesson]Lesson 8: Tax and TipLesson 9: Minimum Wage (Print available)Lesson 10: Cost of College (Print available)Lesson 11: Bookcase BuilderLesson 12: Posing Percent Problems [Free lesson]
Lesson 8: Percent Error Problems
Lesson 9: Problem Solving When the Percent Changes
Unit 4Lesson 4: More and LessLesson 5: All the EquationsLesson 6: 100% (Print available)Lesson 7: Percent machines [Free lesson]Lesson 8: Tax and TipLesson 9: Minimum Wage (Print available)Lesson 10: Cost of College (Print available)Lesson 11: Bookcase BuilderLesson 12: Posing Percent Problems [Free lesson]
Lesson 10: Simple Interest 
Lesson 11: Tax, Commissions, Fees, and Other Real-World Percent ApplicationsUnit 4Lesson 8: Tax and TipLesson 9: Minimum Wage (Print available)Lesson 10: Cost of College (Print available)Lesson 11: Bookcase BuilderLesson 12: Posing Percent Problems [Free lesson]Practice Day (Print available)
Topic C Scale Drawings 
Lesson 12: The Scale Factor as a Percent for a Scale Drawing 
Lesson 13: Changing ScalesUnit 1Lesson 1: Scaling Machines [Free lesson]Lesson 2: Scaling RobotsLesson 3: Make It ScaleLesson 4: Scale Factor ChallengesLesson 5: TilesLesson 6: Introducing ScaleLesson 7: Will It Fit? (Print available) [Free lesson]Lesson 8: Scaling States (Print available)Lesson 9: Scaling BuildingsLesson 10: Room Redesign (Print available)Practice Day 1 (Print available)Practice Day 2 (Print available) Unit 3Lesson 1 Toothpicks
Lesson 14: Computing Actual Lengths from a Scale DrawingUnit 1Lesson 6: Introducing ScaleLesson 7: Will It Fit? (Print available) [Free lesson]Lesson 8: Scaling States (Print available)Lesson 9: Scaling BuildingsLesson 10: Room Redesign (Print available) Unit 3Lesson 1: Toothpicks
Lesson 15: Solving Area Problems Using Scale DrawingsUnit 1Lesson 5: Tiles
Topic D Population, Mixture, and Counting Problems Involving Percents 
Lesson 16: Population ProblemsUnit 8Lesson 10: Crab Island [Free lesson]Lesson 11: Headlines
Lesson 17: Mixture Problems 
Lesson 18: Counting Problems 

Module 5: Statistics and Probability

Topic A Calculating and Interpreting Probabilities 
Lesson 1: Chance ExperimentsUnit 8Lesson 1: How Likely? (Print available) [Free lesson]Lesson 2: Prob-bear-bilities [Free lesson]Lesson 3: Mystery Bag
Lesson 2: Estimating Probabilities by Collecting Data
Lesson 3: Chance Experiments with Equally Likely Outcomes
Lesson 4: Calculating Probabilities for Chance Experiments with Equally Likely Outcomes
Unit 8Lesson 3: Mystery BagLesson 4: Spin ClassLesson 5: Is It Fair?Lesson 6: Fair Games
Lesson 5: Chance Experiments with Outcomes That Are Not Equally LikelyUnit 8Lesson 4: Spin ClassLesson 5: Is It Fair?Lesson 6: Fair GamesLesson 7: Weather or Not
Lesson 6: Using Tree Diagrams to Represent a Sample Space and to Calculate ProbabilitiesUnit 8Lesson 6: Fair GamesLesson 7: Weather or Not
Lesson 7: Calculating Probabilities of Compound EventsUnit 8Lesson 8: Simulate It! (Print available)Lesson 9: Car, Bike, or Train? (Print available)Practice Day 1 (Print available)
Topic B Estimating Probabilities 
Lesson 8: The Difference Between Theoretical Probabilities and Estimated Probabilities
Lesson 9: Comparing Estimated Probabilities to Probabilities Predicted by a Model
Unit 8Lesson 6: Fair GamesLesson 7: Weather or NotLesson 8: Simulate It! (Print available)Lesson 9: Car, Bike, or Train? (Print available)
Lesson 10: Conducting a Simulation to Estimate the Probability of an EventUnit 8Lesson 7: Weather or NotLesson 8: Simulate It! (Print available)Lesson 9: Car, Bike, or Train? (Print available)
Lesson 11: Conducting a Simulation to Estimate the Probability of an Event
Lesson 12: Applying Probability to Make Informed Decisions
Unit 8Lesson 7: Weather or NotLesson 8: Simulate It! (Print available)
Topic C Random Sampling and Estimating Population Characteristics 
Lesson 13: Populations, Samples, and Generalizing from a Sample to a PopulationUnit 8Lesson 9: Car, Bike, or Train? (Print available)Lesson 10: Crab Island [Free lesson]Lesson 11: HeadlinesLesson 12: Flower Power
Lesson 14: Selecting a Sample
Lesson 15: Random Sampling
Lesson 16: Methods for Selecting a Random Sample
Unit 8Lesson 10: Crab Island [Free lesson]Lesson 11: Headlines
Lesson 17: Sampling VariabilityUnit 8Lesson 9: Car, Bike, or Train? (Print available)Lesson 13: Plots and Samples
Lesson 18: Sampling Variability and the Effect of Sample Size
Lesson 19: Understanding Variability When Estimating a Population Proportion
Unit 8Lesson 9: Car, Bike, or Train? (Print available)Lesson 13: Plots and SamplesLesson 14: School Newspaper (Print available)
Lesson 20: Estimating a Population Proportion 
Topic D Comparing Populations 
Lesson 21: Why Worry About Sampling Variability?Unit 8Lesson 9: Car, Bike, or Train? (Print available)Lesson 13: Plots and SamplesLesson 14: School Newspaper (Print available)
Lesson 22: Using Sample Data to Compare the Means of Two or More Populations
Lesson 23: Using Sample Data to Compare the Means of Two or More Populations
Unit 8Lesson 9: Car, Bike, or Train? (Print available)Lesson 10: Crab Island [Free lesson]Lesson 13: Plots and SamplesLesson 14: School Newspaper (Print available)Lesson 15: Asthma Rates (Print available)

Module 6: Geometry

Topic A Unknown Angles 
Lesson 1: Complementary and Supplementary AnglesUnit 7Lesson 2: Friendly Angles [Free lesson]Lesson 3: Angle Diagrams
Lesson 2: Solving for Unknown Angles Using Equations
Lesson 3: Solving for Unknown Angles Using Equations
Lesson 4: Solving for Unknown Angles Using Equations
Unit 7Lesson 1: PinwheelsLesson 2: Friendly AnglesLesson 3: Angle DiagramsLesson 4: Missing Measures (Print available) [Free lesson]
Topic B Constructing Triangles 
Lesson 5: Identical TrianglesUnit 7Lesson 6: Is It Enough?Lesson 7: More Than One
Lesson 6: Drawing Geometric ShapesUnit 7Lesson 6: Is It Enough?Lesson 7: More Than OneLesson 8: Can You Draw It? (Print available)
Lesson 7: Drawing Parallelograms 
Lesson 8: Drawing TrianglesUnit 7Lesson 5: Can You Build It? [Free lesson]Lesson 6: Is It Enough?Lesson 7: More Than OneLesson 8: Can You Draw It? (Print available)Practice Day 1 (Print available)
Lesson 9: Conditions for a Unique Triangle―Three Sides and Two Sides and the Included
Lesson 10: Conditions for a Unique Triangle—Two Angles and a Given Side Angle
Unit 7Lesson 8: Can You Draw It? (Print available)
Lesson 11: Conditions on Measurements That Determine a TriangleUnit 7Lesson 5: Can You Build It? [Free lesson]Lesson 6: Is It Enough?Lesson 7: More Than OneLesson 8: Can You Draw It? (Print available)Practice Day 1 (Print available)
Lesson 12: Unique Triangles―Two Sides and a Non-Included Angle 
Lesson 13: Checking for Identical Triangles
Lesson 14: Checking for Identical Triangles
Unit 7Lesson 6: Is It Enough?Lesson 7: More Than OnePractice Day 1
Lesson 15: Using Unique Triangles to Solve Real-World and Mathematical Problems 
Topic C Slicing Solids 
Lesson 16: Slicing a Right Rectangular Prism with a Plane
Lesson 17: Slicing a Right Rectangular Pyramid with a Plane
Lesson 18: Slicing on an Angle
Unit 7Lesson 9: Slicing Solids
Lesson 19: Understanding Three-Dimensional Figures 
Topic D Problems Involving Area and Surface Area 
Lesson 20: Real-World Area ProblemsUnit 3Lesson 5: Area Strategies
Lesson 21: Mathematical Area ProblemsUnit 3Lesson 5: Area StrategiesLesson 6: Radius Squares (Print available)
Lesson 22: Area Problems with Circular RegionsUnit 3Lesson 5: Area StrategiesLesson 8: Area Challenges [Free lesson]
Lesson 23: Surface Area
Lesson 24: Surface Area
Unit 7Lesson 12: Surface Area Strategies (Print available)Lesson 13: Popcorn Possibilities
Topic E Problems Involving Volume 
Lesson 25: Volume of Right PrismsUnit 7Lesson 10: Simple PrismsLesson 11: More Complicated PrismsLesson 13: Popcorn Possibilities
Lesson 26: Volume of Composite Three-Dimensional ObjectsUnit 7Lesson 11: More Complicated Prisms
Lesson 27: Real-World Volume ProblemsUnit 7Lesson 13: Popcorn Possibilities

Grade 8

Module 1: Integer Exponents and Scientific Notation

Eureka MathDesmos Math 6–A1
Topic A Exponential Notation and Properties of Integer Exponents 
Lesson 1: Exponential NotationUnit 7 Lesson 1 Circles [Free lesson]Lesson 2 Combining Exponents
Lesson 2: Multiplication of Numbers in Exponential Form
Lesson 3: Numbers in Exponential Form Raised to a Power
Unit 7 Lesson 2 Combining ExponentsLesson 3 Power Pairs (Print available) [Free lesson]Lesson 4 Rewriting Powers
Lesson 4: Numbers Raised to the Zeroth Power
Lesson 5: Negative Exponents and the Laws of Exponents
Unit 7 Lesson 5 Zero and Negative ExponentsLesson 6 Write a Rule (Print available)Practice Day 1 (Print available)
Lesson 6: Proofs of Laws of Exponents 
Topic B Magnitude and Scientific Notation 
Lesson 7: MagnitudeUnit 7 Lesson 7 Scales and Weights
Lesson 8: Estimating QuantitiesUnit 7 Lesson 7: Scales and WeightsLesson 8: Point ZapperLesson 9: Use Your Powers
Lesson 9: Scientific Notation
Lesson 10: Operations with Numbers in Scientific Notation
Unit 7 Lesson 10: Solar System [Free lesson]Lesson 11: Balance the Scales [Free lesson]Lesson 13: Star Power
Lesson 11: Efficacy of Scientific NotationUnit 7 Lesson 13: Star Power
Lesson 12: Choice of Unit 
Lesson 13: Comparison of Numbers Written in Scientific Notation and Interpreting Scientific Notation Using TechnologyUnit 7  Lesson 13: Star Power Practice Day 2 (Print available)

Module 2: The Concept of Congruence

Topic A Definitions and Properties of the Basic Rigid Motions 
Lesson 1: Why Move Things Around?
Lesson 2: Definition of Translation and Three Basic Properties
Unit 1Lesson 1: Transformers [Free lesson]Lesson 2: Spinning, Flipping, Sliding [Free lesson]
Lesson 3: Translating LinesUnit 1Lesson 1: Transformers [Free lesson]Lesson 2: Spinning, Flipping, Sliding [Free lesson] Unit 3Lesson 6: Translations
Lesson 4: Definition of Reflection and Basic Properties
Lesson 5: Definition of Rotation and Basic Properties
Lesson 6: Rotations of 180 Degrees
Unit 1Lesson 1: Transformers [Free lesson]Lesson 2: Spinning, Flipping, Sliding [Free lesson]Lesson 4: Moving Day (Print available) [Free lesson]Lesson 5: Getting Coordinated
Topic B Sequencing the Basic Rigid Motions 
Lesson 7: Sequencing Translations
Lesson 8: Sequencing Reflections and Translations
Unit 1Lesson 3: Transformation GolfLesson 6: Connecting the Dots [Free lesson]
Lesson 9: Sequencing Rotations
Lesson 10: Sequences of Rigid Motions
Unit 1Lesson 3: Transformation GolfLesson 6: Connecting the Dots [Free lesson]Lesson 13: Tessellate [Free lesson]Practice Day
Topic C Congruence and Angle Relationships 
Lesson 11: Definition of Congruence and Some Basic PropertiesUnit 1 Lesson 7: Are They the Same?Lesson 8: No Bending, No StretchingLesson 9: Are They Congruent?Practice Day
Lesson 12: Angles Associated with Parallel LinesUnit 1 Lesson 10: Transforming Angles  
Lesson 13: Angle Sum of a TriangleUnit 1 Lesson 11: Tearing It Up (Print available)
Lesson 14: More on the Angles of a TriangleUnit 1 Lesson 11: Tearing It Up (Print available)Lesson 12: Puzzling It Out [Free lesson]
Topic D: The Pythagorean Theorem 
Lesson 15: Informal Proof of the Pythagorean TheoremUnit 8Lesson 7: Pictures to Prove It
Lesson 16: Applications of the Pythagorean TheoremUnit 8Lesson 10: Taco TruckPractice Day 2 (Print available)

Module 3: Similarity

Topic A Dilation 
Lesson 1: What Lies Behind “Same Shape”?Unit 2Lesson 1: Sketchy Dilations [Free lesson]Lesson 2: Dilation Mini Golf [Free lesson]
Lesson 2: Properties of Dilations
Lesson 3: Examples of Dilations
Unit 2Lesson 1: Sketchy Dilations [Free lesson]Lesson 2: Dilation Mini Golf [Free lesson]Lesson 3: Match My DilationLesson 4: Dilations on a Plane (Print available)
Lesson 4: Fundamental Theorem of Similarity
Lesson 5: First Consequences of FTS
Unit 2Lesson 5: Transformations Golf with DilationsLesson 6: Social Scavenger Hunt (Print available) [Free lesson]
Lesson 6: Dilations on the Coordinate PlaneUnit 8Lesson 4: Dilations on a Plane (Print available)
Lesson 7: Informal Proofs of Properties of Dilations 
Topic B Similar Figures 
Lesson 8: Similarity
Lesson 9: Basic Properties of Similarity
Unit 2Lesson 5: Transformations Golf with DilationsLesson 6: Social Scavenger Hunt (Print available) [Free lesson]
Lesson 10: Informal Proof of AA Criterion for SimilarityUnit 2Lesson 7: Are Angles Enough?
Lesson 11: More About Similar TrianglesUnit 2Lesson 7: Are Angles Enough?Lesson 8: Shadows
Lesson 12: Modeling Using SimilarityUnit 2Lesson 8: ShadowsLesson 9: Water SlideLesson 10: Points on a PlanePractice Day 
Topic C The Pythagorean Theorem 
Lesson 13: Proof of the Pythagorean TheoremUnit 8Lesson 6: The Pythagorean TheoremLesson 7: Pictures to Prove ItLesson 8: Triangle-Tracing Turtle [Free lesson]
Lesson 14: The Converse of the Pythagorean TheoremUnit 8 Lesson 9: Make It Right

Module 4: Linear Equations

Topic A Writing and Solving Linear Equations 
Lesson 1: Writing Equations Using Symbols 
Lesson 2: Linear and Nonlinear Expressions in x 
Lesson 3: Linear Equations in xUnit 4Lesson 3: Balanced MovesLesson 4: More Balanced Moves (Print available)
Lesson 4: Solving a Linear EquationUnit 4Lesson 3: Balanced MovesLesson 4: More Balanced MovesLesson 4: More Balanced Moves (Print available)Lesson 5: Equation Roundtable (Print available) [Free lesson]Lesson 6: Strategic Solving (Print available)
Lesson 5: Writing and Solving Linear EquationsUnit 3Lesson 1: Turtle Time Trials Unit 4Lesson 3: Balanced MovesLesson 4: More Balanced Moves (Print available)Lesson 5: Equation Roundtable (Print available) [Free lesson]Lesson 6: Strategic Solving (Print available)
Lesson 6: Solutions of a Linear EquationUnit 3Lesson 10: Solutions Unit 4Lesson 3: Balanced MovesLesson 4: More Balanced Moves (Print available)Lesson 5: Equation Roundtable (Print available) [Free lesson]Lesson 6: Strategic Solving (Print available)
Lesson 7: Classification of SolutionsUnit 4Lesson 7: All, Some, or None?
Lesson 8: Linear Equations in Disguise 
Lesson 9: An Application of Linear Equations 
Topic B Linear Equations in Two Variables and Their GraphsUnit 3Lesson 2: Water TankLesson 3: PostersLesson 4: Stacking CupsLesson 5: Flags [Free lesson]Lesson 6: Translations
Lesson 10: A Critical Look at Proportional RelationshipsUnit 3Lesson 1: Turtle Time Trials [Free lesson]Lesson 2: Water TankLesson 4: Stacking CupsLesson 5: Flags [Free lesson]Lesson 7: Water CoolerLesson 8: Landing PlanesLesson 9: Coin Capture
Lesson 11: Constant RateUnit 2Lesson 9: Water SlideLesson 10: Points on a PlanePractice Day  Unit 3Lesson 3: PostersLesson 4: Stacking CupsLesson 5: Flags [Free lesson]Lesson 6: Translations Unit 4Lesson 8: When Are They the Same?
Lesson 12: Linear Equations in Two VariablesUnit 3Lesson 3: PostersLesson 6: Translations Unit 4Lesson 3: Balanced MovesLesson 4: More Balanced Moves (Print available)
Lesson 13: The Graph of a Linear Equation in Two VariablesUnit 3 Lesson 4: Stacking CupsLesson 5: Flags [Free lesson]Lesson 6: TranslationsLesson 7: Water CoolerLesson 10: SolutionsLesson 11: Pennies and Quarters
Lesson 14: The Graph of a Linear Equation―Horizontal and Vertical LinesUnit 3 Lesson 9: Coin CapturePractice Day  [Free lesson]
Topic C Slope and Equations of Lines 
Lesson 15: The Slope of a Non-Vertical LineUnit 3Lesson 5: Flags [Free lesson]Lesson 6: TranslationsLesson 7: Water CoolerLesson 8: Landing Planes
Lesson 16: The Computation of the Slope of a Non-Vertical LineUnit 3Lesson 7: Water CoolerLesson 8: Landing Planes
Lesson 17: The Line Joining Two Distinct Points of the Graph 𝑦 = 𝑚x + 𝑏 Has Slope mUnit 3Lesson 7: Water Cooler
Lesson 18: There Is Only One Line Passing Through a Given Point with a Given SlopeUnit 3Lesson 5: Flags [Free lesson]Lesson 7: Water Cooler
Lesson 19: The Graph of a Linear Equation in Two Variables Is a LineUnit 3Lesson 4: Stacking CupsLesson 5: Flags [Free lesson]Lesson 6: Translations
Lesson 20: Every Line Is a Graph of a Linear EquationUnit 3Lesson 3: PostersLesson 4: Stacking CupsLesson 5: Flags [Free lesson]Lesson 6: Translations
Lesson 21: Some Facts About Graphs of Linear Equations in Two VariablesUnit 3Lesson 3: PostersLesson 6: TranslationsPractice Day 
Lesson 22: Constant Rates RevisitedUnit 2Lesson 9: Water SlideLesson 10: Points on a Plane Unit 3Lesson 1: Turtle Time Trials [Free lesson]Lesson 2: Water TankLesson 3: Posters
Lesson 23: The Defining Equation of a LineUnit 3Lesson 10: SolutionsLesson 11: Pennies and Quarters
Topic D Systems of Linear Equations and Their Solutions 
Lesson 24: Introduction to Simultaneous EquationsUnit 4Lesson 7: All, Some, or None?Lesson 8: When Are They the Same?Lesson 13: All, Some, or None? Part 2
Lesson 25: Geometric Interpretation of the Solutions of a Linear SystemUnit 4  Lesson 9: On or Off the Line?Lesson 10: On Both LinesLesson 11: Make Them Balance [Free lesson]Lesson 12: Line Zapper [Free lesson]Lesson 13: All, Some, or None? Part 2Practice Day 2 (Print available)
Lesson 26: Characterization of Parallel LinesUnit 3 Lesson 6: Translations
Lesson 27: Nature of Solutions of a System of Linear EquationsUnit 4  Lesson 9: On or Off the Line?
Lesson 28: Another Computational Method of Solving a Linear System 
Lesson 29: Word Problems 
Lesson 30: Conversion Between Celsius and Fahrenheit 
Topic E Pythagorean Theorem 
Lesson 31: System of Equations Leading to Pythagorean Triples 

Module 5: Examples of Functions from Geometry

Topic A Functions 
Lesson 1: The Concept of a FunctionUnit 5 Lesson 1: Turtle Crossing [Free lesson]Lesson 2: Guess My Rule [Free lesson]
Lesson 2: Formal Definition of a FunctionUnit 5 Lesson 1: Turtle Crossing [Free lesson]Lesson 2: Guess My Rule [Free lesson] Lesson 3: Function or Not?
Lesson 3: Linear Functions and ProportionalityUnit 3Lesson 1: Turtle Time Trials [Free lesson] Unit 5Lesson 4: Window Frames
Lesson 4: More Examples of FunctionsUnit 5Lesson 3: Function or Not?Lesson 4: Window Frames
Lesson 5: Graphs of Functions and EquationsUnit 5Lesson 4: Window FramesLesson 5: The Tortoise and the Hare [Free lesson]Lesson 6: Graphing StoriesLesson 7: Feel the Burn (Print available) [Free lesson]Lesson 8: Charge! (Print available)
Lesson 6: Graphs of Linear Functions and Rate of ChangeUnit 2Lesson 9: Water SlideLesson 10: Points on a Plane Unit 3Lesson 4: Stacking CupsLesson 5: Flags [Free lesson]Lesson 6: Translations
Lesson 7: Comparing Linear Functions and GraphsUnit 5Lesson 3: PostersLesson 5: The Tortoise and the Hare [Free lesson]Lesson 6: Graphing StoriesLesson 7: Feel the Burn (Print available) [Free lesson]
Lesson 8: Graphs of Simple Nonlinear Functions 
Topic B Volume 
Lesson 9: Examples of Functions from GeometryUnit 8Lesson 1: Tilted SquaresLesson 2: From Squares to Roots
Lesson 10: Volumes of Familiar Solids—Cones and CylindersUnit 5Lesson 10: Volume LabLesson 11: Cylinders [Free lesson]Lesson 12: Scaling CylindersLesson 13: Cones [Free lesson]Lesson 14: Missing Dimensions (Print available)
Lesson 11: Volume of a SphereUnit 5 Lesson 15: Spheres Practice Day 2 (Print available)

Module 6: Linear Functions

Topic A Linear Functions 
Lesson 1: Modeling Linear RelationshipsUnit 5 Lesson 6: Graphing StoriesLesson 7: Feel the Burn (Print available) [Free lesson]Lesson 8: Charge! (Print available)
Lesson 2: Interpreting Rate of Change and Initial ValueUnit 2Lesson 9: Water SlideLesson 10: Points on a Plane Unit 3Lesson 1: Turtle Time Trials [Free lesson]Lesson 2: Water TankLesson 3: PostersLesson 4: Stacking Cups
Lesson 3: Representations of a LineUnit 5Lesson 6: Graphing StoriesLesson 7: Feel the Burn (Print available) [Free lesson]Lesson 8: Charge! (Print available)
Lesson 4: Increasing and Decreasing Functions
Lesson 5: Increasing and Decreasing Functions
Unit 5Lesson 1: Turtle Crossing [Free lesson]Lesson 5: The Tortoise and the Hare [Free lesson]Lesson 6: Graphing Stories
Topic B Bivariate Numerical Data 
Lesson 6: Scatter Plots
Lesson 7: Patterns in Scatter Plots
Unit 6 Lesson 1: Click BattleLesson 2: Wing SpanLesson 3: Robots [Free lesson]Practice Day 1 (Print available) [Free lesson]
Lesson 8: Informally Fitting a LineUnit 6 Lesson 4: Dapper Cats [Free lesson]Lesson 5: Fit Fights [Free lesson]Lesson 6: Interpreting SlopesLesson 7: Scatter Plot CityLesson 8: Animal BrainsPractice Day 1 (Print available) [Free lesson]Practice Day 2 (Print available)
Lesson 9: Determining the Equation of a Line Fit to Data 
Topic C Linear and Nonlinear Models 
Lesson 10: Linear Models
Lesson 11: Using Linear Models in a Data Context
Unit 5 Lesson 4: Window FramesLesson 5: The Tortoise and the Hare [Free lesson]Lesson 6: Graphing StoriesUnit 6 Lesson 6: Interpreting SlopesLesson 8: Animal BrainsPractice Day 2 (Print available)
Lesson 12: Nonlinear Models in a Data Context 
Topic D Bivariate Categorical Data 
Lesson 13: Summarizing Bivariate Categorical Data in a Two-Way TableUnit 6 Lesson 9: Tasty Fruit
Lesson 14: Association Between Categorical VariablesUnit 6 Lesson 10: Finding Associations [Free lesson] Lesson 11: Federal Budgets Practice Day 3

Module 7: Introduction to Irrational Numbers Using Geometry

Topic A Square and Cube Roots 
Lesson 1: The Pythagorean TheoremUnit 8
Lesson 6: The Pythagorean Theorem
Lesson 2: Square RootsUnit 8
Lesson 2: From Squares to Roots
Lesson 3: Between Squares
Lesson 4: Root Down [Free lesson]
Lesson 3: Existence and Uniqueness of Square Roots and Cube RootsUnit 8
Lesson 5: Filling Cubes
Lesson 4: Simplifying Square RootsUnit 8
Lesson 2: From Squares to Roots
Lesson 3: Between Squares
Lesson 4: Root Down [Free lesson]
Practice Day 1 (Print available)
Lesson 5: Solving Equations with Radicals 
Topic B Decimal Expansions of Numbers 
Lesson 6: Finite and Infinite Decimals
Lesson 7: Infinite Decimals
Lesson 8: The Long Division Algorithm
Lesson 9: Decimal Expansions of Fractions, Part 1
Lesson 10: Converting Repeating Decimals to Fractions
Unit 8
Lesson 12: Fractions to Decimals
Lesson 13: Decimals to Fractions
Lesson 11: The Decimal Expansion of Some Irrational Numbers 
Lesson 12: Decimal Expansions of Fractions, Part 2 
Lesson 13: Comparing Irrational NumbersUnit 8
Lesson 14: Hit the Target
Lesson 14: Decimal Expansion of π 
Topic C The Pythagorean Theorem 
Lesson 15: Pythagorean Theorem, RevisitedUnit 8
Lesson 6: The Pythagorean Theorem
Lesson 7: Pictures to Prove It
Lesson 16: Converse of the Pythagorean TheoremUnit 8
Lesson 9: Make It Right
Lesson 17: Distance on the Coordinate PlaneUnit 8
Lesson 11: Pond Hopper
Lesson 18: Applications of the Pythagorean TheoremUnit 8
Lesson 10: Taco Truck [Free lesson]
Practice Day 2 (Print available)
Topic D Applications of Radicals and Roots 
Lesson 19: Cones and Spheres 
Lesson 20: Truncated Cones 
Lesson 21: Volume of Composite Solids 
Lesson 22: Average Rate of Change 
Lesson 23: Nonlinear Motion 

Grade 6

Unit 1: Area and Surface Area

Illustrative MathematicsDesmos Math 6–A1
Topic A: Reasoning to Find Area 
Lesson 1: Tiling the PlaneUnit 1
Lesson 1: Shapes on a Plane [Free lesson]
Lesson 2: Finding Area by Decomposing and Rearranging
Lesson 3: Reasoning to Find Area
Unit 1
Lesson 2: Letters
Topic 2: Parallelograms
Lesson 4: Parallelograms
Lesson 5: Bases and Heights of Parallelograms
Lesson 6: Area of Parallelograms
Unit 1
Lesson 3: Exploring Parallelograms (Print available) [Free lesson]
Lesson 4: Off the Grid
Topic 3: Triangles
Lesson 7: From Parallelograms to TrianglesUnit 1
Lesson 3: Exploring Parallelograms (Print available) [Free lesson]
Lesson 4: Off the Grid
Lesson 6: Triangles and Parallelograms
Lesson 8: Area of TrianglesUnit 1
Lesson 5: Exploring Triangles (Print available)
Lesson 9: Formula for the Area of a Triangle
Lesson 10: Bases and Heights of Triangles
Unit 1
Lesson 4: Off the Grid
Lesson 6: Triangles and Parallelograms
Topic 4: Polygons
Lesson 11: PolygonsUnit 1
Lesson 2: Letters
Lesson 8: Pile of Polygons
Practice Day 1 (Print available)
Unit 7
Lesson 11: Polygon Maker
Topic 5: Surface Area
Lesson 12: What is Surface Area?Unit 1
Lesson 9: Renata´s Stickers [Free lesson]
Lesson 13: PolyhedraUnit 1Lesson 10: Plenty of Polyhedra
Lesson 14: Nets and Surface AreaUnit 1
Lesson 10: Plenty of Polyhedra
Lesson 11: Nothing But Nets (Print available)
Lesson 13: Take It To Go
Lesson 15: More Nets, More Surface AreaUnit 1
Lesson 10: Plenty of Polyhedra
Lesson 11: Nothing But Nets (Print available)
Lesson 12: Face Value
Lesson 13: Take It To Go (Print available)
Practice Day 2 (Print available)
Lesson 16: Distinguishing Between Surface Area and Volume
Topic 6: Squares and Cubes 
Lesson 17: Squares and CubesUnit 6
Lesson 12: Squares and Cubes
Lesson 18: Surface Area of a Cube 
Topic 7: Let’s Put It to Work 
Lesson 19: Designing a TentUnit 1
Lesson 13: Take It To Go (Print available)

Unit 2: Introducing Ratios

Topic 1: Introducing Ratios
Lesson 1: Introducing Ratios and Ratio LanguageUnit 2Lesson 1: Pizza Maker [Free lesson]Lesson 2: Ratio Rounds (Print available)
Lesson 2: Representing Ratios with DiagramsUnit 2Lesson 1: Pizza Maker [Free lesson]Lesson 2: Ratio Rounds (Print available)Lesson 3: Rice Ratios (Print available)
Topic 2: Equivalent Ratios
Lesson 3: RecipesUnit 2Lesson 1: Pizza Maker [Free lesson]Lesson 3: Rice Ratios (Print available)
Lesson 4: Color MixturesUnit 2Lesson 7: Mixing Paint, Part 1Lesson 12: Mixing paint, Part 2
Lesson 5: Defining Equivalent RatiosUnit 2Lesson 3: Rice Ratios (Print available)Lesson 4: Fruit Lab [Free lesson]Lesson 11: Community LifePractice Day 1 (Print available)
Topic 3: Representing Equivalent ratios
Lesson 6: Introducing Double Number Line DiagramsUnit 2Lesson 5: Balancing Act
Lesson 7: Creating Double Line DiagramsUnit 2Lesson 5: Balancing ActLesson 6: Product prices (Print available)
Lesson 8: How Much for One?Unit 2Lesson 6: Product prices (Print available)
Lesson 9: Constant SpeedUnit 2Lesson 8: World Records (Print available)
Lesson 10: Comparing Situations by Examining RatiosUnit 2Lesson 7: Mixing Paint, Part 1 
Topic 4: Solving Ratio and Rate Problems
Lesson 11: Representing Ratios with TablesUnit 2Lesson 9: Disaster Preparation [Free lesson]
Lesson 12: Navigating a Table of Equivalent Ratios
Lesson 13: Tables and Double Line Diagrams
Unit 2Lesson 6: Product prices (Print available)Lesson 7: Mixing Paint, Part 1
Lesson 14: Solving Equivalent Ratio ProblemsUnit 2Lesson 6: Product prices (Print available)Lesson 7: Mixing Paint, Part 1Lesson 10: BalloonsLesson 11: Community Life (Print available)
Topic 5: Part-Part-Whole Ratios
Lesson 15: Part-Part-Whole RatiosUnit 2Lesson 12: Mixing paint, Part 2Lesson 13: City Planning
Lesson 16: Solving More Ratio ProblemsUnit 2Lesson 13: City PlanningLesson 14: Lunch Waste (Print available)
Topic 6: Let’s Put It to Work 
Lesson 17: A Fermi ProblemUnit 2Lesson 13: City PlanningLesson 14: Lunch Waste (Print available)Practice Day 2 (Print available)

Unit 3: Rates and Percentages

Topic 1: Units of Measurement 
Lesson 1: The Burj KhalifaUnit 3
Lesson 4: Model Trains
Topic 2: Unit Conversion
Lesson 2: Anchoring Units of MeasurementUnit 3
Lesson 1: Many Measurements (Print available) [Free lesson]
Lesson 3: Measuring with Different-Sized Units
Lesson 4: Converting Units
Unit 3
Lesson 2: Counting Classrooms
Lesson 3: Pen Pals
Topic 3: Rates
Lesson 5: Comparing Speeds and PricesUnit 2
Lesson 8: World Records (Print available) 

Unit 3
Lesson 4: Model Trains
Lesson 5: Soft Serve [Free lesson]
Lesson 6: Welcome to the Robot Factory
Lesson 6: Interpreting Rates
Lesson 7: Equivalent Ratios Have the Same Unit Rates
Unit 3
Lesson 4: Model Trains
Lesson 5: Soft Serve [Free lesson]
Lesson 8: More About Constant SpeedUnit 2
Lesson 8: World Records (Print available) 

Unit 3
Lesson 4: Model Trains
Lesson 9: Solving Rate ProblemsUnit 3
Lesson 7: More Soft Serve
Topic 4: Percentages
Lesson 10: What Are percentagesUnit 3
Lesson 8: Lucky Duckies [Free lesson]
Lesson 9: Bicycle Goals
Lesson 11: Percentages and Double Number LinesUnit 3
Lesson 9: Bicycle Goals
Lesson 10: What’s Missing? (Print available)
Lesson 12: Percentages and Tape DiagramsUnit 3
Lesson 10: What’s Missing? (Print available)
Lesson 13: Benchmark percentagesUnit 3
Lesson 8: Lucky Duckies [Free lesson]
Lesson 14: Solving Percentage Problems
Lesson 15: Finding This Percent of That
Lesson 16: Finding the Percentage
Unit 3
Lesson 10: What’s Missing? (Print available)
Lesson 11: Cost Breakdown
Lesson 12: More Bicycle Goals
Lesson 13: A Country as a Village
Topic 5: Let’s Put It to Work 
Lesson 17: Painting a RoomUnit 3
Lesson 13: A Country as a Village
Lesson 7: Equivalent Ratios Have the Same Unit RatesUnit 3
Lesson 4: Model Trains
Lesson 5: Soft Serve [Free lesson]

Unit 4: Dividing Fractions

Topic 1: Making Sense of Division 
Lesson 1: Size of Divisor and Size of Quotient
Lesson 2: Meanings of Division
Unit 4Lesson 1: Cookie Cutter
Lesson 3: Interpreting Division SituationsUnit 4Lesson 2: Making Connections (Print available)
Topic 2: Meanings of Fraction Division
Lesson 4: How Many Groups (Part 1)Unit 4Lesson 3: Flour Planner [Free lesson]Lesson 4: Flower Planters 
Lesson 5: How Many Groups (Part 2)Unit 4Lesson 5: Garden Bricks (Print available)
Lesson 6: Using Diagrams to Find the Number of GroupsUnit 4Lesson 5: Garden Bricks (Print available)Lesson 6: Fill the Gap [Free lesson]
Lesson 7: What Fraction of a Group?
Lesson 8: How Much in Each Group? (Part 1)
Lesson 9: How Much in Each Group? (Part 2)
Unit 4Lesson 8: Potting Soil
Topic 3: Algorithm for Fraction Division
Lesson 10: Dividing by Unit and Non-Unit FractionsUnit 4Lesson 7: Break It DownLesson 8: Potting SoilLesson 9: Division Challenges 
Lesson 11: Using an Algorithm to Divide FractionsUnit 4Lesson 9: Division ChallengesPractice Day
Topic 4: Fractions in Lengths, Areas, and Volumes
Lesson 12: Fractional LengthsUnit 4Lesson 11: Classroom Comparisons
Lesson 13: Rectangles with Fractional Side LengthsUnit 4Lesson 12: Puzzling Areas (Print available) [Free lesson]
Lesson 14: Fractional Lengths in Triangles and Prisms
Lesson 15: Volume of PrismsUnit 4Lesson 13: Volume Challenges
Topic 5: Let’s Put It to Work
Lesson 16: Solving Problems with FractionsUnit 4Lesson 10: Swap Meet (Print available)
Lesson 17: Fitting Boxes into BoxesUnit 4Lesson 14: Planter Planner (Print available)

Unit 5: Arithmetic in Base Ten

Topic 1: Warming Up to Decimals 
Lesson 1: Using Decimals in a Shopping ContextUnit 5Lesson 1: Dishing Out Decimals (Print available) [Free lesson]
Topic 2: Adding and Subtracting Decimals
Lesson 2: Using Decimals to Represent Addition and SubtractionUnit 5Lesson 3: Fruit by the PoundLesson 4: Missing Digits
Lesson 3: Adding and Subtracting Decimals with Few Non-Zero DigitsUnit 5Lesson 4: Missing Digits
Lesson 4: Adding and Subtracting Decimals with Many Non-Zero Digits 
Topic 3: Multiplying Decimals
Lesson 5: Decimal Points in ProductsUnit 5Lesson 5: Decimal Multiplication
Lesson 6: Methods for Multiplying DecimalsUnit 5Lesson 5: Decimal MultiplicationLesson 6: Multiplying with AreasLesson 7: Multiplication methods (Print available)
Lesson 7: Using Diagrams to Represent MultiplicationUnit 5Lesson 5: Decimal MultiplicationLesson 6: Multiplying with Areas
Lesson 8: Calculating Products of DecimalsUnit 5Lesson 6: Multiplying with Areas
Topic 4: Dividing Decimals
Lesson 9: Using the Partial Quotients MethodUnit 5Lesson 8: Division Diagrams
Lesson 10: Using Long DivisionUnit 5Lesson 8: Division DiagramsLesson 9: Long Division Launch (Print available)Lesson 10: Return of the Long Division (Print available)
Lesson 11: Dividing Numbers That Result in Decimals
Lesson 12: Dividing Decimals by Whole Numbers
Lesson 13: Dividing Decimals by Decimals
Unit 5Lesson 9: Long Division Launch (Print available)Lesson 10: Return of the Long Division (Print available)
Topic 5: Let’s Put It to Work
Lesson 14: Using Operations on Decimals to Solve ProblemsUnit 5Lesson 11: Movie Time [Free lesson]
Lesson 15: Making and Measuring Boxes
Lesson 12: Dividing Decimals by Whole Numbers 
Lesson 13: Dividing Decimals by DecimalsUnit 5Lesson 9: Long Division Launch (Print available)Lesson 10: Return of the Long Division (Print available)

Unit 6: Expressions and Equations

Lesson 1: Tape Diagrams and Equations
Lesson 2: Truth and Equations
Unit 6Lesson 1: Weight for It [Free lesson]Lesson 2: Five Equations (Print available)
Lesson 3: Staying in BalanceUnit 6Lesson 1: Weight for It [Free lesson]Lesson 2: Five Equations (Print available)Lesson 3: Hanging Around
Lesson 4: Practice Solving Equations and Representing Situations with EquationsUnit 6Lesson 3: Hanging AroundLesson 4: Hanging It UpLesson 5: Swap and Solve (Print available)
Lesson 5: A New Way to Interpret a and bUnit 6Lesson 4: Hanging It UpLesson 5: Swap and Solve (Print available)
Topic 2: Equal and Equivalent
Lesson 6: Write Expressions Where Letters Stand for NumbersUnit 6Lesson 6: Vari-applesLesson 7: Border Tiles
Lesson 7: Revisit PercentagesUnit 3Lesson 10: What’s Missing?Lesson 11: Cost BreakdownLesson 12: More Bicycle Goals
Lesson 8: Equal and EquivalentUnit 6Lesson 1: Weight for It [Free lesson]Lesson 2: Five Equations (Print available)Lesson 3: Hanging AroundLesson 6: Vari-apples
Topic 9: The Distributive Property, Part 1Unit 6Lesson 8: Products and Sums [Free lesson]
Lesson 10: The Distributive Property, Part 2
Lesson 11: The Distributive Property, Part 3
Unit 6Lesson 8: Products and Sums [Free lesson]Lesson 9: Products, Sums, and Differences (Print available)
Topic 3: Expressions with Exponents
Lesson 12: Meaning of ExponentsUnit 6Lesson 10: PowersLesson 11: Exponent Expressions (Print available)
Lesson 13: Expressions with Exponents
Lesson 14: Evaluating Expressions with Exponents
Lesson 15: Equivalent Exponential Expressions
Unit 6Lesson 11: Exponent Expressions (Print available)Lesson 12: Squares and Cubes
Topic 4: Relationships Between Quantities 
Lesson 16: Two Related Quantities, Part 1
Lesson 17: Two Related Quantities, Part 2
Lesson 18: More Relationships
Unit 6Lesson 13: Turtles All the WayLesson 14: Representing RelationshipsLesson 15: Connecting Representations (Print available)
Topic 5: Let’s Put It to Work
Lesson 19: Tables, Equations, and Graphs, Oh My!Unit 6Lesson 16: Subway fares (Print available) [Free lesson]

Unit 7: Rational Numbers

Topic 1: Positive and Negative Numbers
Lesson 1: Positive and Negative NumbersUnit 7Lesson 1: Can You Dig In [Free lesson]Lesson 2: Digging Deeper
Lesson 2: Points on the Number LineUnit 7Lesson 2: Digging Deeper
Lesson 3: Comparing Positive and Negative Numbers
Lesson 4: Ordering Rational Numbers
Unit 7Lesson 3: Order in the Class (Print available) [Free lesson]
Lesson 5: Using Negative Numbers to make Sense of ContextsUnit 7 Lesson 4: Sub-Zero
Lesson 6: Absolute Value of Numbers
Lesson 7: Comparing Numbers and Distance from Zero
Unit 7Lesson 5: Distance on the Number Line
Topic 2: Inequalities
Lesson 8: Writing and Graphing InequalitiesUnit 7Lesson 13: Popcorn Possibilities
Lesson 9: Solutions of Inequalities
Lesson 10: Interpreting Inequalities
Unit 7Lesson 6: Tunnel Travel [Free lesson]Lesson 7: Comparing WeightsLesson 8: Shira´s Solutions
Topic 3: The Coordinate Plane
Lesson 11: Points on the Coordinate Plane
Lesson 12: Constructing the Coordinate Plane
Unit 7Lesson 9: Sand Dollar SearchLesson 10: The A-maze-ing Coordinate Plane
Lesson 13: Interpreting Points on a Coordinate PlaneUnit 7Lesson 9: Sand Dollar SearchLesson 10: The A-maze-ing Coordinate PlaneLesson 11: Polygon Maker
Lesson 14: Distances on a Coordinate PlaneUnit 7Lesson 11: Polygon MakerLesson 12: Graph Telephone (Print available)
Lesson 15: Shapes on the Coordinate PlaneUnit 1Lesson 1: Shapes on a Plane [Free lesson]Lesson 2: LettersLesson 5: Exploring Triangles (Print available)Lesson 6: Triangles and ParallelogramsUnit 7Lesson 3: Exploring Parallelograms (Print available)Lesson 11: Polygon MakerLesson 12: Graph Telephone (Print available)
Topic 4: Common Factors and Common Multiples
Lesson 16: Common FactorsUnit 5Lesson 15: Common factors
Lesson 17: Common MultiplesUnit 5Lesson 14: Common Multiples
Lesson 18: Using Common Multiples and Common FactorsUnit 5Lesson 14: Common MultiplesLesson 15: Common factorsPractice Day 2 (Print available)
Topic 5: Let’s Put It to Work
Lesson 19: Drawing on the Coordinate PlaneUnit 7Lesson 11: Polygon MakerLesson 12: Graph Telephone (Print available)

Unit 8: Data Sets and Distributions

Topic 1: Data, Variability, and Statistical Questions
Lesson 1: Got Data?
Lesson 2: Statistical Questions
Unit 8Lesson 1: Screen TimeLesson 2: Dot Plots
Topic 2: Dot Plots and Distributions
Lesson 3: Representing Data Graphically
Lesson 4: Dot Plots
Lesson 5: Using Dot Plots to Answer Statistical Questions
Unit 8Lesson 2: Dot PlotsLesson 3: Minimum Wage (Print available) [Free lesson]Lesson 4: Lots More Dots
Lesson 6: Interpreting Histograms
Lesson 7: Using Histograms to Answer Statistical Questions
Lesson 8: Describing Distributions on Histograms
Unit 8Lesson 5: The Plot Thickens [Free lesson]Lesson 6: DIY Histograms (Print available)
Topic 3: Measures of Center and Variability
Lesson 9: Mean
Lesson 10: Finding and Interpreting the Mean as a Balance Point
Unit 8Lesson 7: Snack Time
Lesson 11: Variability and MADUnit 8Lesson 8: Pop It!
Lesson 12: Using Mean and MAD to Make ComparisonsUnit 8Lesson 9: Hoops
Topic 4: Median and IQR
Lesson 13: MedianUnit 8Lesson 11: Toy Cars [Free lesson]Lesson 12: In the News
Lesson 14: Comparing Mean and MedianUnit 8Lesson 12: In the News
Lesson 15: Quartiles and Interquartile RangeUnit 8Lesson 13: Pumpkin Patch
Lesson 16: Box PlotsUnit 8Lesson 14: Car, Plane, Bus, or Train? (Print available)
Lesson 17: Using Box PlotsUnit 8Lesson 14: Car, Plane, Bus, or Train? (Print available)Lesson 15: Hollywood Part 2Lesson 16: Hollywood Part 3 (Print available)Practice Day 2 (Print available)
Topic 5: Let’s Put It to Work
Lesson 18: Using Data to Solve ProblemsUnit 8Lesson 16: Hollywood Part 3 (Print available)

Unit 9: Putting It All Together

Topic 1: Making Connections
Lesson 1: Fermi Problems
Lesson 2: In Our Class Were the World
Unit 3Lesson 13: A Country as a Village
Lesson 3: Rectangle MadnessUnit 5Lesson 14: Common MultiplesLesson 15: Common factors
Topic 2: Voting
Lesson 4: How Do We Choose?Unit 2Lesson 13: City PlanningLesson 14: Lunch Waste (Print available)
Lesson 5: More than Two ChoicesUnit 3Lesson 13: A Country as a Village
Lesson 6: Picking RepresentativesUnit 8Lesson 16: Hollywood Part 3 (Print available)

Grade 7

Unit 1: Scale Drawings

Illustrative MathematicsDesmos Math 6–A1
Topic 1: Scaled Copies 
Lesson 1: What are Scaled Copies?Unit 1Lesson 1: Scaling Machines [Free lesson]
Lesson 2: Corresponding Parts and Scale FactorsUnit 1Lesson 2: Scaling Robots Unit 3Lesson 1: Toothpicks
Lesson 3: Making Scaled Copies
Lesson 4: Scaled Relationship
Unit 1Lesson 3: Make It Scale Unit 4Lesson 3: Sticker Sizes
Lesson 5: The Size and the Scale FactorUnit 1Lesson 4: Scale Factor Challenges
Lesson 6: Scaling and AreaUnit 1Lesson 5: TilesPractice Day 1 (Print available)
Topic 2: Scale Drawings 
Lesson 7: Scale DrawingsUnit 1Lesson 6: Introducing ScaleLesson 7: Will It Fit? (Print available) [Free lesson]
Lesson 8: Scale Drawings and Maps 
Lesson 9: Creating Scale Drawings
Lesson 10: Changing Scales in Scale Drawings
Unit 1Lesson 8: Scaling StatesLesson 9: Scaling BuildingsLesson 10: Room Redesign (Print available)
Lesson 11: Scales without Units 
Lesson 12: Units in Scale DrawingsUnit 1Lesson 8: Scaling StatesLesson 9: Scaling BuildingsLesson 10: Room Redesign (Print available)Practice Day 2 (Print available)
Topic 3: Let’s Put It to Work
Lesson 13: Draw It to ScaleUnit 1Lesson 10: Room Redesign (Print available)

Unit 2: Introducing Proportional Relationships

Topic 1: Representing Proportional Relationships with Tables
Lesson 1: One of These Things Is Not Like the OthersUnit 2Lesson 1: Paint [Free lesson] 
Lesson 2: Introducing Proportional Relationships with TablesUnit 2Lesson 2: Balloon FloatLesson 3: Sugary Drinks (Print available)Lesson 4: Robot Factory
Lesson 3: More About Constant of ProportionalityUnit 2Lesson 3: Sugary Drinks (Print available)Unit 4Lesson 3: Sticker Sizes
Topic 2: Representing Proportional Relationships with Equations 
Lesson 4: Proportional Relationships with EquationsUnit 2Lesson 4: Robot FactoryLesson 5: SnapshotsLesson 6: Two and Two (Print available) [Free lesson]Lesson 7: All Kinds of Equations
Lesson 5: Two Equations for Each Relationship
Lesson 6: Using Equations to Solve Problems
Unit 2Lesson 6: Two and Two (Print available) [Free lesson]Lesson 7: All Kinds of EquationsPractice Day
Topic 3: Comparing Proportional and Nonproportional Relationships 
Lesson 7: Comparing Relationships with TablesUnit 2Lesson 2: Balloon FloatLesson 3: Sugary Drinks (Print available)Lesson 4: Robot Factory
Lesson 8: Comparing Relationships with EquationsUnit 2Lesson 4: Robot FactoryLesson 5: SnapshotsLesson 6: Two and Two (Print available) [Free lesson]Lesson 7: All Kinds of EquationsLesson 11: Four RepresentationsLesson 12: Water Efficiency
Lesson 9: Solving Problems About Proportional RelationshipsUnit 2Lesson 12: Water Efficiency
Topic 4: Representing Proportional Relationships with Graphs
Lesson 10: Introducing Graphs of Proportional Relationships
Lesson 11: Interpreting Graphs of Proportional Relationships
Lesson 12: Using Graphs to Compare Relationships
Lesson 13: Two Graphs for Each Relationship
Unit 2Lesson 8: Dino Pops [Free lesson]Lesson 9: Gallon ChallengeLesson 10: Three TurtlesLesson 11: Four RepresentationsLesson 12: Water Efficiency
Topic 5: Let’s Put It to Work
Lesson 14: For RepresentationsUnit 2Lesson 11: Four Representations (Print available)
Lesson 15: Using Water EfficiencyUnit 2Lesson 12: Water Efficiency

Unit 3: Measuring Circles

Topic 1: Circumference of a Circle 
Lesson 1: How Well Can You Measure?Unit 3Lesson 1: Toothpicks
Lesson 2: Exploring Circles
Lesson 3: Exploring Circumference
Lesson 4: Applying Circumference
Unit 3Lesson 2: Is It a Circle?Lesson 3: Measuring Around [Free lesson]
Lesson 5: Circumference and Wheels 
Topic 2: Area of a Circle
Lesson 6: Estimating AreasUnit 3Lesson 5: Area Strategies
Lesson 7: Exploring the Area of a Circle
Lesson 8: Relating Area to Circumference
Unit 3Lesson 5: Area StrategiesLesson 6: Radius Squares (Print available)Lesson 7: Why Pi?Lesson 8: Area Challenges [Free lesson]Lesson 9: Circle vs. SquarePractice Day 2 (Print available)
Lesson 9: Applying Area of CirclesUnit 3Lesson 6: Radius Squares (Print available)
Topic 3: Let’s Put It to Work
Lesson 10: Distinguishing Circumference and AreaUnit 3Lesson 7: Why Pi?
Lesson 11: Stained-Glass WindowsUnit 3Lesson 5: Area StrategiesLesson 6: Radius Squares (Print available)

Unit 4: Proportional Relationships and Percentages

Topic 1: Proportional Relationships with Fractions 
Lesson 1: Lots of Flags
Lesson 2: Ratios and Rates with Fractions
Lesson 3: Revisiting Proportional Relationships
Lesson 4: Half as Much Again
Unit 4Lesson 1: Mosaics [Free lesson]Lesson 2: Peach Cobbler (Print available)Lesson 3: Sticker Sizes
Lesson 5: Say It with Decimals 
Topic 2: Percent Increase and Decrease 
Lesson 6: Increasing and DecreasingUnit 4Lesson 4: More and LessLesson 5: All the EquationsLesson 6: 100% (Print available)Lesson 7: Percent machines [Free lesson]Lesson 8: Tax and TipLesson 9: Minimum Wage (Print available)Lesson 10: Cost of College (Print available)Lesson 11: Bookcase BuilderLesson 12: Posing Percent Problems [Free lesson]
Lesson 7: One Hundred percentUnit 4Lesson 6: 100% (Print available)
Lesson 8: Percent Increase and Decrease with EquationsUnit 4Lesson 5: All the Equations
Lesson 9: More and Less than 1% 
Topic 3: Applying Percentages
Lesson 10: Tax and Tip
Lesson 11: Percentage Contexts
Unit 4Lesson 8: Tax and TipLesson 9: Minimum Wage (Print available)Lesson 10: Cost of College (Print available)Lesson 11: Bookcase BuilderLesson 12: Posing Percent Problems [Free lesson]
Lesson 12: Finding the PercentagesUnit 4Lesson 4: More and Less
Lesson 13: Measurement Error
Lesson 14: Percent Error
Lesson 15: Error Intervals
Unit 4Lesson 11: Bookcase Builder
Topic 4: Let’s Put It to Work 
Lesson 16: Posing Percent ProblemsUnit 4Lesson 8: Tax and TipLesson 9: Minimum Wage (Print available)Lesson 10: Cost of College (Print available)Lesson 11: Bookcase BuilderLesson 12: Posing Percent Problems [Free lesson]Practice Day

Unit 5: Rational Number Arithmetic

Topic 1: Interpreting Negative Numbers 
Lesson 1: Interpreting Negative NumbersUnit 5Lesson 1: Floats and Anchors [Free lesson]
Topic 2: Adding and Subtracting Rational Numbers
Lesson 2: Changing Temperatures
Lesson 3: Changing Elevation
Unit 5Lesson 2: More Floats and AnchorsLesson 3: BumpersLesson 4: Draw Your Own (Print available) [Free lesson]
Lesson 4: Money and Debts 
Lesson 5: Representing SubtractionUnit 5Lesson 5: Number Puzzles
Lesson 6: Subtracting Rational Numbers
Lesson 7: Adding and Subtracting to Solve Problems
Unit 5Lesson 3: BumpersLesson 4: Draw Your Own (Print available) [Free lesson]Lesson 5: Number PuzzlesLesson 10: Integer Puzzles [Free lesson]Lesson 11: Changing TemperaturesLesson 13: Solar Panels and More (Print available)Practice Day 1 (Print available)
Topic 3: Multiplying and Dividing Rational Numbers
Lesson 8: Position, Speed, and Direction
Lesson 9: Multiplying Rational Numbers
Lesson 10: Multiply!
Unit 5Lesson 7: Back in Time
Lesson 11: Dividing Rational NumbersUnit 5Lesson 8: Speeding Turtles
Lesson 12: Negative Rates 
Topic 4: Four Operations with Rational Numbers 
Lesson 13: Expressions with Rational NumbersUnit 5Lesson 9: Expressions (Print available)
Lesson 14: Solving Problems with Rational NumbersLesson 11: Changing Temperatures
Lesson 12: Arctic Ice Sea (Print available)
Lesson 13: Solar Panels and More (Print available)
Topic 5: Solving Equations When There Are Negative Numbers 
Lesson 15: Making and Measuring Boxes 
Lesson 16: Representing Contexts with Equations 
Topic 6: Let’s Put It to Work 
Lesson 17: The Stock market

Unit 6: Expressions, Equations, and Inequalities

Topic 1: Representing Situations of the Form px + q and p(+ q) = r
Lesson 1: Relationships Between Quantities
Unit 2 Lesson 1: Paint [Free lesson] Lesson 2: Balloon Float
Unit 4 Lesson 1: Mosaics [Free lesson] Lesson 2: Peach Cobbler (Print available)
Unit 6 Lesson 1: Toothpicks and Tiles
Lesson 2: Reasoning about Contexts with Tape Diagrams
Lesson 3: Reasoning about Equations with Tape Diagrams
Lesson 4: Reasoning about Equations and Tape Diagrams (Part 1)
Lesson 5: Reasoning about Equations and Tape Diagrams (Part 2)
Unit 6Lesson 2: Smudged ReceiptsLesson 3: EquationsLesson 4: Seeing Structure (Print available)
Lesson 6: Distinguishing between Two Types of SituationsUnit 6Lesson 6: Balancing EquationsLesson 7: Keeping It True (Print available)
Topic 2: Solving Equations of the Form px + q and p(+ q) = and Problems That lead to Those Equations 
Lesson 7: Reasoning about Solving Equations (Part 1)Unit 6Lesson 5: Balancing MovesLesson 6: Balancing EquationsLesson 7: Keeping It True (Print available) 
Lesson 8: Reasoning about Solving Equations (Part 2)Unit 6Lesson 5: Balancing MovesLesson 6: Balancing EquationsLesson 7: Keeping It True (Print available)Lesson 9: Always-Equal Machines
Topic 9 Dealing with Negative Numbers 
Lesson 10: Different Options for Solving One EquationUnit 6Lesson 7: Keeping It True (Print available)Lesson 9: Always-Equal MachinesLesson 10: Collect the Squares [Free lesson]Lesson 11: Equation Roundtable (Print available)
Lesson 11: Using Equations to Solve ProblemsUnit 6Lesson 12: Community Day (Print available)
Lesson 12: Solving Problems about Percent Increase or DecreaseUnit 4Lesson 10: Cost of College (Print available)
Topic 3: Inequalities 
Lesson 13: Reintroducing InequalitiesUnit 6Lesson 13: I Saw the SignsLesson 15: BudgetingLesson 16: Shira the Sheep [Free lesson]
Lesson 14: Finding Solutions to Inequalities in Context
Lesson 15: Efficiency Solving Inequalities
Unit 6Lesson 14: Unbalanced HangersLesson 15 Budgeting (Print available)Lesson 16: Shira the Sheep [Free lesson]Lesson 17: Write Them and Solve Them (Print available)
Lesson 16: Interpreting Inequalities
Lesson 17: Modeling with Inequalities
Unit 6Lesson 16: Shira the Sheep [Free lesson]Lesson 17: Write Them and Solve Them (Print available)Practice Day 2 (Print available)
Topic 4: Writing Equivalent Expressions 
Lesson 18: Subtraction in Equivalent ExpressionsUnit 6Lesson 9: Always-Equal MachinesLesson 10: Collect the Squares [Free lesson]Lesson 11: Equation Roundtable (Print available) 
Lesson 19: Expanding and FactoringUnit 6Lesson 8: Factoring and Expanding (Print available)Lesson 11: Equation Roundtable (Print available)
Lesson 20: Combining Like Terms (Part 1)
Lesson 21: Combining Like Terms (Part 2)
Lesson 22: Combining Like Terms (Part 3)
Unit 6Lesson 2: Smudged ReceiptsLesson 6: Balancing EquationsLesson 8: Factoring and Expanding (Print available)Lesson 9: Always-Equal MachinesLesson 10: Collect the Squares [Free lesson]Lesson 11: Equation Roundtable (Print available)Practice Day 1 (Print available)
Topic 5: Let’s Put It to Work
Lesson 23: Applications of ExpressionsUnit 6Lesson 12: Community Day (Print available)

Unit 7: Angles, Triangles, and Prisms

Topic 1: Angle Relationships
Lesson 1:Relationships of Angles
Unit 7 Lesson 1: Pinwheels Lesson 2: Friendly Angles [Free lesson] Lesson 3: Angle Diagrams
Lesson 2: Adjacent Angles
Lesson 3: Nonadjacent Angles
Unit 7Lesson 2: Friendly Angles [Free lesson]Lesson 3: Angle Diagrams
Lesson 4: Solving for Unknown AnglesUnit 7Lesson 2: Friendly Angles [Free lesson]Lesson 3: Angle DiagramsLesson 4: Missing Measures (Print available)
Lesson 5: Using Equations to Solve for Unknown AnglesUnit 7Lesson 3: Angle DiagramsLesson 4: Missing Measures (Print available) [Free lesson]
Topic 2: Drawing Polygons with Given Conditions 
Lesson 6: Building Polygons (Part 1)
Lesson 7: Building Polygons (Part 2)
Unit 7Lesson 6: Is It Enough?
Lesson 8: Triangles with 3 Common MeasuresUnit 7Lesson 13: Popcorn Possibilities
Lesson 9: Drawing Triangles (Part 1)
Lesson 10: Drawing Triangles (Part 2)
Unit 7Lesson 5: Can You Build It? [Free lesson]Lesson 6: Is It Enough?Lesson 7: More Than OneLesson 8: Can You Draw It? (Print available)Practice Day 1 (Print available)
Topic 3: Solid Geometry
Lesson 11: Slicing SolidsUnit 7Lesson 9: Slicing Solids
Lesson 12: Volume of Right PrismsUnit 7Lesson 10: Simple Prisms
Lesson 13: Decomposing Bases for AreasUnit 7Lesson 11: More Complicated Prisms
Lesson 14: Surface Area of Right PrismsUnit 7Lesson 10: Simple PrismsLesson 11: More Complicated PrismsLesson 12: Surface Area Strategies (Print available)
Lesson 15: Distinguishing Volume and Surface Area
Lesson 16: Applying Volume and Surface AreaUnit 7Lesson 13: Popcorn Possibilities
Topic 4: Let’s Put It to Work
Lesson 17: Building Prisms

Unit 8: Probability and Sampling

Topic 1: Probabilities of Single Step Events
Lesson 1: Mystery Bags
Lesson 2: Chance Experiments
Lesson 3: What Are Probabilities?
Unit 8 Lesson 1: How Likely? (Print available) [Free lesson] Lesson 2: Prob-bear-bilities [Free lesson] Lesson 3: Mystery Bag
Lesson 4: Estimating Probabilities Through Repeated ExperimentsUnit 8Lesson 4: Spin ClassLesson 5: Is It Fair?Lesson 6: Fair Games
Lesson 5: More Estimating ProbabilitiesUnit 8Lesson 6: Fair GamesLesson 7: Weather or NotLesson 9: Car, Bike, or Train? (Print available)
Lesson 6: Estimating Probabilities Using SimulationUnit 8Lesson 6: Fair GamesLesson 7: Weather or NotLesson 8: Simulate ItLesson 9: Car, Bike, or Train? (Print available)
Topic 2: Probabilities of Multi-step Events
Lesson 7: Simulating Multi-step EventsUnit 8Lesson 7: Weather or NotLesson 8: Simulate ItLesson 9: Car, Bike, or Train? (Print available)
Lesson 8: Keeping Track of All Possible OutcomesUnit 8Lesson 4: Spin ClassLesson 5: Is It Fair?Lesson 6: Fair Games
Topic 9: Multi-step experiments
Lesson 10: Designing SimulationsUnit 8Lesson 7: Weather or NotLesson 8: Simulate ItLesson 9: Car, Bike, or Train? (Print available)
Topic 3: Sampling
Lesson 11: Comparing Groups
Lesson 12: Larger Populations
Lesson 13: What Makes a Good Sample?
Lesson 14: Sampling in a Fair Way
Unit 8Lesson 10: Crab Island [Free lesson]Lesson 11: Headlines
Topic 4: Using Samples
Lesson 15: Estimating Population Measures of Center
Lesson 16: Estimating Population Proportions
Unit 8 Lesson 9: Car, Bike, or Train? (Print available)Lesson 10: Crab Island [Free lesson]Lesson 11: HeadlinesLesson 12: Flower Power
Lesson 17: More about Sampling Variability
Lesson 18: Comparing Populations Using Samples
Lesson 19: Comparing Populations with Friends
Unit 8Lesson 9: Car, Bike, or Train? (Print available)Lesson 10: Crab Island [Free lesson]Lesson 13: Plots and SamplesLesson 14: School Newspaper (Print available)Lesson 15: Asthma Rates (Print available)
Topic 5: Let’s Put It to Work
Lesson 20: Memory TestUnit 8Lesson 14: School Newspaper (Print available)Lesson 15: Asthma Rates (Print available)

Grade 8

Unit 1: Rigid Transformations and Congruence

Illustrative MathematicsDesmos Math 6–A1
Topic 1: Rigid Transformations 
Lesson 1: Moving in the PlaneUnit 1Lesson 1: Transformers [Free lesson]
Lesson 2: Naming the MovesUnit 1Lesson 2: Spinning, Flipping, Sliding [Free lesson]
Lesson 3: Grid MovesUnit 1Lesson 3: Transformation GolfLesson 4: Moving Day (Print available) [Free lesson]Lesson 5: Getting CoordinatedUnit 3Lesson 6: Translations
Lesson 4: Making the MovesUnit 1Lesson 1: Transformers [Free lesson]Lesson 2: Spinning, Flipping, Sliding [Free lesson]Lesson 4: Moving Day (Print available) [Free lesson]Lesson 5: Getting Coordinated
Lesson 5: Coordinate MovesUnit 1Lesson 4: Moving Day (Print available) [Free lesson]Lesson 5: Getting Coordinated
Lesson 6: Describing TransformationsUnit 1Lesson 5: Getting CoordinatedLesson 6: Connecting the Dots [Free lesson]
Topic 2: Properties of Rigid Transformations 
Lesson 7: No Bending or StretchingUnit 1Lesson 7: No Bending, No Stretching
Lesson 8: Rotation PatternsUnit 1Lesson 1: Transformers [Free lesson]Lesson 2: Spinning, Flipping, Sliding [Free lesson]Lesson 4: Moving Day (Print available) [Free lesson]Lesson 5: Getting Coordinated
Lesson 9: Moves in Parallel
Lesson 10: Composing Figures
Unit 1 Lesson 10: Transforming Angles
Topic 3: Congruence 
Lesson 11: What is the Same?
Lesson 12: Congruent Polygons
Lesson 13: Congruence
Unit 1 Lesson 7: Are They the Same?Lesson 9: Are They Congruent?Practice Day (Print available)
Topic 4: Angles in a Triangle
Lesson 14: Alternate Interior Angles
Lesson 15: Adding the Angles in a Triangle
Unit 1 Lesson 11: Tearing It Up (Print available)
Lesson 16: Parallel Lines and the Angles in a TriangleUnit 1 Lesson 10: Transforming Angles
Topic 5: Let’s Put It to Work
Lesson 17: Rotate and TessellateLesson 13: Tessellate [Free lesson]

Unit 2: Dilations, Similarity, and Introducing Slope

Topic 1: Dilations
Lesson 1: Projecting and ScalingUnit 2Lesson 1: Sketchy Dilations [Free lesson]Lesson 2: Dilation Mini Golf (Print available) [Free lesson]
Lesson 2: Circular Grid
Lesson 3: Dilations with No Grid
Lesson 4: Dilations on a Square Grid
Lesson 5: More Dilations
Unit 2Lesson 1: Sketchy Dilations [Free lesson]Lesson 2: Dilation Mini Golf (Print available) [Free lesson]Lesson 3: Match My DilationLesson 4: Dilations on a Plane
Topic 2: Similarity 
Lesson 6: SimilarityUnit 2Lesson 5: Transformations Golf with DilationsLesson 6: Social Scavenger Hunt (Print available) [Free lesson]
Lesson 7: Similar Polygons 
Lesson 8: Similar Triangles
Lesson 9: Side Length Quotients in Similar Triangles
Unit 2Lesson 7: Are Angles Enough?Lesson 8: Shadows
Topic 3: Slope
Lesson 10: Meet SlopeUnit 2Lesson 9: Water SlideLesson 10: Points on a PlanePractice Day (Print available)Unit 3Lesson 3: PostersLesson 4: Stacking CupsLesson 5: Flags [Free lesson]Lesson 6: Translations Unit 4Lesson 8: When Are They the Same?
Lesson 11: Writing Equations of LinesUnit 3Lesson 3: PostersLesson 6: TranslationsLesson 10: SolutionsLesson 11: Pennies and Quarters Unit 4Lesson 3: Balanced MovesLesson 4: More Balanced Moves (Print available)
Lesson 12: Using Equations of LinesUnit 3Lesson 9: Coin Capture
Topic 4: Let’s Put It to Work
Lesson 13: The Shadow KnowsUnit 2Lesson 8: Shadows

Unit 3: Linear Relationships

Topic 1: Proportional Relationships 
Lesson 1: Understanding Proportional RelationshipsUnit 3Lesson 1: Turtle Time Trials [Free lesson]
Lesson 2: Graphs of Proportional RelationshipsUnit 3Lesson 1: Turtle Time Trials [Free lesson]Lesson 2: Water Tank Unit 5Lesson 4: Window Frames
Lesson 3: Representing Proportional RelationshipsUnit 3Lesson 1: Turtle Time Trials [Free lesson] Unit 5Lesson 4: Window FramesLesson 6: Graphing StoriesLesson 7: Feel the Burn (Print available) [Free lesson]Lesson 8: Charge! (Print available)
Lesson 4: Comparing Proportional RelationshipsUnit 3Lesson 3: Posters
Topic 2: Representing Linear Relationships
Lesson 5: Introduction to Linear RelationshipsUnit 3Lesson 1: Turtle Time Trials [Free lesson]Lesson 4: Stacking CupsUnit 5Lesson 6: Graphing StoriesLesson 7: Feel the Burn (Print available) [Free lesson]Lesson 8: Charge! (Print available)
Lesson 6: More Linear RelationshipsUnit 5Lesson 6: Graphing StoriesLesson 7: Feel the Burn (Print available) [Free lesson]Lesson 8: Charge! (Print available)
Lesson 7: Representations of Linear RelationshipsUnit 3Lesson 5: Flags [Free lesson]Lesson 6: Graphing StoriesLesson 7: Feel the Burn (Print available) [Free lesson]Lesson 8: Charge! (Print available)
Lesson 8: Translating mx + bUnit 3Lesson 3: PostersLesson 6: Translations
Topic 3: Finding Slopes 
Lesson 9: Slopes Don’t Have to be PositiveUnit 3Lesson 5: Flags [Free lesson]Lesson 6: TranslationsLesson 7: Water CoolerLesson 8: Landing Planes
Lesson 10: Calculating SlopeUnit 3Lesson 7: Water CoolerLesson 8: Landing Planes
Lesson 11: Equations of All Kinds of LinesUnit 3Lesson 3: PostersLesson 4: Stacking CupsLesson 5: Flags [Free lesson]Lesson 6: Translations
Topic 4: Linear Equations 
Lesson 12: Solutions to Linear EquationsUnit 3Lesson 3: PostersLesson 6: TranslationsLesson 10: Solutions Unit 4Lesson 3: Balanced MovesLesson 4: More Balanced Moves (Print available)
Lesson 13: More Solutions to Linear EquationsUnit 3 Lesson 4: Stacking CupsLesson 5: Flags [Free lesson]Lesson 6: TranslationsLesson 7: Water CoolerLesson 10: Solutions
Topic 5: Let’s Put It to Work 
Lesson 14: Using Linear Relations to Solve ProblemsUnit 3 Lesson 11: Pennies and Quarters

Unit 4: Linear Equations and Linear Systems

Topic 1: Puzzle Problems 
Lesson 1: Number PuzzlesUnit 4Lesson 1: Number machines
Topic 2: Linear Equation in One Variable 
Lesson 2: Keeping the Equation BalancedUnit 4Lesson 2: Keep It Balanced
Lesson 3: Balanced MovesUnit 4Lesson 3: Balanced Moves
Lesson 4: More Balanced MovesUnit 4Lesson 4: More Balanced Moves (Print available)
Lesson 5: Solving Any Linear EquationUnit 4Lesson 4: More Balanced Moves (Print available)Lesson 5: Equation Roundtable (Print available) [Free lesson]Lesson 6: Strategic Solving (Print available)
Lesson 6: Strategic SolvingUnit 4Lesson 5: Equation Roundtable (Print available) [Free lesson]Lesson 6: Strategic Solving (Print available)
Lesson 7: All, Some, or No Solutions
Lesson 8: How many Solutions?
Unit 4Lesson 7: All, Some, or None?
Lesson 9: When Are They the SameUnit 4Lesson 8: When Are They the Same?
Topic 3: Systems of Linear Equations
Lesson 10: On or Off the Line?Unit 4Lesson 7: All, Some, or None?Lesson 8: When Are They the Same?Lesson 13: All, Some, or None? Part 2
Lesson 11: On Both of the Lines
Lesson 12: Systems of Equations
Lesson 13: Solving Systems of Equations
Unit 4 Lesson 9: On or Off the Line?Lesson 10: On Both LinesLesson 11: Make Them Balance [Free lesson]Lesson 12: Line Zapper [Free lesson]Lesson 13: All, Some, or None? Part 2Practice Day 2 (Print available)
Lesson 14: Solving More Systems 
Lesson 15: Writing Systems of EquationsUnit 4 Lesson 14: Strategic Solving, Part 2 (Print available)
Topic 4: Let’s Put It to Work 
Lesson 16: Posing Problems with Systems of EquationsUnit 4 Lesson 14: Strategic Solving, Part 2 (Print available)

Unit 5: Functions and Volume

Topic 1: Inputs and Outputs 
Lesson 1: Inputs and OutputsUnit 5Lesson 1: Turtle Crossing [Free lesson]Lesson 2: Guess My Rule [Free lesson]
Lesson 2: Introduction to FunctionsUnit 5Lesson 1: Turtle Crossing [Free lesson]Lesson 2: Guess My Rule [Free lesson]Lesson 3: Function or Not?
Topic 2: Representing and Interpreting Functions 
Lesson 3: Equations of FunctionsUnit 3Lesson 1: Turtle Time Trials [Free lesson] Unit 5Lesson 3: Function or Not?Lesson 4: Window Frames
Lesson 4: Tables, Equations, and Graphs of Functions
Lesson 5: More Graphs of Functions
Unit 5Lesson 4: Window FramesLesson 5: The Tortoise and the Hare [Free lesson]Lesson 6: Graphing StoriesLesson 7: Feel the Burn (Print available) [Free lesson]Lesson 8: Charge! (Print available)
Lesson 6: Even More Graphs of Functions 
Lesson 7: Connecting Representations of FunctionsUnit 5Lesson 7: Feel the Burn (Print available) [Free lesson]Lesson 8: (Print available)Charge!
Topic 3: Linear Functions and Rates of Change
Lesson 8: Linear FunctionsUnit 2Lesson 9: Water SlideLesson 10: Points on a PlaneUnit 3Lesson 4: Stacking CupsLesson 5: Flags [Free lesson]Lesson 6: Translations
Lesson 9: Linear ModelsUnit 5Lesson 3: PostersLesson 5: The Tortoise and the Hare [Free lesson]Lesson 6: Graphing StoriesLesson 7: Feel the Burn (Print available) [Free lesson]
Lesson 10: Piecewise Linear FunctionsUnit 5Lesson 9: Piecing It Together
Topic 4: Cylinder and Cones 
Lesson 11: Filling Containers 
Lesson 12: How Much Will Fit? 
Lesson 13: The Volume of a CylinderUnit 5Lesson 10: Volume LabLesson 11: Cylinders [Free lesson]Lesson 12: Scaling Cylinders
Lesson 14: Finding Cylinder DimensionsUnit 5Lesson 10: Volume LabLesson 11: Cylinders [Free lesson]Lesson 12: Scaling CylindersLesson 14: Missing Dimensions (Print available)
Lesson 15: The Volume of a ConeUnit 5Lesson 10: Volume LabLesson 13: Cones [Free lesson]Lesson 14: Missing Dimensions (Print available)
Lesson 16: Finding Cone DimensionsUnit 5Lesson 12: Scaling CylindersLesson 13: Cones [Free lesson]Lesson 14: Missing Dimensions (Print available)
Topic 5: Dimensions and Spheres 
Lesson 17: Scaling One DimensionUnit 5Lesson 12: Scaling Cylinders
Lesson 18: Scaling Two Dimensions 
Lesson 19: Estimating a Hemisphere 
Lesson 20: The Volume of a Sphere
Lesson 21: Cylinders, Cones, and Spheres
Unit 5Lesson 15: SpheresPractice Day 2 (Print available)
Topic 6: Let’s Put It to Work 
Lesson 22: Volume As a Function of …Unit 5Lesson 15: Spheres

Unit 6: Associations in Data

Topic 1: Does This Predict That? 
Lesson 1: Organizing DataUnit 6 Lesson 1: Click Battle
Lesson 2: Plotting DataUnit 6 Lesson 2: Wing Span
Topic 2: Associations in Numerical Data 
Lesson 3: What a Point in a Scatter Plot MeansUnit 6 Lesson 1: Click BattleLesson 2: Wing SpanLesson 3: Robots [Free lesson]Lesson 7: Scatter Plot City
Lesson 4: Fitting a LineUnit 6 Lesson 4: Dapper Cats [Free lesson]Lesson 5: Fit Fights [Free lesson]Lesson 6: Interpreting SlopesLesson 8: Animal BrainsPractice Day 1 (Print available) [Free lesson]Practice Day 2 (Print available)
Lesson 5: Describing Trends in Scatter PlotsUnit 6 Lesson 1: Click BattleLesson 2: Wing SpanLesson 3: Robots [Free lesson]Lesson 7: Scatter Plot City(Print available)Practice Day 1 [Free lesson]
Lesson 6: The Slope of a Fitted LineUnit 6 Lesson 6: Interpreting SlopesLesson 7: Scatter Plot CityPractice Day 1 (Print available) [Free lesson]Practice Day 2 (Print available)
Lesson 7: Observing More patterns in Scatter PlotsUnit 6 Lesson 1: Click BattleLesson 2: Wing SpanLesson 3: Robots [Free lesson]Lesson 7: Scatter Plot City
Lesson 8: Analyzing Bivariate DataUnit 6Lesson 9: Tasty Fruit
Topic 3: Associations in Categorical data 
Lesson 9: Looking for AssociationsUnit 6Lesson 10: Finding Associations [Free lesson]Lesson 11: Federal BudgetsPractice Day 3 (Print available)
Lesson 10: Using Data Displays to Find associationsUnit 6Lesson 10: Finding Associations [Free lesson]Lesson 9: Tasty Fruit
Topic 4: Let’s Put It to Work
Lesson 11: Gone in 30 SecondsUnit 6Lesson 11: Federal Budgets

Unit 7: Exponents and Scientific Notation

Topic 1: Exponent Review 
Lesson 1: Exponent ReviewUnit 7 Lesson 1: Circles [Free lesson]Lesson 2: Combining Exponents
Topic 2: Exponent Rules 
Lesson 2: Multiplying Powers of 10
Lesson 3: Powers of Powers of 10
Lesson 4: Dividing Powers of 10
Unit 7 Lesson 3: Power Pairs (Print available) [Free lesson]Lesson 4: Rewriting Powers  
Lesson 5: Negative Exponents with Powers of 10Unit 7 Lesson 5: Zero and Negative ExponentsLesson 6: Write a Rule (Print available)Practice Day 1 (Print available)
Lesson 6: What about Other Bases? 
Lesson 7: Practice with Rational Bases
Lesson 8: Combining Bases 
Topic 3: Scientific Notation 
Lesson 9: Describing Large and Small Numbers using Powers of 10Unit 7 Lesson 7: Scales and Weights
Lesson 10: Representing Large Numbers on the Number Line
Lesson 11: Representing Small Numbers on the Number Line
Unit 7 Lesson 8: Point Zapper
Lesson 12: Applications of Arithmetic with Powers of 10Unit 7  Lesson 8: Point ZapperLesson 9: Use Your Powers
Lesson 13: Defining Scientific Notation
Lesson 14: Multiplying, Dividing, and Estimating with Scientific Notation
Unit 7 Lesson 10: Solar System [Free lesson]Lesson 11: Balance the Scales [Free lesson]Lesson 13: Star Power
Lesson 15: Adding and Subtracting with Scientific NotationUnit 7 Lesson 10: Solar System [Free lesson]Lesson 11: Balance the Scales [Free lesson]Lesson 12: City LightsLesson 13: Star Power
Topic 4: Let’s Put It to Work
Lesson 16: Is a Smartphone Smart Enough to Go to the Moon?Lesson 13: Star Power Practice Day 2 (Print available)

Unit 8: Pythagorean Theorem and Irrational Numbers

Topic 1: Side Lengths and Areas of Squares
Lesson 1: The Areas of Squares and Their Side LengthsUnit 8Lesson 1: Tilted Squares
Lesson 2: Side Lengths and AreasUnit 8Lesson 2: From Squares to RootsLesson 3: Between Squares
Lesson 3: Rational and Irrational Numbers
Lesson 4: Square Roots on the Number Line
Lesson 5: Reasoning about Square RootsUnit 8Lesson 2: From Squares to RootsLesson 3: Between SquaresLesson 4: Root Down [Free lesson]Practice Day 1 (Print available)
Topic 2: The Pythagorean Theorem
Lesson 6: Finding Side Lengths of TrianglesUnit 8Lesson 6: The Pythagorean TheoremLesson 7: Pictures to Prove ItLesson 8: Triangle-Tracing Turtle [Free lesson]
Lesson 7: A Proof of the Pythagorean TheoremUnit 8Lesson 7: Pictures to Prove It
Lesson 8: Finding Unknown Side LengthsUnit 8Lesson 11: Pond Hopper
Lesson 9: The ConverseUnit 8Lesson 9: Make It Right
Lesson 10: Applications of the Pythagorean TheoremUnit 8Lesson 10: Taco Truck [Free lesson]
Lesson 11: Finding Distances in the Coordinate PlaneUnit 8Lesson 11: Pond Hopper
Topic 3: Side Lengths and Volumes of Cubes
Lesson 12: Edge Lengths and Volumes
Lesson 13: Cube Roots
Unit 8Lesson 5: Filling Cubes
Topic 4: Decimal Representation of Rational and Irrational Numbers
Lesson 14: Decimal Representation of Rational and Numbers
Lesson 15: Infinite Decimal expansions
Unit 8Lesson 12: Fractions to DecimalsLesson 13: Decimals to Fractions
Topic 5: Let’s Put It to Work
Lesson 16: When Is the Same Size Not the Same Size?Unit 8Lesson 10: Taco Truck [Free lesson]

Unit 9: Putting It All Together

Topic 1: Tessellations
Lesson 1: Tessellations of the Plane
Lesson 2: Regular Tessellations
Lesson 3: Tessellating Polygons
Topic 2: The Weather
Lesson 4: What Influences Temperature?
Lesson 5: Plotting the Weather
Lesson 6: Using and Interpreting a Mathematical Model

A closer look at grades 6–8 (domain)

Amplify Science is based on the latest research on teaching and learning and helps teachers deliver rigorous and riveting lessons through hands-on investigations, literacy-rich activities, and interactive digital tools that empower students to think, read, write, and argue like real scientists.

In the 6–8 classroom, this looks like students:

  • Collecting evidence from a variety of sources.
  • Making sense of evidence in a variety of ways.
  • Formulating convincing scientific arguments.

Is your school implementing the domain model? Click here.

Collage of four images showing children engaged in educational activities such as conducting experiments and crafting in a classroom setting.
A four-step process: Spark intrigue, Explore evidence, Explain and elaborate, and Evaluate claims, leading to ongoing engagement and building complexity.

Program structure

Our cyclical lesson design ensures students receive multiple exposures to concepts through a variety of modalities. As they progress through the lessons within a unit, students build and deepen their understanding, increasing their ability to develop and refine complex explanations of the unit’s phenomenon.

It’s this proven program structure and lesson design that enables Amplify Science to teach less, but achieve more. Rather than asking teachers to wade through unnecessary content, we designed our 6–8 program to address 100% of the NGSS in fewer lessons than other programs.

Scope and sequence

Every year our grades 6–8 sequence consists of 9 units, with each unit containing 10–19 lessons. Lessons are written to last a minimum of 45-minutes, though teachers can expand or contract the timing to meet their needs.

A grid of educational icons, each representing a different science topic, such as earth and space science, life science, and physical science, with titles and lesson counts.

Unit types

Each unit delivers three-dimensional learning experiences and engages students in gathering evidence from a rich collection of sources, while also serving a unique purpose.

In grades 6–8, there are three types of units:

  • One unit is a launch unit.
  • Three units are core units.
  • Two units are engineering internships.
Launch units

Launch units are the first units taught in each year of Amplify Science. The goal of the Launch unit is to introduce students to norms, routines, and practices that will be built on throughout the year, including argumentation, active reading, and using the program’s technology. For example, rather than taking the time to explain the process of active reading in every unit in a given year, it is explained thoroughly in the Launch unit, thereby preparing students to actively read in all subsequent units.

Core units

Core units establish the context of the unit by introducing students to a real-world problem. As students move through lessons in a Core unit, they figure out the unit’s anchoring phenomenon, gain an understanding of the unit’s disciplinary core ideas and science and engineering practices, and make linkages across topics through the crosscutting concepts. Each Core unit culminates with a Science Seminar and final writing activity.

Engineering Internship units

Engineering Internship units invite students to design solutions for real-world problems as interns for a fictional company called Futura. Students figure out how to help those in need, from tsunami victims in Sri Lanka to premature babies, through the application of engineering practices. In the process, they apply and deepen their learning from Core units.

Units at a glance

A rover sits on a rocky, reddish hill under a hazy sky, leaving visible tire tracks across the barren landscape.
Geology on Mars

Domain: Earth and Space Science

Unit type: Launch

Student role: Planetary geologists

Phenomenon: Analyzing data about landforms on Mars can provide evidence that Mars may have once been habitable.    

Two prehistoric marine reptiles with long snouts are near a rocky shoreline, one on land and one in the water, with an island and clouds in the background.
Plate Motion

Domain: Earth and Space Science

Unit type: Core

Student role: Geologists

Phenomenon: Mesosaurus fossils have been found on continents separated by thousands of kilometers of ocean, even though the Mesosaurus species once lived all together.    

A geometric badge with a mountain, telescope, and audio wave icons on a purple background with polygonal shapes.
Plate Motion Engineering Internship

Domain: Earth and Space Science

Unit type: Engineering internship

Student role: Mechanical engineering interns

Phenomenon: Patterns in earthquake data can be used to design an effective tsunami warning system.    

Illustration of a volcano by the sea with smoke, trees, mountains, and a cross-section showing a fault line beneath the ground.
Rock Transformations

Domain: Earth and Space Science

Unit type: Core

Student role: Geologists

Phenomenon: Rock samples from the Great Plains and from the Rocky Mountains — regions hundreds of miles apart — look very different, but have surprisingly similar mineral compositions.    

Illustration of a city skyline at night with buildings, a bridge, and a large full moon in a starry sky.
Earth, Sun, and Moon

Domain: Earth and Space Science

Unit type: Core

Student role: Astronomers

Phenomenon: An astrophotographer can only take pictures of specific features on the Moon at certain times.    

Abstract digital painting of a landscape with green hills, a red-orange horizon, and a large yellow sun surrounded by blue and orange swirling shapes on the right.
Ocean, Atmosphere, and Climate

Domain: Earth and Space Science

Unit type: Core

Student role: Climatologists

Phenomenon: During El Niño years, the air temperature in Christchurch, New Zealand is cooler than usual.    

Illustration of a town with houses and fields under a sky with large clouds and swirling wind patterns, set against a backdrop of hills and mountains.
Weather Patterns

Domain: Earth and Space Science

Unit type: Core

Student role: Forensic meteorologists

Phenomenon: In recent years, rainstorms in Galetown have been unusually severe.    

A polar bear stands on a small ice floe surrounded by water and floating ice under a red sun in an Arctic landscape.
Earth’s Changing Climate

Domain: Earth and Space Science

Unit type: Core

Student role: Climatologists

Phenomenon: The ice on Earth’s surface is melting.    

Hexagonal badge with icons including a wrench, building, sun, screwdriver, paint can, and molecules on a purple geometric background.
Earth’s Changing Climate Engineering Internship

Domain: Earth and Space Science

Unit type: Engineering internship

Student role: Civil engineers

Phenomenon: Designing rooftops with different modifications can reduce a city’s impact on climate change.    

Colorful abstract digital artwork featuring a yellow figure holding a device, with blue and red shapes and textured patterns in the background.
Microbiome

Domain: Life Science

Unit type: Launch

Student role: Microbiological researchers

Phenomenon: The presence of 100 trillion microorganisms living on and in the human body may keep the body healthy.    

An abstract illustration of a person having their mouth and throat examined with a tongue depressor, surrounded by colorful shapes, with an eye chart in the background.
Metabolism

Domain: Life Science

Unit type: Core

Student role: Medical researchers

Phenomenon: Elisa, a young patient, feels tired all the time.    

Geometric orange background with a hexagon icon displaying symbols for statistics, farming, healthcare, safety vest, chemistry, and agriculture.
Metabolism Engineering Internship

Domain: Life Science

Unit type: Engineering internship

Student role: Food engineers

Phenomenon: Designing health bars with different molecular compositions can effectively meet the metabolic needs of patients or rescue workers.    

Six spiders with different colors and stripe patterns are arranged in a grid pattern on a dark background, showing variations in leg and body color.
Traits and Reproduction

Domain: Life Science

Unit type: Core

Student role: Biomedical students

Phenomenon: Darwin’s bark spider offspring have different silk flexibility traits, even though they have the same parents.    

An underwater scene shows a whale surrounded by jellyfish, sea turtles, and fish, with sunlight filtering through the water.
Populations and Resources

Domain: Life Science

Unit type: Core

Student role: Biologists

Phenomenon: The size of the moon jelly population in Glacier Sea has increased.    

A low-poly landscape with trees, mushrooms, a rabbit sitting, and a fox bending down near another rabbit under a sunny sky with mountains in the background.
Matter and Energy in Ecosystems

Domain: Life Science

Unit type: Core

Student role: Ecologists

Phenomenon: What caused the mysterious crash of a biodome ecosystem?    

Three green dinosaurs and one yellow dinosaur stand in a row on grass, each with purple spikes and a red spot on their backs. The sky is blue with light clouds.
Natural Selection

Domain: Life Science

Unit type: Core

Student role: Biologists

Phenomenon: The newt population in Oregon State Park has become more poisonous over time.    

Red-toned graphic with hexagonal badge featuring a world map, a mosquito, a DNA strand, charts, cubes, and circular icons. Geometric background pattern.
Natural Selection Engineering Internship

Domain: Life Science

Unit type: Engineering internship

Student role: Clinical engineers

Phenomenon: Designing malaria treatment plans that use different combinations of drugs can reduce drug resistance development while helping malaria patients.  

Two giant tortoises are near a river; one is by the water and the other is standing on land and stretching its neck toward a leafy tree.

Evolutionary History

Domain: Life Science

Unit type: Core

Student role: Paleontologists

Phenomenon: A mystery fossil at the Natural History Museum has similarities with both wolves and whales.    

Two people climb over rocky terrain strewn with electronic waste, with illustrated insets showing a hiking boot, a solar-powered device, and a person adjusting a belt-like gadget.
Harnessing Human Energy

Domain: Physical Science

Unit type: Launch

Student role: Energy scientists

Phenomenon: Rescue workers can use their own human kinetic energy to power the electrical devices they use during rescue missions.    

A spacecraft approaches a modular space station with large solar panels, set against a backdrop of outer space.
Force and Motion

Domain: Physical Science

Unit type: Core

Student role: Physicists

Phenomenon: The asteroid sample-collecting pod failed to dock at the space station as planned.    

Green geometric background with a hexagonal badge showing a parachute, a box, a ruler, a bandage, and stacked layers.
Force and Motion Engineering Internship

Domain: Physical Science

Unit type: Engineering internship

Student role: Mechanical engineering interns

Phenomenon: Designing emergency supply delivery pods with different structures can maintain the integrity of the supply pods and their contents. 

Illustration of a roller coaster car full of people with raised arms, speeding down a loop against a blue sky with clouds.
Magnetic Fields

Domain: Physical Science

Unit type: Core

Student role: Physicists

Phenomenon: During a test launch, a spacecraft traveled much faster than expected.    

Illustration of a person in a red coat and hat with arms crossed, eyes closed, surrounded by large orange and brown circles, possibly representing snow or lights.
Thermal Energy

Domain: Physical Science

Unit type: Core

Student role: Thermal scientists

Phenomenon: One of two proposed heating systems for Riverdale School will best heat the school.    

An orange popsicle gradually melts, shown in four stages from solid to completely melted, with wooden sticks visible, against a purple background.
Phase Change

Domain: Physical Science

Unit type: Core

Student role: Chemists

Phenomenon: A methane lake on Titan no longer appears in images taken by a space probe two years apart.    

A green background with a picture of a person and a sandwich.
Phase Change Engineering Internship

Domain: Physical Science

Unit type: Engineering internship

Student role: Chemical engineering interns

Phenomenon: Designing portable baby incubators with different combinations of phase change materials can keep babies at a healthy temperature.    

Digital illustration showing red and blue molecules on a blue background transitioning to a lighter background, representing molecular diffusion across a boundary.
Chemical Reactions

Domain: Physical Science

Unit type: Core

Student role: Forensic chemists

Phenomenon: A mysterious brown substance has been detected in the tap water of Westfield.    

Illustration of Earth with yellow arrows and colored waves approaching from the left, representing incoming solar or cosmic radiation.
Light Waves

Domain: Physical Science

Unit type: Core

Student role: Spectroscopists

Phenomenon: The rate of skin cancer is higher in Australia than in other parts of the world.    

Planning and instructional resources

Using the Amplify NYC Science Benchmarks

Planning and Implementation Guides

NYC Field Trip List

Implementation Rubric for Administrators

6-8 Look-for tool

K-5 Look-for Tool (1 page)

NYSED Investigations and Amplify Alignment

For more guidance on the New York state investigations and suggested pacing, please log in to your NYC account and check out the NYC Public Schools Science Collaborative Website for Elementary and for Intermediate.

NYC Companion resources

6-8 Companion Lessons can be found in the Amplify Science platform!

A screenshot of a digital lesson on harnessing energy with an arrow pointing to a "Companion Lesson" button. The inset shows the companion PDF. The text provides instructions for accessing the lesson.

Grade 6 Lesson guides and Copymasters

  • Companion lesson: Insert after Lesson 2.2
  • Time frame: 60 minutes (can spread across multiple class periods)
  • NYSP–12SLS: PE: MS-PS3-6, DCI: PS3.B
  • Links (click to download):
  • Companion lesson: Insert after Lesson 3.3
  • Time frame: Two 45-minute class periods
  • NYSP–12SLS: PE: MS-PS2-3, MS-PS2-5, DCI: PS2.B
  • Links (click to download):
  • Companion lesson: Insert after Lesson 3.3 and after Investigating Non-Touching Forces
  • Time frame: 60 minutes (first and second reads can be spread across two class periods)
  • NYSP–12SLS: PE: MS-PS2-5, MS-PS2-3, DCI: PS2.B
  • Links (click to download):
  • Companion lesson: Insert after Lesson 2.5
  • Time frame: 105 minutes (can be spread across multiple class periods)
  • NYSP–12SLS: PE: MS-PS1-6, DCI: PS1.B
  • Links (click to download):
  • Companion lesson: Insert after Lesson 3.4
  • Time frame: 60 minutes (first and second reads can be spread across two class periods)
  • NYSP–12SLS: PE: MS-LS2-5, DCI: LS2.C, LS4.D
  • Links (click to download):
  • Companion lesson: Insert after Lesson 1.3
  • Time frame: 60 minutes (first and second reads can be spread across two class periods)
  • NYSP–12SLS: PE: MS-ESS2-4, DCI: ESS2.C
  • Links (click to download):
  • Companion lesson: Insert after Lesson 3.3*
  • Time frame: 90 minutes (can be spread across multiple class periods)
  • NYSP–12SLS: PE: MS-PS1-7, MS-ESS2-6, DCI: PS1.A, ESS2.C
  • Links (click to download):

*Note: The homework assignment for Ocean, Atmosphere, and Climate Lesson 3.3 (reading the article “Deep Ocean Currents: Driven by Density”) should be assigned after the Investigating Deep Ocean Currents companion lesson rather than after Lesson 3.3.

Grade 7 Lesson Guides and Copymasters

  • Companion lesson: Insert after Lesson 3.2
  • Time frame: 60 minutes (first and second reads can be spread across two class periods)
  • NYSP–12SLS: PE: MS-LS1-3, DCI: PS3.D, LS1.A
  • Links (click to download):
  • Companion lesson: Insert after Lesson 3.3 or later
  • Time frame: Three 45-minute class periods, each several days apart
  • NYSP–12SLS: PE: MS-LS1-8, DCI: LS1.D
  • Links (click to download):
  • Companion lesson: Insert after Lesson 3.5
  • Time frame: 60 minutes (first and second reads can be spread across two class periods)
  • NYSP–12SLS: PE: MS-LS1-6, MS-LS1-7, DCI: LS1.C, PS3.D
  • Links (click to download):
  • Companion lesson: Insert after Lesson 2.2
  • Time frame: 60 minutes (first and second reads can be spread across two class periods)
  • NYSP–12SLS: PE: MS-PS1-4, DCI: PS3.A
  • Links (click to download):
  • Companion lesson: Insert after Lesson 1.3
  • Time frame: 60 minutes
  • NYSP–12SLS: PE: MS-PS1-7, DCI: PS1.A
  • Links (click to download):
  • Companion lesson: Insert after Lesson 2.3, 2.4, or 2.5
  • Time frame: Two 45-minute class periods
  • NYSP–PE: MS-PS1-8, MS-PS1-2 DCI: PS1.A, PS1.B
  • Links (click to download):

Grade 8 Lesson Guides and Copymaster

NYC Companion Kits

Materials needed to teach Amplify Science lessons are provided in a kit for each unit. While some materials used in the NYC Companion Lessons are also found in a unit’s kit, materials specific to the companion lessons are provided in NYC Companion Kits. The contents of each kit and any additional materials needed to teach the companion lessons are listed in the PDFs provided below. Please select your grade to view or download the list.

NYC Student Editions (print)
The NYC Student Editions are durable student references that compile all reading material required for a grade level, including the articles students read for NYC Companion Lessons. Students reading in the Student Edition should annotate the text directly with sticky notes to achieve the full benefits of Active Reading. The Active Reading approach was designed as an interactive process in which students highlight and annotate digital or hard copies of articles directly. Printable versions of the articles are available in the downloads section below.

It is recommended that NYC teachers insert this additional lesson between Lessons 3.1 and 3.2 in order to have students complete a reading assignment in class along with an additional Sim activity.

  • Lesson: Earth, Moon and Sun: Modeling Seasons
  • Lesson Placement: Insert between Lessons 3.1 and 3.2*
  • Links (click to download):

*If teaching this Modeling Seasons lesson, do not assign reading “The Endless Summer of the Arctic Tern” article for homework in Lesson 3.1. However, students should still model a lunar eclipse with the Modeling Tool for homework, as they will be revisiting and revising this model in Lesson 3.3.

NYC Investigation Notebooks (for teacher download)

* includes NYC Companion Lesson Copymaster(s)

* includes NYC Companion Lesson Copymaster(s)

  • Geology on Mars
  • Earth, Moon, and Sun
  • Force and Motion
  • Engineering Internship: Force and Motion
  • Magnetic Fields*
  • Light Waves
  • Traits and Reproduction
  • Natural Selection
  • Evolutionary History

* includes NYC Companion Lesson Copymaster(s)

Remote and hybrid learning resources

Grade 6

Unit 1: Area and Surface Area

Amplify MathDesmos Math 6–A1
Unit 1: Area and Surface AreaUnit 1: Area and Surface Area
Unit 7: Positive and Negative Numbers
Lesson 1: The TangramUnit 1
Lesson 1: Shapes on a Plane
Lesson 2: Exploring the TangramUnit 1
Lesson 2: Letters
Sub-Unit 1 : Area of Special Polygons
Lesson 3: Tilting the PlaneUnit 1
Lesson 1: Shapes on a Plane
Lesson 4: Compositing and Rearranging to Determine AreaUnit 1
Lesson 2: Letters
Lesson 5: Reasoning to Determine AreaUnit 1
Lesson 2: Letters
Lesson 6: ParallelogramsUnit 1
Lesson 3: Exploring Parallelograms (Print available)
Lesson 4: Off the Grid
Lesson 7: Bases and Heights of ParallelogramsUnit 1
Lesson 3: Exploring Parallelograms (Print available)
Lesson 4: Off the Grid
Lesson 8: Bases and Heights of ParallelogramsUnit 1
Lesson 3: Exploring Parallelograms (Print available)
Lesson 4: Off the Grid
Lesson 9: From Parallelograms to TrianglesUnit 1
Lesson 3: Exploring Parallelograms (Print available)
Lesson 4: Off the Grid
Lesson 6: Triangles and Parallelograms
Lesson 10: Bases and Heights of TrianglesUnit 1
Lesson 4: Off the Grid
Lesson 6: Triangles and Parallelograms
Lesson 11: Formula for the Area of a TriangleUnit 1
Lesson 5: Exploring Triangles (Print available)
Lesson 12: From Triangles to TrapezoidsUnit 1
Lesson 4: Off the Grid
Lesson 6: Triangles and Parallelograms
Lesson 13: PolygonsUnit 1
Lesson 2: Letters
Lesson 8: Pile of Polygons Practice Day 1 (Print available)

Unit 7
Lesson 11: Polygon Maker
Sub-Unit 2: Nets and Surface Area
Lesson 14: What is Surface Area?Unit 1
Lesson 9: Renata’s Stickers
Lesson 15: Nets and Surface Area of Rectangular PrismsUnit 1
Lesson 10: Plenty of Polyhedra
Lesson 11:Nothing but Nets(Print available)
Lesson 12: Face Value
Lesson 13: Take It To Go (Print available)
Lesson 16: Nets and Surface Area of PrismsUnit 1
Lesson 12: Face Value
Lesson 13: Take It To Go (Print available)
Lesson 17: Constructing a RhombicuboctahedronUnit 1
Lesson 13: Take It To Go (Print available)
Lesson 18: Simplifying Expressions for Squares and CubesUnit 1
Lesson 11: Exponent Expressions (Print available)
Lesson 12: Squares and Cubes
Lesson 19: Simplifying Expressions Even More Using ExponentsUnit 1
Lesson 11: Exponent Expressions (Print available)
Lesson 20: Designing a Suspended Tent 

Unit 2: Introducing Ratios

Amplify MathDesmos Math 6–A1
Unit 2: Introducing RatiosUnit 2: Introducing Ratios
Lesson 1: Fermi Problems 
Sub-Unit 1: What are Ratios?
Lesson 2: Introducing Ratios and Ratio LanguageUnit 2
Lesson 1: Pizza Maker
Lesson 2: Ratio Rounds (Print available)
Lesson 3: Representing Ratios with DiagramsUnit 2
Lesson 1: Pizza Maker
Lesson 2: Ratio Rounds (Print available)
Lesson 3:Rice Ratios (Print available)
Lesson 4: A Recipe for Purple Oobleck 
Lesson 5: Kapa Dyes 
Sub-Unit 2:Equivalent Ratios
Lesson 6: Defining Equivalent RatiosUnit 2
Lesson 3: Rice Ratios (Print available)
Lesson 4: Fruit Lab (Print available)
Lesson 11: Community Life (Print available)
Practice Day 1 (Print available)
Lesson 7: Representing Equivalent Ratios with Tables 
Lesson 8: Reasoning with Multiplication and Division (optional) 
Lesson 9: Common Factors 
Lesson 10: Common Multiples 
Lesson 11: Navigating a Table of Equivalent RatiosUnit 2
Lesson 6: Product Prices (Print available)
Lesson 7: Mixing Paint, Part 1
Lesson 12: Tables and Double Number Line DiagramsUnit 2
Lesson 6: Product Prices (Print available)
Lesson 7: Mixing Paint, Part 1
Lesson 13: Tempo and Double Number LinesUnit 2
Lesson 5: Balancing Act
Lesson 6: Product Prices (Print available)
Sub-Unit 3: Solving Ratio Problems 
Lesson 14: Solving Equivalent RatiosUnit 2
Lesson 6: Product Prices (Print available)
Lesson 7: Mixing Paint, Part 1
Lesson 10: Balloons
Lesson 11: Community Life (Print available)
Lesson 15: Part-Part-Whole RatiosUnit 2
Lesson 12 Mixing Paint, Part 2
Lesson 13: City Planning
Lesson 16: Comparing Ratios 
Lesson 17: More Comparing and Solving 
Lesson 18: Measuring with Different-Sized Units 
Lesson 20: More Fermi Problems 

Unit 3: Rates and Percentages

Amplify MathDesmos Math 6–A1
Unit 3: Rates and PercentagesUnit 2: Introducing Ratios
Unit 3: Unit Rates and percentages
Lesson 1: Choosing Representation for Student CouncilLaunch Lesson
Sub-Unit 1: Rates
Lesson 2: How Much for One?Unit 3
Lesson 4: Model Trains
Lesson 3: Constant Speed  
Lesson 4: Comparing SpeedsUnit 2
Lesson 8: World Records (Print available) 

Unit 3
Lesson 4: Model Trains
Lesson 5: Soft Serve
Lesson 6: Welcome to the Robot Factory
Lesson 5: Interpreting RatesUnit 3
Lesson 8: World Records (Print available) 

Unit 3
Lesson 4: Model Trains
Lesson 5: Soft Serve
Lesson 6: Welcome to the Robot Factory
Lesson 6: Comparing Rates 
Lesson 7: Solving Rate ProblemsUnit 3
Lesson 7: More Soft Serve
Sub-Unit 2: Percentages
Lesson 8: What Are percentages?Unit 3
Lesson 8: Lucky Duckies
Lesson 9: Bicycle Goals
Lesson 9: Determining Percentages 
Lesson 10: Benchmark PercentagesUnit 3
Lesson 7: Lucky Duckies
Lesson 11: Finding This Percent of ThatUnit 3
Lesson 10: What’s Missing? (Print available)
Lesson 11: Cost Breakdown
Lesson 12: More Bicycle Goals
Lesson 13: A Country as a Village
Lesson 12: This Percent of What 
Lesson 13: Solving Percentage ProblemsUnit 3
Lesson: 10: What’s Missing (Print available)
Lesson: 11: Cost Breakdown
Lesson: 12: More Bicycle Goals
Lesson: 13: A Country as a Village
Lesson 14: If Our Class Were the World 
Lesson 15: Voting for a School Mascot 

Unit 4: Dividing Fractions

Amplify MathDesmos Math 6–A1
Lesson 1: Seeing Fractions
Sub-Unit 1: Interpreting Division Scenarios
Lesson 3: Relating Multiplication and Division 
Lesson 4: Size of Divisor and Size of QuotientUnit 4
Lesson 1: Cookie Cutter
Sub-Unit 2: Division with Fractions
Lesson 5: How Many GroupsUnit 4
Lesson 3: Flour Planner
Lesson 4: Flower Planters
Lesson 4: Garden Bricks (Print available) 
Lesson 6: Using Diagrams to Find the Number of GroupsUnit 4
Lesson 5: Garden Bricks (Print available)
Lesson 6: Fill the Gap
Lesson 7: Dividing with Common DenominatorsUnit 4
Lesson 6: Fill the Gap
Lesson 8: How Much in Each Group? (Part 1)Unit 4
Lesson 8: Potting Soil
Lesson 9: How Much in Each Group? (Part 2)Unit 4
Lesson 8: Potting Soil
Lesson 10: Dividing by Unit and Non-Unit FractionsUnit 4
Lesson 7: Break It Down
Lesson 8: Potting Soil
Lesson 9: Division Challenges
Lesson 11: Using an Algorithm to Divide FractionsUnit 4
Lesson 9: Division Challenges Practice Day
Lesson 13: Fractional LengthsUnit 4
Lesson 12: Puzzling 
Lesson 14: Area with Fractional LengthsUnit 4
Lesson 9: Puzzling Area (Print available)
Lesson 15: Volume of PrismsUnit 4
Lesson 13: Volume Challenges (Print available)
Lesson 16: Fish Tanks Inside of Fish TanksUnit 4
Lesson 10: Swap Meet
Lesson 17: Now, Where Was That Bus?Unit 4
Lesson 10: Capstone

Unit 5: Arithmetic in Base Ten

Amplify MathDesmos Math 6–A1
Lesson 1: Precision and World Records 
Sub-Unit 1: Adding and Subtracting Decimals 
Lesson 2: Speaking of Decimals…Unit 5
Lesson 1: Dishing Out Decimals (Print available)
Lesson 3: Adding and Subtracting DecimalsUnit 5
Lesson 3: Fruit by the Pound
Lesson 4: Missing Digits
Lesson 4: X Games Medal ResultsUnit 5
Lesson 2: Decimal Diagrams
Sub-Unit 2: Multiplying Decimals
Lesson 5: Decimal Points in ProductsUnit 5
Lesson 5: Decimal Multiplication
Lesson 6: Methods for Multiplying DecimalsUnit 5
Lesson 5: Decimal Multiplication
Lesson 6: Multiplying with Areas
Lesson 7: Multiplication Methods (Print available)
Lesson 7: Using Diagrams to Represent MultiplicationUnit 5
Lesson 5: Decimal Multiplication
Lesson 6: Multiplying with Areas
Lesson 8: Calculating Products of DecimalsUnit 5
Lesson 6: Multiplying with Areas
Sub-Unit 3: Dividing Decimals
Lesson 9: Exploring Division 
Lesson 10: Using Long DivisionUnit 5
Lesson 8: Division Diagrams
Lesson 9: Long Division Launch (Print available)
Lesson 10: Return of the Long Division (Print available)
Lesson 11: Dividing Numbers That Result in DecimalsUnit 5
Lesson 9: Long Division Launch (Print available)
Lesson 10: Return of the Long Division (Print available)
Lesson 12: Using Related Expressions to Divide with Decimals 
Lesson 13: Dividing Multi-Digit DecimalsUnit 5
Lesson 9: Long Division Launch (Print available)
Lesson 10: Return of the Long Division (Print available)
Lesson 14: The So-called World’s Littlest Skyscraper

Unit 6: Expressions and Equations

Amplify MathDesmos Math 6–A1
Unit 6: Expressions and EquationsUnit 6: Expressions and Equations
Lesson 1: Detecting Counterfeit Coins
Sub-Unit 1: Expressions and Equations in One Variable
Lesson 2: Write Expressions Where Letters Stand for Numbers 
Lesson 3: Tape Diagrams and Equations 
Lesson 4: Truth and EquationsUnit 6
Lesson 1: Weight for It
Lesson 2: Five Equations (Print available)
Lesson 5: Staying in BalanceUnit 6
Lesson 1: Weight for It
Lesson 2: Five Equations (Print available)
Lesson 3: Hanging Around
Lesson 6: Staying in Balance with Variables 
Lesson 7: Practice Solving EquationsUnit 6
Lesson 3: Hanging Around
Lesson 4: Hanging It Up
Lesson 5: Swap and Solve (Print available)
Lesson 8: A New Way to Interpret a over bUnit 6
Lesson 4: Hanging It Up
Lesson 5: Swap and Solve (Print available)
Lesson 9: Revisiting Percentages
Sub-Unit 2: Equivalent Expressions
Lesson 10: Equal and Equivalent (Part 1)Unit 6
Lesson 1: Weight for It
Lesson 2: Five Equations (Print available)
Lesson 3: Hanging Around
Lesson 6: Vari-apples
Lesson 11: Equal and Equivalent (Part 2)Unit 6
Lesson 1: Weight for It
Lesson 2: Five Equations (Print available)
Lesson 3: Hanging Around
Lesson 6: Vari-apples
Lesson 12: The Distributive Property, Part 1Unit 6
Lesson 8: Products and Sums
Lesson 9: Products, Sums, and Differences (Print available)
Lesson 13: The Distributive Property, Part 2Unit 6
Lesson 8: Products and Sums
Lesson 9: Products, Sums, and Differences (Print available)
Lesson 14: Meaning of ExponentsUnit 6
Lesson 10: Powers
Lesson 11: Exponent Expressions (Print available)
Lesson 15: Evaluating Expressions with ExponentsUnit 6
Lesson 11: Exponent Expressions (Print available)
Lesson 12: Squares and Cubes
Lesson 16: Analyzing Exponential Expressions and EquationsUnit 6
Lesson 11: Exponent Expressions (Print available)
Lesson 12: Squares and Cubes
Sub-Unit 3: Relationships Between Quantities
Lesson 17: Two Related Quantities, Part 1Unit 6
Lesson 13: Turtles All the Way
Lesson 14: Representing Relationships
Lesson 15: Connecting Representations (Print available)
Lesson 18: Two Related Quantitites, Part 2Unit 6
Lesson 13: Turtles All the Way
Lesson 14: Representing Relationships
Lesson 15: Connecting Representations (Print available)
Lesson 19: Creating a Class Mobile 

Unit 7: Rational Numbers

Amplify MathDesmos Math 6–A1
Unit 7: Rational Numbers
Unit 1: Area and Surface Area
Unit 7: Positive and Negative Numbers
Lesson 1: How Far? Which Way?
Sub-unit 1: Negative Numbers and Absolute Value
Lesson 2: Positive and Negative NumbersUnit 7
Lesson 1: Can You Dig In
Lesson 2: Digging Deeper
Lesson 3: Points on the Number LineUnit 7
Lesson 2: Digging Deeper
Lesson 4: Comparing IntegersUnit 7
Lesson 3: Order in the Class (Print available)
Lesson 5: Comparing and Ordering Rational NumbersUnit 7 
Lesson 3: Order in the Class (Print available)
Lesson 6: Using Negative Numbers to Make Sense of Contexts>Unit 7
Lesson 4: Sub-Zero
Lesson 7: Absolute Value of NumbersUnit 7
Lesson 5: Distance on the Number Line
Lesson 8: Comparing Numbers and Distance from ZeroUnit 7
Lesson 5: Distance on the Number Line
Sub-Unit 2: Inequalities
Lesson 9: Writing Inequalities 
Lesson 10: Graphing Inequalities 
Lesson 11: Solutions to One or More InequalitiesUnit 7
Lesson 6: Tunnel Travel
Lesson 7: Comparing Weights
Lesson 8: Shira´s Solutions
Lesson 12: Interpreting InequalitiesUnit 7
Lesson 6: Tunnel Travel
Lesson 7: Comparing Weights
Lesson 8: Shira´s Solutions
Sub-Unit 3: The Coordinate Plane
Lesson 13: Extending the Coordinate Plane 
Lesson 14: Points on the Coordinate PlaneUnit 7
Lesson 9: Sand Dollar Search
Lesson 10: The A-maze-ing Coordinate Plane
Lesson 15: Interpreting Points on a Coordinate PlaneUnit 7
Lesson 9: Sand Dollar Search
Lesson 10: The A-maze-ing Coordinate Plane
Lesson 11: Polygon Maker
Lesson 16: Distances on a Coordinate PlaneUnit 7
Lesson 11: Polygon Maker
Lesson 12: Graph Telephone (Print available)
Lesson 17: Shapes on the Coordinate PlaneUnit 1
Lesson 1: Shapes on a Plane
Lesson 2: Letters
Lesson 5: Exploring Triangles (Print available)
Lesson 6: Triangles and Parallelograms

Unit 7
Lesson 3: Exploring Parallelograms (Print available)
Lesson 11: Polygon Maker
Lesson 12: Graph Telephone (Print available)
Lesson 18: Lost and Found Puzzles 
Lesson 19: Drawing on the Coordinate PlaneUnit 7
Lesson 11: Polygon Maker
Lesson 12: Graph Telephone (Print available)

Unit 8: Data Sets and Distributions

Amplify MathDesmos Math 6–A1
Unit 8: Data Sets and DistributionsUnit 8: Describing Data
Lesson 1: Plausible Variation or New Species?
Sub-Unit 1: Statistical Questions and Representing Data
Lesson 2: Statistical QuestionsUnit 8
Lesson 1: Screen Time
Lesson 2: Dot Plots
Lesson 3: Interpreting Dot PlotsUnit 8
Lesson 2: Dot Plots
Lesson 3: Minimum Wage (Print available)
Lesson 4: Lots More Dots
Lesson 4: USing Dot Plots to Answer Statistical QuestionsUnit 8
Lesson 2: Dot Plots
Lesson 3: Minimum Wage (Print available)
Lesson 4: Lots More Dots
Lesson 5: Interpreting HistogramsUnit 8
Lesson 5: The Plot Thickens
Lesson 6: DIY Histograms (Print available)
Lesson 6: Using Histograms to Answer Statistical QuestionsUnit 8
Lesson 5: The Plot Thickens
Lesson 6: DIY Histograms (Print available)
Lesson 7: Describing Distributions on HistogramsUnit 8
Lesson 5: The Plot Thickens
Lesson 6: DIY Histograms (Print available)
Sub-Unit 2: Measures of Center
Lesson 8: Mean as a Fair ShareUnit 8
Lesson 7: Snack Time
Lesson 9: Mean as a Balance PointUnit 8
Lesson 7: Snack Time
Lesson 10: MedianUnit 8
Lesson 11: Toy Cars
Lesson 12: In the News
Lesson 11: Comparing Mean and MedianUnit 8
Lesson 12: In the News
Sub-Unit 3: Measures of Variability
Lesson 12: Describing Variability 
Lesson 13: Variability and MAD 
Lesson 14: Variability and IQRUnit 8
Lesson 13: Pumpkin Patch
Lesson 15: Box PlotsUnit 8
Lesson 14: Car, Plane, Bus, or Train? (Print available)
Lesson 16: Comparing MAD and IQR 
Lesson 17: Asian Elephant Populations 

Grade 7

Unit 1: Scale Drawings

Amplify MathDesmos Math 6–A1
Unit 1: Scale DrawingsUnit 1: Scale Drawings
Unit 3: Measuring Circles
Unit 4: Proportional Relationships and Percentages
Lesson 1: Scale-y Shapes 
Sub-Unit 1: Scaled Copies 
Lesson 2: What are Scaled Copies?Unit 1
Lesson 1: Scaling Machines
Lesson 3: Corresponding Parts and Scale FactorsUnit 1
Lesson 2: Scaling Robots 
Unit 3
Lesson 1: Toothpicks
Lesson 4: Making Scaled CopiesUnit 1
Lesson 3: Make It Scale 
Unit 4
Lesson 3: Sticker Sizes
Lesson 5: The Size of the Scale FactorUnit 1
Lesson 4: Tiles
Lesson 6: Scaling and AreaUnit 1
Lesson 5: Tiles Practice Day 1 (Print available)
Sub-Unit 2: Scale Drawings 
Lesson 7: Scale DrawingsUnit 1
Lesson 6: Introducing Scale
Lesson 7: Will It Fit? (Print available)
Lesson 8: Creating Scale DrawingsUnit 1
Lesson 8: Scaling States
Lesson 9: Scaling Buildings
Lesson 10: Room Redesign (Print available)
Lesson 9: Scale Drawings and Maps 
Lesson 10: Changing Scale in Scale DrawingsUnit 1
Lesson 8: Scaling States
Lesson 9: Scaling Buildings
Lesson 10: Room Redesign (Print available)
Lesson 11: Scales without Units 
Lesson 12: Units in Scale DrawingsUnit 1
Lesson 8: Scaling States
Lesson 9: Scaling Buildings
Lesson 10: Room Redesign (Print available)Practice Day (Print available)
Lesson 13: Build Your Brand 

Unit 2: Introducing Proportional Relationships

Amplify MathDesmos Math 6–A1
Unit 2: Introducing Proportional RelationshipsUnit 2: Introducing Proportional Relationships
Unit 4: Proportional Relationships and Percentages
Lesson 1: Making Music 
Sub-Unit 1: Representing Proportional Relationships with Tables and Equations
Lesson 2: Introducing Proportional Relationships with TablesUnit 2
Lesson 2: Balloon Float
Lesson 3: Sugary Drinks (Print available)
Lesson 4: Robot Factory
Lesson 3: More About Constant of ProportionalityUnit 2
Lesson 3: Sugary Drinks (Print available)

Unit 4
Lesson 3: Sticker Sizes
Lesson 4: Comparing Relationships with TablesUnit 2
Lesson 4: Robot Factory
Lesson 5: Snapshots
Lesson 6: Two and Two (Print available)
Lesson 7: All Kinds of Equations
Lesson 5: Proportional Relationships and EquationsUnit 2
Lesson 4: Robot Factory
Lesson 5: Snapshots
Lesson 6: Two and Two (Print available)
Lesson 7: All Kinds of Equations
Lesson 6: Speed and Equations 
Lesson 7: Two Equations for Each RelationshipUnit 2
Lesson 4: Two and Two (Print available)
Lesson 5: Lesson 7: All Kinds of Equations
Lesson 8: Using Equations to Solve ProblemsUnit 2
Lesson 6: Two and Two (Print available)
Lesson 7: All Kinds of Equations
Lesson 9: Comparing Relationships with EquationsUnit 2
Lesson 4: Robot Factory
Lesson 5: Snapshots
Lesson 6: Two and Two (Print available)
Lesson 7: All Kinds of Equations
Lesson 11: Four Representations (Print available)
Lesson 12: Water Efficiency
Lesson 10: Solving Problems About Proportional RelationshipsUnit 2
Lesson 12: Water Efficiency
Sub-Unit 2: Representing Proportional Relationships with Graphs 
Lesson 11: Introducing Graphs of Proportional RelationshipsUnit 2
Lesson 8: Dino Pops
Lesson 9: Gallon Challenge
Lesson 10: Three Turtles
Lesson 11: Four Representations
Lesson 12: Water Efficiency
Lesson 12: Interpreting Graphs of Proportional RelationshipsUnit 2
Lesson 8: Dino Pops
Lesson 9: Gallon Challenge
Lesson 10: Three Turtles
Lesson 11: Four Representations
Lesson 12: Water Efficiency
Lesson 13: Using Graphs to Compare RelationshipsUnit 2
Lesson 8: Dino Pops
Lesson 9: Gallon Challenge
Lesson 10: Three Turtles
Lesson 11: Four Representations
Lesson 12: Water Efficiency
Lesson 14: Two Graphs for Each RelationshipUnit 2
Lesson 8: Dino Pops
Lesson 9: Gallon Challenge
Lesson 10: Three Turtles
Lesson 11: Four Representations
Lesson 12: Water Efficiency
Lesson 15: Four Ways to Tell One Story (Part 1) 
Lesson 16: Four Ways to Tell One Story (Part 2) 
Lesson 17: Welcoming Committee 

Unit 3: Measuring Circles

Amplify MathDesmos Math 6–A1
Unit 3: Measuring CirclesUnit 3: Measuring Circles
Lesson 1: The Wandering Goat 
Sub-unit 1: Circumference of a Circle 
Lesson 2: Exploring CirclesUnit 3
Lesson 2: Is it a Circle?
Lesson 3: Measuring Around
Lesson 3: How Well Can You Measure? 
Lesson 4: Exploring CircumferenceUnit 3
Lesson 2: Is It a Circle?
Lesson 3: Measuring Around
Lesson 5: Understanding π 
Lesson 6: Applying CircumferenceUnit 3
Lesson 2: Is It a Circle?
Lesson 3: Measuring Around
Lesson 7: Circumference and Wheels 
Sub-Unit 2: Area of a Circle
Lesson 8: Exploring the Area of a CircleUnit 3
Lesson 5: Area Strategies
Lesson 6: Radius Squares (Print available)
Lesson 7: Why Pi?
Lesson 8: Area Challenges
Lesson 9: Circle vs. Square
Practice Day 2 (Print available)
Lesson 9: Relating Area to CircumferenceUnit 3
Lesson 5: Area Strategies
Lesson 6: Radius Squares (Print available)
Lesson 7: Why Pi?
Lesson 8: Area Challenges
Lesson 9: Circle vs. Square
Practice Day 2 (Print available)
Lesson 10: Applying Area to CirclesUnit 3
Lesson 6:Radius Squares (Print available)
Lesson 11: Distinguishing Circumference and AreaUnit 3
Lesson 7: Why Pi?
Lesson 12: Capturing Space 

Unit 4: Proportional Relationships and Percentages

Amplify MathDesmos Math 6–A1
Unit 4: PercentagesUnit 4: Proportional Relationships and Percentages
Lesson 1: (Re)Presenting the United States 
Lesson 2: Understanding Percentages and Decimals 
Lesson 3: Percent Increase and DecreaseUnit 4Lesson 4: More or Less
Lesson 4: Determining 100%Unit 4Lesson 6: 100% (Print available)
Lesson 5: Determining Percent ChangeUnit 4Lesson 7: Percent Machines
Lesson 6: Percent Increase and Decrease With EquationsUnit 4Lesson 5: All the Equations
Lesson 7: Using Equations to Solve Percent ProblemsUnit 4Lesson 5: All the Equations
Sub-Unit 2: Applying Percentages 
Lesson 8: Tax and TipUnit 4
Lesson 8: Tax and Tip
Lesson 9: Minimum Wage (Print available)
Lesson 10: Cost of College (Print available)
Lesson 11: Bookcase Builder
Lesson 12: Posing Percent Problems
Lesson 9: Percent ContextsUnit 4
Lesson 8: Tax and Tip
Lesson 9: Minimum Wage (Print available)
Lesson 10: Cost of College (Print available)
Lesson 11: Bookcase Builder
Lesson 12: Posing Percent Problems
Lesson 10: Determining the PercentageUnit 4
Lesson 4: More and Less
Lesson 11: Measurement ErrorUnit 4
Lesson 11: Bookcase Builder
Lesson 12: Error IntervalsUnit 4
Lesson 11: Bookcase Builder
Lesson 13: Writing Better Headlines 

Unit 5: Rational Number Arithmetic

Amplify MathDesmos Math 6–A1
Unit 5: Rational Number ArithmeticUnit 5: Rational Number Artithmetics
Lesson 1: Target: Zero 
Sub-Unit 1: Adding and Subtracting Rational Numbers 
Lesson 2: Interpreting Negative Numbers
Lesson 3: Changing TemperaturesUnit 5
Lesson 2: More Floats and Anchors
Lesson 3: Bumpers
Lesson 4: Draw Your Own (Print available)
Lesson 4: Adding Rational Numbers 
Lesson 5: Money and Debts 
Lesson 6: Representing SubtractionUnit 5
Lesson 5: Number Puzzles
Lesson 7: Subtracting Rational Numbers (Part 1)Unit 5
Lesson 3: Bumpers
Lesson 4: Draw Your Own (Print available)
Lesson 5: Number Puzzles
Lesson 10: Integer Puzzles
Lesson 11: Changing Temperatures
Lesson 13: Solar Panels and More (Print available)
Lesson 8: Subtracting Rational Numbers (Part 2)Unit 5
Lesson 3: Bumpers
Lesson 4: Draw Your Own (Print available)
Lesson 5: Number Puzzles
Lesson 10: Integer Puzzles
Lesson 11: Changing Temperatures
Lesson 13: Solar Panels and More (Print available)
Lesson 9: Adding and Subtracting Rational NumbersUnit 5
Lesson 3: Bumpers
Lesson 4: Draw Your Own (Print available)
Lesson 5: Number Puzzles
Lesson 10: Integer Puzzles
Lesson 11: Changing Temperatures
Lesson 13: Solar Panels and More (Print available)Practice Day 1 (Print available)
Sub-Unit 2: Multiplying and Dividing Rational Numbers 
Lesson 10: Position, Speed, and TimeUnit 5
Lesson 7: Back in Time
Lesson 11: Multiplying Rational NumbersUnit 5
Lesson 7: Back in Time
Lesson 12: Multiply!Unit 5
Lesson 7: Back in Time
Lesson 13: Dividing Rational NumbersUnit 5
Lesson 7: Speeding Turtles
Lesson 14: Negative Rates 
Sub-Unit 3: Four Operations with Rational Numbers 
Lesson 15: Expressions with Rational NumbersUnit 5
Lesson 9: Expressions (Print available)
Lesson 16: Say It With Decimals 
Lesson 17: Solving Problems with Rational NumbersLesson 11: Changing Temperatures
Lesson 12: Arctic Ice Sea (Print available)
Lesson 13: Solar Panels and More (Print available)
Lesson 18: Solving Equations With Rational Numbers 
Lesson 19: Representing Contexts With Equations 
Lesson 20: Summiting Everest 

Unit 6: Expressions, Equations, and Inequalities

Amplify MathDesmos Math 6–A1
Unit 6: Expressions, Equations, and InequalitiesUnit 2: Introducing Proportional Relationships
Unit 4: Proportional Relationships and Percentages
Unit 6: Expressions, Equations, and Inequalities
Lesson 1: Keeping the Balance 
Lesson 2: Balanced and UnbalancedUnit 6
Lesson 1: Toothpicks and Tiles
Lesson 2: Balanced and UnbalancedUnit 6
Lesson 1: Toothpicks and Tiles
Lesson 3: Reasoning About Solving Equations (Part 1)Unit 6
Lesson 2: Smudged Receipts
Lesson 4: Reasoning About Solving Equations (Part 2)Unit 6
Lesson 2: Smudged Receipts
Lesson 3: Equations
Lesson 4: Seeing Structure (Print available)
Lesson 5: Dealing with Negative NumbersUnit 6
Lesson 2: Smudged Receipts
Lesson 3: Equations
Lesson 4: Seeing Structure (Print available)
Lesson 5: Dealing with Negative NumbersUnit 6
Lesson 8: Factoring and Expanding (Print available)
Lesson 16: Shira the Sheep
Lesson 6: Two Ways to Solve One EquationUnit 6
Lesson 4: Seeing Struction (Print available)
Lesson 7: Practice Solving EquationsUnit 6
Lesson 2: Smudged Receipts
Lesson 3: Equations
Lesson 4: Seeing Structure (Print available)
Sub-Unit 2: Solving Real-World Problems Using Two-Step Equations 
Lesson 8: Reasoning With Tape DiagramsUnit 6
Lesson 2: Smudged Receipts
Lesson 9: Reasoning About Equations and Tape Diagrams (Part 1)Unit 6
Lesson 2: Smudged Receipts
Lesson 10: Reasoning About Equations and Tape Diagrams (Part 2)Unit 6
Lesson 2: Smudged Receipts
Lesson 11: Using Equations to Solve ProblemsUnit 6
Lesson 2: Smudged Receipts
Lesson 3: Equations
Lesson 4: Seeing Structure (Print available) 
Lesson 12: Solving Percent Problems in New WaysUnit 6
Lesson 4: Seeing Structure (Print available)

Unit 4
Lesson 7: Percent MachinesPractice Day 1 (Print available)
Practice Day 2 (Print available)
Sub-Unit 3: Inequalities 
Lesson 13: Reintroducing InequalitiesUnit 6
Lesson 1: Toothpicks and Tiles
Lesson 14: Solving InequalitiesUnit 6
Lesson 5: Balancing Moves
Lesson 6: Balancing Equations
Lesson 13: I Saw the Signs
Lesson 15: Finding Solutions to Inequalities in ContextUnit 6
Lesson 13: I Saw the Signs
Practice Day 1 (Print available)
Lesson 16: Efficiently Solving InequalitiesUnit 6
Lesson 10: Collect the Squares
Lesson 17: Interpreting InequalitiesUnit 6
Lesson 13: I Saw the Signs
Lesson 14: Unbalanced Hangers
Lesson 15: Budgeting (Print available)
Lesson 18: Modeling With Inequalities 
Sub-Unit 4: Equivalent Expressions 
Lesson 19: Subtraction in Equivalent Expressions 

Unit 7: Angles, Triangles, and Prisms

Amplify MathDesmos Math 6–A1
Unit 7: Angles, Triangles, and PrismsUnit 7: Angles, Triangles, and Prisms
Lesson 1: Shaping Up 
Sub-Unit 1: Angle Relationships 
Lesson 2: Relationships of AnglesUnit 7
Lesson 1: Pinwheels
Lesson 2: Friendly Angles
Lesson 3: Angle Diagrams
Lesson 3: Supplementary and Complementary Angles (Part 1) 
Lesson 4: Supplementary and Complementary Angles (Part 2) 
Lesson 5: Vertical AnglesUnit 7
Lesson 2: Friendly Angles
Lesson 3: Angle Diagrams
Lesson 4: Missing Measures (Print available) [Free lesson]
Lesson 6: Using Equations to Solve for Unknown AnglesUnit 7
Lesson 3: Angle Diagrams
Lesson 4: Missing Measures (Print available) [Free lesson]
Lesson 7: Like Clockwork 
Sub-Unit 2: Drawing Polygons with Given Conditions 
Lesson 8: Building Polygons (Part 1)Unit 7
Lesson 6: Is It Enough?
Lesson 9: Building Polygons (Part 2)Unit 7
Lesson 6: Is It Enough?
Lesson 10: Triangles with Three Common MeasuresUnit 7
Lesson 13: Popcorn Possibilities
Lesson 11: Drawing Triangles (Part 1)Unit 7
Lesson 5: Can You Build It? [Free lesson]
Lesson 6: Is It Enough?
Lesson 7: More Than One
Lesson 8: Can You Draw It? (Print available)
Practice Day 1 (Print available)
Lesson 12: Drawing Triangles (Part 2)Unit 7
Lesson 5: Can You Build It? [Free lesson]
Lesson 6: Is It Enough?
Lesson 7: More Than One
Lesson 8: Can You Draw It? (Print available)
Practice Day 1 (Print available)
Sub-Unit 3: Solid Geometry
Lesson 13: Slicing SolidsUnit 7
Lesson 9: Slicing Solids
Lesson 14: Volume of Right PrismsUnit 7
Lesson 10: Simple Prisms
Lesson 15: Decomposing Bases for AreasUnit 7
Lesson 11: More Complicated Prisms
Lesson 16: Surface Area of Right PrismsUnit 7
Lesson 10: Simple Prisms
Lesson 11: More Complicated Prisms
Lesson 12: Surface Area Strategies (Print available)
Lesson 17: Distinguishing Volume and Surface Area
Lesson 18: Applying Volume and Surface AreaUnit 7
Lesson 13: Popcorn Possibilities

Unit 8: Probability and Sampling

Amplify MathDesmos Math 6–A1
Unit 8: Probability and SamplingUnit 8: Probability and Sampling
Lesson 1: The Invention of Fairness 
Lesson 2: Chance Experiments 
Lesson 3: What are Probabilities?Unit 8
Lesson 1: How Likely? (Print available)
Lesson 2: Prob-bear-bilities [Free lesson
Lesson 3: Mystery Bag
Lesson 4: Estimating Probabilities Through Repeated ExperimentsUnit 8
Lesson 4: Spin Class
Lesson 5: Is It Fair?
Lesson 6: Fair Games
Lesson 5: Code Breaking (Part 1)
Lesson 6: Code Breaking (Part 2)
Sub-Unit 2: Probabilities of Multi-Step Events
Lesson 7: Keeping Track of All Possible OutcomesUnit 8
Lesson 4: Spin Class
Lesson 5: Is it Fair?
Lesson 6: Fair Games
Lesson 8: Experiments With Multi-Step Events  
Lesson 9: Simulating Multi-Step Events 
Lesson 10: Designing Simulations 
Sub-Unit 3:Sampling
Lesson 11: Comparing Two PopulationsUnit 8
Lesson 10: Crab Island
Lesson 11: Headlines
Lesson 12: Larger PopulationsUnit 8
Lesson 10: Crab Island
Lesson 11: Headlines
Lesson 13: What Makes a Good Sample?Unit 8
Lesson 10: Crab Island
Lesson 11: Headlines
Lesson 14: Sampling in a Fair WayUnit 8
Lesson 10: Crab Island
Lesson 11: Headlines
Lesson 15: Estimating Population Measures of CenterUnit 8
Lesson 9: Car, Bike, or Train?
Lesson 10: Crab Island
Lesson 11: Headlines
Lesson 12: Flower Power
Lesson 16: Estimating Population ProportionsUnit 8
Lesson 9: Car, Bike, or Train?
Lesson 10: Crab Island
Lesson 11: Headlines
Lesson 12: Flower Power
Lesson 17: Presentation of Findings 

Grade 8

Unit 1: Rigid Transformations and Congruence

Amplify MathDesmos Math 6–A1
Unit 1: Rigid Transformations and CongruenceUnit 1: Rigid Transformations and Congruence
Unit 3: Proportional and Linear Relationships
Lesson 1: Tessellations 
Sub-Unit 1: Rigid Transformations 
Lesson 2: Moving in the PlaneUnit 1
Lesson 1: Transformers
Lesson 3: Symmetry and Reflection 
Lesson 4: Grid MovesUnit 1
Lesson 3: Transformation Golf
Lesson 4: Moving Day (Print available)
Lesson 5: Getting Coordinated

Unit 3
Lesson 6: Translations
Lesson 5: Making the MovesUnit 1
Lesson 1: Transformers
Lesson 2: Spinning, Flipping, Sliding
Lesson 4: Moving Day (Print available)
Lesson 5: Getting Coordinated
Lesson 6: Coordinate Moves (Part 1)Unit 1
Lesson 4: Moving Day (Print available)
Lesson 5: Getting Coordinated
Lesson 7: Coordinate Moves (Part 2)Unit 1
Lesson 4: Moving Day (Print available)
Lesson 5: Getting Coordinated
Lesson 6: Describing TransformationsUnit 1
Lesson 5: Getting Coordinated
Lesson 6: Connecting the Dots
Sub-Unit 2: Rigid Transformations and Congruence 
Lesson 9: No Bending or StretchingUnit 1
Lesson 7: No Bending, No Stretching
Lesson 10: What is the Same?Unit 1
Lesson 7: Are They the Same?
Lesson 9: Are They Congruent?
Lesson 11: Congruent PolygonsUnit 1
Lesson 7: Are They the Same?
Lesson 9: Are They Congruent?
Sub-Unit 4: Angles in a Triangle 
Lesson 13: Line Moves 
Lesson 14: Rotation Patterns 
Lesson 15: Alternate Interior AnglesUnit 1 
Lesson 11: Tearing It Up (Print available)
Lesson 16: Adding the Angles in a TriangleUnit 1
Lesson 11: Tearing It Up (Print available)
Lesson 17: Parallel Lines and the Angles in a TriangleUnit 1 
Lesson 10: Transforming Angles
Lesson 18: Creating a Border Pattern Using Transformations 

Unit 2: Dilations, Similarity, and Introducing Slope

Amplify MathDesmos Math 6–A1
Unit 2: Dilations and SimilarityUnit 2: Dilations and Similarity
Lesson 1: Projecting and Scaling 
Sub-Unit 1: Dilations
Lesson 2: Circular GridUnit 2
Lesson 1: Sketchy Dilations
Lesson 2: Dilation Mini Golf
Lesson 3: Match My Dilation
Lesson 4: Dilations on a Plane
Lesson 3: Dilations on a Plane 
Lesson 4: Dilations on a Square GridUnit 2
Lesson 1: Sketchy Dilations
Lesson 2: Dilation Mini Golf
Lesson 3: Match My Dilation
Lesson 4: Dilations on a Plane
Lesson 5: Dilations with CoordinatesUnit 2
Lesson 4: Dilations on a Plane
Sub-Unit 2: Similiarity
Lesson 6: SimilarityUnit 2
Lesson 5: Transformations Golf with Dilations
Lesson 6: Social Scavenger Hunt (Print available)
Lesson 7: Similar PolygonsUnit 2
Lesson 6: Social Scavenger Hunt (Print available)
Lesson 8: Similar TrianglesUnit 2
Lesson 7: Are Angles Enough?
Lesson 8: Shadows
Lesson 9: Ratios of Side Lengths in Similar Triangles
Lesson 12: Optical Illusions 

Unit 3: Linear Relationships

Amplify MathDesmos Math 6–A1
Unit 3: Proportional and Linear RelationshipsUnit 3: Proportional and Linear Relationships
Unit 4: Linear Equations and Linear Systems
Unit 5: Functions and Volume
Lesson 1: Visual Patterns 
Sub-Unit 1: Proportional Relationships 
Lesson 2: Proportional Relationships 
Lesson 3: Understanding Proportional RelationshipsUnit 3
Lesson 1: Turtle Time Trials
Lesson 4: Graphs of Proportional RelationshipsUnit 3
Lesson 1: Turtle Time Trials
Lesson 2: Water Tank 

Unit 5
Lesson 4: Window Frames
Lesson 5: Representing Proportional RelationshipsUnit 3
Lesson 1: Turtle Time Trials 
Unit 5
Lesson 4: Window Frames
Lesson 6: Graphing Stories
Lesson 7: Feel the Burn (Print available)
Lesson 8: Charge! (Print available)
Lesson 6: Comparing Proportional RelationshipsUnit 3
Lesson 3: Posters
Sub-Unit 2: Linear Relationships
Lesson 7: Introduction to Linear RelationshipsUnit 3
Lesson 1: Turtle Time Trials
Lesson 4: Stacking Cups

Unit 5
Lesson 6: Graphing Stories
Lesson 7: Feel the Burn (Print available)
Lesson 8: Charge! (Print available)
Lesson 8: Comparing Linear Relationships 
Lesson 9: More Linear RelationshipsUnit 5
Lesson 6: Graphing Stories
Lesson 7: Feel the Burn (Print available)
Lesson 8: Charge! (Print available)
Lesson 10: Representations of Linear RelationshipsUnit 3
Lesson 5: Flags
Lesson 6: Graphing Stories
Lesson 7: Feel the Burn (Print available)
Lesson 8: Charge! (Print available)
Lesson 11: Writing Equations for Lines Using Two Points 
Lesson 12: Translating mx + bUnit 3
Lesson 3: Posters
Lesson 6: Translations
Lesson 13: Slopes Don’t Have to be PositiveUnit 3
Lesson 5: Flags
Lesson 6: Translations
Lesson 7: Water Cooler
Lesson 8: Landing Planes
Lesson 10: Calculating SlopeUnit 3
Lesson 7: Water Cooler
Lesson 8: Landing Planes
Lesson 14: Writing Equations for Lines Using Two Points, Revisited 
Lesson 11: Equations of All Kinds of LinesUnit 3
Lesson 3: Posters
Lesson 4: Stacking Cups
Lesson 5: Flags
Lesson 6: Translations
Sub-Unit 3: Linear Equations 
Lesson 16: Solutions to Linear EquationsUnit 3
Lesson 3: Posters
Lesson 6: Translations
Lesson 10: Solutions

 Unit 4
Lesson 3: Balanced Moves
Lesson 4: More Balanced Moves (Print available)
Lesson 17: More Solutions to Linear EquationsUnit 3 
Lesson 4: Stacking Cups
Lesson 5: Flags
Lesson 6: Translations
Lesson 7: Water Cooler
Lesson 10: Solutions
Lesson 18: Coordinating Linear Relationships 
Lesson 19: Rogue Planes 

Unit 4: Linear Equations and Linear Systems

Amplify MathDesmos Math 6–A1
Unit 4: Linear Equations and Systems of Linear EquationsUnit 4: Linear Equations and Systems of Linear Equations
Lesson 1: Number PuzzlesUnit 4
Lesson 1: Number machines
Sub-Unit 1: Linear Equations in One Variable 
Lesson 2: Writing Expressions and Equations
Lesson 3: Keeping the BalanceUnit 4
Lesson 2: Keep It Balanced
Lesson 4: Balanced Moves (Part 1)Unit 4
Lesson 3: Balanced Moves
Lesson 5: Balanced Moves (Part 2)Unit 4
Lesson 4: More Balanced Moves (Print available)
Lesson 6: Solving Any Linear EquationsUnit 4
Lesson 4: More Balanced Moves (Print available)
Lesson 5: Equation Roundtable (Print available)
Lesson 6: Strategic Solving (Print available)
Lesson 7: How Many Solutions? (Part 1)Unit 4
Lesson 5: Equation Roundtable (Print available)
Lesson 8: How Many Solutions? (Part 2)Unit 4
Lesson 5: Equation Roundtable (Print available)
Lesson 9: Strategic Solving 
Lesson 10: When Are They the SameUnit 4
Lesson 8: When Are They the Same?
Sub-Unit 2: Systems of Linear Equations
Lesson 11: On or Off the Line?Unit 4
Lesson 9: On or Off the Line?
Lesson 12: On Both of the LinesUnit 4
Lesson 10: On Both Lines
Lesson 13: Systems of Linear EquationsUnit 4
Lesson 11: Make Them Balance
Lesson 14: Solving Systems of Equations (Part 1)Unit 4
Lesson 14: All, Some, or None? Part 2
Lesson 15: Solving Systems of Equations (Part 2)Unit 4
Lesson 12: All, Some, or None? Part 2
Lesson 16: Writing Systems of Linear EquationsUnit 4
Lesson 14: Strategic Solving, Part 2 (Print available)
Lesson 17: Pay Gaps 

Unit 5: Functions and Volume

Amplify MathDesmos Math 6–A1
Unit 5: Functions and VolumeUnit 2: Dilations, Similarity, and Introducing Slope
Unit 3:
Proportional and Linear Relationships
Unit 5:
Functions and Volume
Lesson 1: Pick a Pitch 
Sub-Unit 1: Representing and Interpreting Functions 
Lesson 2: Introduction to FunctionsUnit 5
Lesson 2: Guess My Rule
Lesson 3: Equations of FunctionsUnit 3
Lesson 4: Window Frames
Lesson 4: Graphs of Functions (Part 1)Unit 5
Lesson 3: Function or Not?
Lesson 5: Graphs of Functions (Part 2)Unit 5
Lesson 5: The Tortoise and the Hare
Lesson 6: Graphs of Functions (Part 3)Unit 5
Lesson 6: Graphing Stories
Lesson 7: Connecting Representations of FunctionsUnit 5
Lesson 7: Feel the Burn (Print available)Lesson 8: Charge! (Print available)
Lesson 8: Comparing Linear Functions 
Lesson 9: Modeling with Linear Functions 
Lesson 10: Piecewise Linear FunctionsUnit 5
Lesson 9: Piecing It Together
Sub-Unit 2: Cylinder, Cones, and Spheres 
Lesson 11: Filling Containers 
Lesson 12: The Volume of a CylinderUnit 5
Lesson 10: Volume LabLesson 11: Cylinders
Lesson 12: Scaling Cylinders
Lesson 13: Determining Dimensions of CylindersUnit 5
Lesson 14: Missing Dimensions (Print available)
Lesson 14: The Volume of a ConeUnit 5
Lesson 10: Volume LabLesson 13: Cones
Lesson 15: Determining Dimensions of ConesUnit 5
Lesson 12: Scaling Cylinders
Lesson 13: Cones
Lesson 14: Missing Dimensions (Print available)
Lesson 16: Estimating a Hemisphere 
Lesson 17: The Volume of a SphereUnit 5
Lesson 15: Spheres
Lesson 18: Cylinders, Cones and SpheresUnit 5
Lesson 15: Practice Day 2 (Print available)
Lesson 19: Scaling One Dimension 
Lesson 20: Scaling Two Dimensions 
Lesson 21: Packing Spheres 

Unit 6: Exponents and Scientific Notation

Amplify MathDesmos Math 6–A1
Unit 6: Exponents and Scientific NotationUnit 7: Exponents and Scienctific Notation
Lesson 1: Create a Sierpinski Triangle 
Sub-Unit 1: Exponent Rules 
Lesson 2: Reviewing ExponentsUnit 7
 Lesson 1: Circles
Lesson 2: Combining Exponents
Lesson 3: Multiplying PowersUnit 7 
Lesson 3: Power Pairs (Print available)
Lesson 4: Rewriting Powers
Lesson 4: Dividing PowersUnit 7 
Lesson 3: Power Pairs (Print available)
Lesson 4: Rewriting Powers
Lesson 5: Negative ExponentsUnit 7 
Lesson 5: Zero and Negative Exponents
Lesson 6: Powers of PowersUnit 7 
Lesson 3: Power Pairs (Print available)
Lesson 7: Different Bases, Same Exponent 
Lesson 8: Practice with Rational BasesUnit 7
Practice Day 1 (Print available)
Sub-Unit 2: Scientific Notation 
Lesson 9: Representing Large Numbers on the Number LineUnit 7
Lesson 8: Point Zapper
Lesson 10: Representing Small Numbers on the Number LineUnit 7
Lesson 8: Point Zapper
Lesson 11: Applications of Arthithmetic with Powers of 10Unit 7
Lesson 8: Point Zapper
Lesson 9: Use Your Powers
Lesson 12: Definition of Scientific NotationUnit 7
Lesson 10: Solar System
Lesson 11: Balance the Scale
Lesson 13: Star Power
Lesson 13: Multiplying, Dividing, and Estimating with Scientific NotationUnit 7
Lesson 11: Balance the Scale
Lesson 13: Star Power
Lesson 14: Adding and Subtracting with Scientific NotationUnit 7
Lesson 11: Balance the Scale
Lesson 12: City Lights
Lesson 13: Star Power
Lesson 15: Is a Smartphone Smart Enough to Go to the Moon? 

Unit 7: Irrationals and the Pythagorean Theorem

Practice Day 2 (Print available)

Amplify MathDesmos Math 6–A1
Unit 7: Irrationals and the Pythagorean TheoremUnit 8: The Pythagorean Theorem and Irrational Numbers
Lesson 1: Sliced Bread
Sub-Unit 1: Rational and Irrational Numbers
Lesson 2: The Square RootUnit 8
Lesson 2: From Squares to Roots
Lesson 3: The Ares of Squares and Their Side LengthsUnit 8
Lesson 1: Tilted Squares
Lesson 3: Between Squares
Lesson 4: Estimating Square RootsUnit 8
Lesson 3: Between Squares
Lesson 4: Root Down
Lesson 5: The Cube RootUnit 8
Lesson 5: Filling Cubes
Lesson 6: Rational and Irrational NumbersUnit 8
Lesson 14: Hit the Target
Lesson 7: Decimal Representations of Rational NumbersUnit 8
Lesson 12: Fractions to Decimals
Lesson 8: Converting Repeating Decimals Into FractionsUnit 8
Lesson 13: Decimals to Fractions
Sub-Unit 2: The Pythagorean Theorem
Lesson 9: Observing the Pythagorean TheoremUnit 8
Lesson 6: The Pythagorean Theorem
Lesson 10: Proving the Pythagorean TheoremUnit 8
Lesson 7: Pictures to Prove It
Lesson 11: Determining Unknown Side LengthsUnit 8
Lesson 8: Triangle-Tracing Turtle
Lesson 12: Converse of the Pythagorean TheoremUnit 8
Lesson 9: Make it Right
Lesson 13: Distances on the Coordinate Plane (Part 1)Unit 8
Lesson 11: Pond Hopper
Lesson 13: Distances on the Coordinate Plane (Part 1)Unit 8
Lesson 11: Pond Hopper
Lesson 14: Distances on the Coordinate Plane (Part 2)Unit 8
Lesson 11: Pond Hopper
Lesson 15: Applications of the Pythagorean TheoremUnit 8
Lesson 8: Triangle-Tracing Turtle
Lesson 10: Taco Truck
Lesson 16: Pythagorean Triples

Unit 8: Pythagorean Theorem and Irrational Numbers

Amplify MathDesmos Math 6–A1
Unit 8: Associations in DataUnit 6: Associations in Data
Lesson 1: Creating a Scatter PlotUnit 6
Lesson 1: Click Battle
Sub-Unit 1: Associations in Data
Lesson 2: Interpreting Points on a Scatter PlotUnit 6
Lesson 3: Robots
Lesson 3: Observing Patterns in a Scatter PlotUnit 6
Lesson 7: Scatter Plot City
Lesson 4: Fitting a Line to DataUnit 6
Lesson 4: Dapper Cats
Lesson 5: Fit Fights
Lesson 5: Using a Linear ModelUnit 6
Lesson 6: Interpreting Slopes
Lesson 6: Interpreting Slope and y-interceptUnit 6
Lesson 6: Interpreting Slopes
Lesson 7: Analyzing Bivariate DataUnit 6
Lesson 8: Animal Brains
Lesson 8: Looking for AssociationsUnit 6
Lesson 9: Tasty Fruit
Lesson 9: Using Data Displays to Find AssociationsUnit 6
Lesson 10: Finding Associations
Lesson 11: Federal Budgets

Amplify Science Resources for NYC (6-8)

This page has been archived. For the latest information, please visit the NYC Resource Site.

Welcome!

As the 2021-2022 school year kicks into full gear, you’re likely thinking about making your classroom responsive to student needs due to the covid-19 pandemic.

Got additional questions? Use Zoom to attend office hours with Adaliz Gonzalez, the DOE’s Middle School Science Lead on Thursdays from 3-4pm.

Meeting ID: 852 2280 0969

Passcode: 528986

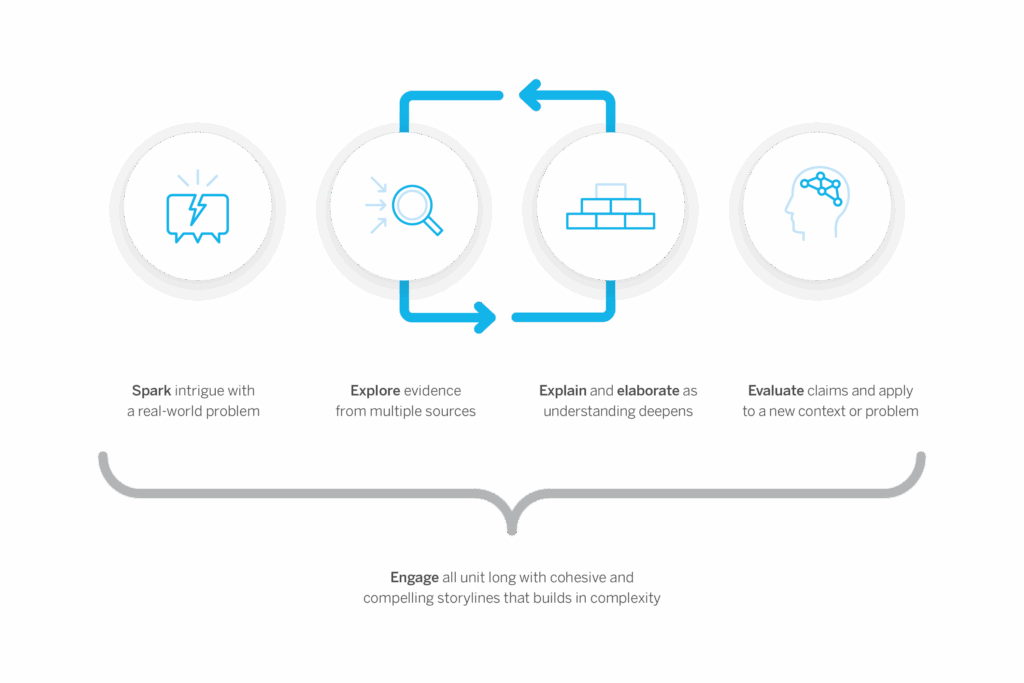
A powerful partnership

Amplify Science was developed by the science education experts at UC Berkeley’s Lawrence Hall of Science and the digital learning team at Amplify.

The word "Amplify" is written in large, orange letters with a period at the end on a light background.
The logo for The Lawrence Hall of Science, University of California, Berkeley, features blue text on a light background and is recognized by educators using Amplify Science for middle school science programs.

NYC Newsletters

Educator Spotlight Submission

Calling all NYC DOE educators! Do you know an educator who has gone above and beyond? Would you like to highlight your teaching experience for others? Submit nominations here to see them featured as a spotlight in a future edition of our monthly newsletter and on our Instagram pages!

Introduction

This page includes planning, implementation, and professional learning resources for NYC schools using Amplify Science. Please take a moment to familiarize yourself with the categories in the navigation bar on the left side of the page, so that you’ll be able to easily find what you need.

Most New York City educators come here looking for specific information, but if you’re new to Amplify Science, we recommend you read through the program guide to learn a little about the program. 

New to Amplify? – Start HERE!

Teachers and Administrators 

Step 1: Review the Amplify Science Overview Video.

Step 2: Review the NYC Scope and sequence for 21-22 school year.

Step 3: Review the Unpacking the Kit Videos listed below to understand what’s in your unit 1 kit.

Step 4: Access your unique Log-in information to log-in to the Amplify Science Curriculum outlined below under Login support

Step 5: Log into the platform and access our Program Hub.  Select Using this site for self study for a complete suite of training videos and resources for an initial orientation video series.

Step 6: Log into the curriculum and begin studying the Unit Map and Teacher’s Guide resources and begin planning your first lesson. Print out the NYC Program Guide for essential program information.

Step 7: Administrator’s ONLY – Review the new administrator orientation presentation for an overview of the program. Review other materials under Admin Resources

NOTE: Should you need any additional guidance on how to get started with prep (or anything else!), please feel free to get in touch with our pedagogical support team. They are available Monday-Friday from 7AM-7PM EST. You can reach them via the chat icon in the lower right- hand corner of your screen when logged in, through email (help@amplify.com), or via phone (800-823-1969).

Getting started resources

Login Support

Materials

Unpacking your first Amplify Science classroom kit

21-22 Login Update

The temporary login credentials for fall ’21 have been deactivated. 

Please make sure you check out the Getting started resources > Login Support below for instructions around teacher and student logins. If there are any issues, please confirm with your STARS programmer that your classes are assigned correctly and then contact our Amplify Help Desk at help@amplify.com or at 1-800-823-1969 for further assistance.

Implementation resources

21-22 NYC Scope and Sequence and Pacing Guide

Use our NYC Field Trip List to plan an engaging field trip for your students!

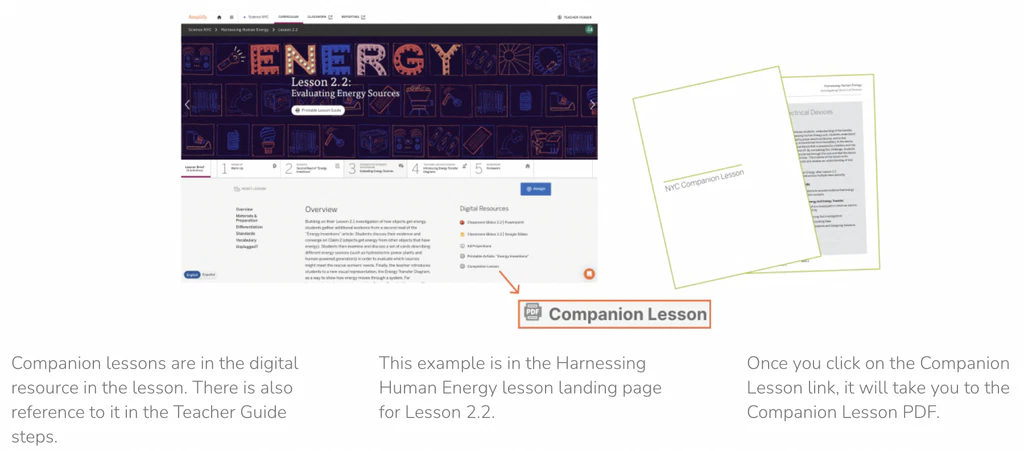
NYC Companion Lesson Guides 

The format of the NYC Companion Lessons is similar to other Amplify Science lessons. Some companion lessons are designed to require more than a single class period to teach, so each lesson includes pacing suggestions. Science Background sections support teachers with the science content introduced in the lessons. For students’ written work, possible student responses are included at the end of each lesson guide.

The Lesson Guides are available in the last section of each unit’s print Teacher’s Guide and can be downloaded from the tables in the downloads section below.

NYC Companion Lesson Copymasters
Each NYC Companion Lesson has an accompanying Copymaster (for creating student sheets) that can be copied and distributed to students or used as a visual reference. The NYC Companion Lessons require students to have physical copies of the student sheets. The copymasters are available to download as printable PDF files from the tables in the downloads section below.

Grade 6 Lesson guides and Copymasters

  • Companion lesson: Insert after Lesson 2.2
  • Time frame: 60 minutes (can spread across multiple class periods)
  • NYSP–12SLS: PE: MS-PS3-6, DCI: PS3.B
  • Links (click to download):
  • Companion lesson: Insert after Lesson 3.3
  • Time frame: Two 45-minute class periods
  • NYSP–12SLS: PE: MS-PS2-3, MS-PS2-5, DCI: PS2.B
  • Links (click to download):
  • Companion lesson: Insert after Lesson 3.3 and after Investigating Non-Touching Forces
  • Time frame: 60 minutes (first and second reads can be spread across two class periods)
  • NYSP–12SLS: PE: MS-PS2-5, MS-PS2-3, DCI: PS2.B
  • Links (click to download):
  • Companion lesson: Insert after Lesson 2.5
  • Time frame: 105 minutes (can be spread across multiple class periods)
  • NYSP–12SLS: PE: MS-PS1-6, DCI: PS1.B
  • Links (click to download):
  • Companion lesson: Insert after Lesson 3.4
  • Time frame: 60 minutes (first and second reads can be spread across two class periods)
  • NYSP–12SLS: PE: MS-LS2-5, DCI: LS2.C, LS4.D
  • Links (click to download):
  • Companion lesson: Insert after Lesson 1.3
  • Time frame: 60 minutes (first and second reads can be spread across two class periods)
  • NYSP–12SLS: PE: MS-ESS2-4, DCI: ESS2.C
  • Links (click to download):
  • Companion lesson: Insert after Lesson 3.3*
  • Time frame: 90 minutes (can be spread across multiple class periods)
  • NYSP–12SLS: PE: MS-PS1-7, MS-ESS2-6, DCI: PS1.A, ESS2.C
  • Links (click to download):

*Note: The homework assignment for Ocean, Atmosphere, and Climate Lesson 3.3 (reading the article “Deep Ocean Currents: Driven by Density”) should be assigned after the Investigating Deep Ocean Currents companion lesson rather than after Lesson 3.3.

Grade 7 Lesson Guides and Copymasters

  • Companion lesson: Insert after Lesson 3.2
  • Time frame: 60 minutes (first and second reads can be spread across two class periods)
  • NYSP–12SLS: PE: MS-LS1-3, DCI: PS3.D, LS1.A
  • Links (click to download):
  • Companion lesson: Insert after Lesson 3.3 or later
  • Time frame: Three 45-minute class periods, each several days apart
  • NYSP–12SLS: PE: MS-LS1-8, DCI: LS1.D
  • Links (click to download):
  • Companion lesson: Insert after Lesson 3.5
  • Time frame: 60 minutes (first and second reads can be spread across two class periods)
  • NYSP–12SLS: PE: MS-LS1-6, MS-LS1-7, DCI: LS1.C, PS3.D
  • Links (click to download):
  • Companion lesson: Insert after Lesson 2.2
  • Time frame: 60 minutes (first and second reads can be spread across two class periods)
  • NYSP–12SLS: PE: MS-PS1-4, DCI: PS3.A
  • Links (click to download):
  • Companion lesson: Insert after Lesson 1.3
  • Time frame: 60 minutes
  • NYSP–12SLS: PE: MS-PS1-7, DCI: PS1.A
  • Links (click to download):
  • Companion lesson: Insert after Lesson 2.3, 2.4, or 2.5
  • Time frame: Two 45-minute class periods
  • NYSP–PE: MS-PS1-8, MS-PS1-2 DCI: PS1.A, PS1.B
  • Links (click to download):

Grade 8 Lesson Guides and Copymaster

  • Companion lesson: Insert after Lesson 2.2
  • Time frame: 90 minutes (can be spread across multiple class periods)
  • NYSP–12SLS: PE: MS-PS3-2, MS-PS3-5
  • Links (click to download):

NYC Companion Kits

Materials needed to teach Amplify Science lessons are provided in a kit for each unit. While some materials used in the NYC Companion Lessons are also found in a unit’s kit, materials specific to the companion lessons are provided in NYC Companion Kits. The contents of each kit and any additional materials needed to teach the companion lessons are listed in the PDFs provided below. Please select your grade to view or download the list.

NYC Student Editions (print)
The NYC Student Editions are durable student references that compile all reading material required for a grade level, including the articles students read for NYC Companion Lessons. Students reading in the Student Edition should annotate the text directly with sticky notes to achieve the full benefits of Active Reading. The Active Reading approach was designed as an interactive process in which students highlight and annotate digital or hard copies of articles directly. Printable versions of the articles are available in the downloads section below.

It is recommended that NYC teachers insert this additional lesson between Lessons 3.1 and 3.2 in order to have students complete a reading assignment in class along with an additional Sim activity.

  • Lesson: Earth, Moon and Sun: Modeling Seasons
  • Lesson Placement: Insert between Lessons 3.1 and 3.2*
  • Links (click to download):

*If teaching this Modeling Seasons lesson, do not assign reading “The Endless Summer of the Arctic Tern” article for homework in Lesson 3.1. However, students should still model a lunar eclipse with the Modeling Tool for homework, as they will be revisiting and revising this model in Lesson 3.3.

NYC Investigation Notebooks (for teacher download)

* includes NYC Companion Lesson Copymaster(s)

* includes NYC Companion Lesson Copymaster(s)

  • Geology on Mars
  • Earth, Moon, and Sun
  • Force and Motion
  • Engineering Internship: Force and Motion
  • Magnetic Fields*
  • Light Waves
  • Traits and Reproduction
  • Natural Selection
  • Evolutionary History

* includes NYC Companion Lesson Copymaster(s)

Admin resources

Remote and hybrid learning resources

In response to the shifts towards remote learning, Amplify has created resources for using our programs remotely. Please visit our Program Hub accessible via your Teacher Platform for all of our hybrid and remote learning supports which includes guidance for teachers and parents/guardians.

Additionally, please see below where you’ll find the recordings from our recently held webinars on our remote learning resources and some best practices for implementing Amplify Science in a distance learning setting.

Resource guides

Professional learning opportunities

Interested in attending training? Check out and sign up for this year’s PL offerings here!

Election Day 21-22 PL

Grade 6 Guided Planning Presentation and Webinar

Grade 7 Guided Planning Presentation and Webinar

Grade 8 Guided Planning Presentation and Webinar

Grades 6-8 Unpacking Phenomena Presentation and Webinar

All 2020-2021 PL session materials can be found below under Professional learning resources.

Amplify Science Back-to-School Recorded Webinars – Amplify held a series of national office hours throughout the summer and fall to share information about our new resources to support remote and hybrid learning– including recommendations about what to prioritize from your curriculum and essential refresher topics, such as how to navigate your program and find the best planning resources. Feel free to watch all recorded sessions at your convenience.

Archived Professional Learning Resources

Winter 2022

Spring 2021

Winter 2021

Fall 2020

Summer 2020

Summer 2019- Harnessing Human Energy and Thermal Energy

Fall 2019- Population and Resources with Participant Notebook

Winter 2022

Spring 2021

Winter 2021

Fall 2020

  • Grade 7: Progress Builds & Embedded Assessments Webinar
  • Grade 7: Amplify Science Remote & Hybrid Resources Webinar

Summer 2020

Summer 2019 – Microbiome and Metabolism

Fall 2019 – Phase Change with Participant Notebook

Winter 2022

Spring 2021

Winter 2021

Fall 2020

  • Grade 8: Progress Builds & Embedded Assessments Webinar
  • Grade 8: Amplify Science Remote & Hybrid Resources Webinar

Summer 2020

Summer 2019 –  Geology on Mars and Earth, Moon, Sun

Fall 2019 – Force and Motion with Participant Notebook

Caregiver resources

Caregiver Hub

Questions

For general questions about the Amplify program (navigation, pedagogy, login), please reach out:

Email – scihelp@amplify.com
Phone – call toll-free at (800) 823-1969, Monday to Friday, 7 a.m.–7 p.m.  ET

Amplify Chat – click the Amplify Chat icon within the individual teacher account

A closer look at grades 6–8 (domain)

Amplify Science is based on the latest research on teaching and learning and helps teachers deliver rigorous and riveting lessons through hands-on investigations, literacy-rich activities, and interactive digital tools that empower students to think, read, write, and argue like real scientists.

In the 6–8 classroom, this looks like students:

  • Collecting evidence from a variety of sources.
  • Making sense of evidence in a variety of ways.
  • Formulating convincing scientific arguments.

Is your school implementing the domain model? Click here.

Collage of four images showing children engaged in educational activities such as conducting experiments and crafting in a classroom setting.
A four-step process: Spark intrigue, Explore evidence, Explain and elaborate, and Evaluate claims, leading to ongoing engagement and building complexity.

Program structure

Our cyclical lesson design ensures students receive multiple exposures to concepts through a variety of modalities. As they progress through the lessons within a unit, students build and deepen their understanding, increasing their ability to develop and refine complex explanations of the unit’s phenomenon.

It’s this proven program structure and lesson design that enables Amplify Science to teach less, but achieve more. Rather than asking teachers to wade through unnecessary content, we designed our 6–8 program to address 100% of the NGSS in fewer lessons than other programs.

Scope and sequence

Every year our grades 6–8 sequence consists of 9 units, with each unit containing 10–19 lessons. Lessons are written to last a minimum of 45-minutes, though teachers can expand or contract the timing to meet their needs.

A grid of educational icons, each representing a different science topic, such as earth and space science, life science, and physical science, with titles and lesson counts.

Unit types

Each unit delivers three-dimensional learning experiences and engages students in gathering evidence from a rich collection of sources, while also serving a unique purpose.

In grades 6–8, there are three types of units:

  • One unit is a launch unit.
  • Three units are core units.
  • Two units are engineering internships.
Launch units

Launch units are the first units taught in each year of Amplify Science. The goal of the Launch unit is to introduce students to norms, routines, and practices that will be built on throughout the year, including argumentation, active reading, and using the program’s technology. For example, rather than taking the time to explain the process of active reading in every unit in a given year, it is explained thoroughly in the Launch unit, thereby preparing students to actively read in all subsequent units.

Core units

Core units establish the context of the unit by introducing students to a real-world problem. As students move through lessons in a Core unit, they figure out the unit’s anchoring phenomenon, gain an understanding of the unit’s disciplinary core ideas and science and engineering practices, and make linkages across topics through the crosscutting concepts. Each Core unit culminates with a Science Seminar and final writing activity.

Engineering Internship units

Engineering Internship units invite students to design solutions for real-world problems as interns for a fictional company called Futura. Students figure out how to help those in need, from tsunami victims in Sri Lanka to premature babies, through the application of engineering practices. In the process, they apply and deepen their learning from Core units.

Units at a glance

A rover sits on a rocky, reddish hill under a hazy sky, leaving visible tire tracks across the barren landscape.
Geology on Mars

Domain: Earth and Space Science

Unit type: Launch

Student role: Planetary geologists

Phenomenon: Analyzing data about landforms on Mars can provide evidence that Mars may have once been habitable.    

Two prehistoric marine reptiles with long snouts are near a rocky shoreline, one on land and one in the water, with an island and clouds in the background.
Plate Motion

Domain: Earth and Space Science

Unit type: Core

Student role: Geologists

Phenomenon: Mesosaurus fossils have been found on continents separated by thousands of kilometers of ocean, even though the Mesosaurus species once lived all together.    

A geometric badge with a mountain, telescope, and audio wave icons on a purple background with polygonal shapes.
Plate Motion Engineering Internship

Domain: Earth and Space Science

Unit type: Engineering internship

Student role: Mechanical engineering interns

Phenomenon: Patterns in earthquake data can be used to design an effective tsunami warning system.    

Illustration of a volcano by the sea with smoke, trees, mountains, and a cross-section showing a fault line beneath the ground.
Rock Transformations

Domain: Earth and Space Science

Unit type: Core

Student role: Geologists

Phenomenon: Rock samples from the Great Plains and from the Rocky Mountains — regions hundreds of miles apart — look very different, but have surprisingly similar mineral compositions.    

Illustration of a city skyline at night with buildings, a bridge, and a large full moon in a starry sky.
Earth, Sun, and Moon

Domain: Earth and Space Science

Unit type: Core

Student role: Astronomers

Phenomenon: An astrophotographer can only take pictures of specific features on the Moon at certain times.    

Abstract digital painting of a landscape with green hills, a red-orange horizon, and a large yellow sun surrounded by blue and orange swirling shapes on the right.
Ocean, Atmosphere, and Climate

Domain: Earth and Space Science

Unit type: Core

Student role: Climatologists

Phenomenon: During El Niño years, the air temperature in Christchurch, New Zealand is cooler than usual.    

Illustration of a town with houses and fields under a sky with large clouds and swirling wind patterns, set against a backdrop of hills and mountains.
Weather Patterns

Domain: Earth and Space Science

Unit type: Core

Student role: Forensic meteorologists

Phenomenon: In recent years, rainstorms in Galetown have been unusually severe.    

A polar bear stands on a small ice floe surrounded by water and floating ice under a red sun in an Arctic landscape.
Earth’s Changing Climate

Domain: Earth and Space Science

Unit type: Core

Student role: Climatologists

Phenomenon: The ice on Earth’s surface is melting.    

Hexagonal badge with icons including a wrench, building, sun, screwdriver, paint can, and molecules on a purple geometric background.
Earth’s Changing Climate Engineering Internship

Domain: Earth and Space Science

Unit type: Engineering internship

Student role: Civil engineers

Phenomenon: Designing rooftops with different modifications can reduce a city’s impact on climate change.    

Colorful abstract digital artwork featuring a yellow figure holding a device, with blue and red shapes and textured patterns in the background.
Microbiome

Domain: Life Science

Unit type: Launch

Student role: Microbiological researchers

Phenomenon: The presence of 100 trillion microorganisms living on and in the human body may keep the body healthy.    

An abstract illustration of a person having their mouth and throat examined with a tongue depressor, surrounded by colorful shapes, with an eye chart in the background.
Metabolism

Domain: Life Science

Unit type: Core

Student role: Medical researchers

Phenomenon: Elisa, a young patient, feels tired all the time.    

Geometric orange background with a hexagon icon displaying symbols for statistics, farming, healthcare, safety vest, chemistry, and agriculture.
Metabolism Engineering Internship

Domain: Life Science

Unit type: Engineering internship

Student role: Food engineers

Phenomenon: Designing health bars with different molecular compositions can effectively meet the metabolic needs of patients or rescue workers.    

Six spiders with different colors and stripe patterns are arranged in a grid pattern on a dark background, showing variations in leg and body color.
Traits and Reproduction

Domain: Life Science

Unit type: Core

Student role: Biomedical students

Phenomenon: Darwin’s bark spider offspring have different silk flexibility traits, even though they have the same parents.    

An underwater scene shows a whale surrounded by jellyfish, sea turtles, and fish, with sunlight filtering through the water.
Populations and Resources

Domain: Life Science

Unit type: Core

Student role: Biologists

Phenomenon: The size of the moon jelly population in Glacier Sea has increased.    

A low-poly landscape with trees, mushrooms, a rabbit sitting, and a fox bending down near another rabbit under a sunny sky with mountains in the background.
Matter and Energy in Ecosystems

Domain: Life Science

Unit type: Core

Student role: Ecologists

Phenomenon: What caused the mysterious crash of a biodome ecosystem?    

Three green dinosaurs and one yellow dinosaur stand in a row on grass, each with purple spikes and a red spot on their backs. The sky is blue with light clouds.
Natural Selection

Domain: Life Science

Unit type: Core

Student role: Biologists

Phenomenon: The newt population in Oregon State Park has become more poisonous over time.    

Red-toned graphic with hexagonal badge featuring a world map, a mosquito, a DNA strand, charts, cubes, and circular icons. Geometric background pattern.
Natural Selection Engineering Internship

Domain: Life Science

Unit type: Engineering internship

Student role: Clinical engineers

Phenomenon: Designing malaria treatment plans that use different combinations of drugs can reduce drug resistance development while helping malaria patients.  

Two giant tortoises are near a river; one is by the water and the other is standing on land and stretching its neck toward a leafy tree.

Evolutionary History

Domain: Life Science

Unit type: Core

Student role: Paleontologists

Phenomenon: A mystery fossil at the Natural History Museum has similarities with both wolves and whales.    

Two people climb over rocky terrain strewn with electronic waste, with illustrated insets showing a hiking boot, a solar-powered device, and a person adjusting a belt-like gadget.
Harnessing Human Energy

Domain: Physical Science

Unit type: Launch

Student role: Energy scientists

Phenomenon: Rescue workers can use their own human kinetic energy to power the electrical devices they use during rescue missions.    

A spacecraft approaches a modular space station with large solar panels, set against a backdrop of outer space.
Force and Motion

Domain: Physical Science

Unit type: Core

Student role: Physicists

Phenomenon: The asteroid sample-collecting pod failed to dock at the space station as planned.    

Green geometric background with a hexagonal badge showing a parachute, a box, a ruler, a bandage, and stacked layers.
Force and Motion Engineering Internship

Domain: Physical Science

Unit type: Engineering internship

Student role: Mechanical engineering interns

Phenomenon: Designing emergency supply delivery pods with different structures can maintain the integrity of the supply pods and their contents. 

Illustration of a roller coaster car full of people with raised arms, speeding down a loop against a blue sky with clouds.
Magnetic Fields

Domain: Physical Science

Unit type: Core

Student role: Physicists

Phenomenon: During a test launch, a spacecraft traveled much faster than expected.    

Illustration of a person in a red coat and hat with arms crossed, eyes closed, surrounded by large orange and brown circles, possibly representing snow or lights.
Thermal Energy

Domain: Physical Science

Unit type: Core

Student role: Thermal scientists

Phenomenon: One of two proposed heating systems for Riverdale School will best heat the school.    

An orange popsicle gradually melts, shown in four stages from solid to completely melted, with wooden sticks visible, against a purple background.
Phase Change

Domain: Physical Science

Unit type: Core

Student role: Chemists

Phenomenon: A methane lake on Titan no longer appears in images taken by a space probe two years apart.    

A green background with a picture of a person and a sandwich.
Phase Change Engineering Internship

Domain: Physical Science

Unit type: Engineering internship

Student role: Chemical engineering interns

Phenomenon: Designing portable baby incubators with different combinations of phase change materials can keep babies at a healthy temperature.    

Digital illustration showing red and blue molecules on a blue background transitioning to a lighter background, representing molecular diffusion across a boundary.
Chemical Reactions

Domain: Physical Science

Unit type: Core

Student role: Forensic chemists

Phenomenon: A mysterious brown substance has been detected in the tap water of Westfield.    

Illustration of Earth with yellow arrows and colored waves approaching from the left, representing incoming solar or cosmic radiation.
Light Waves

Domain: Physical Science

Unit type: Core

Student role: Spectroscopists

Phenomenon: The rate of skin cancer is higher in Australia than in other parts of the world.    

Season 1, Episode 5

Teaching is listening, starring Patti and Rod Lloyd

Today on Beyond My Years, host Ana Torres takes you to the northernmost region of Alaska to sit down with Patti and Rod Lloyd. Patti and Rod are longtime educators in a rural school district where caribou outnumber people, the village is only accessible by plane, and the Indigenous culture of the Iñupiat people goes back 10,000 years. They teach Ana about how they make the content matter by connecting it to student life outside of the classroom, the honor of teaching where children are the most valuable part of the community, the importance of listening more than you speak, and they offer advice for teaching responsibly as an outsider. They also share stories of how the first week of every school year is spent connecting to the land and having the village elders teach about their culture, emphasizing the joy to be found when you open yourself up to what your students have to teach you. Throughout the conversation, it is clear that despite teaching in a unique landscape, the lessons that Patti and Rod have learned are applicable to teaching any student anywhere. Taking all those lessons back to the classroom, Eric and Ana discuss the benefits of building genuine community relationships, making learning culturally relevant, and the importance of focusing on effective teaching methods.

Two individuals in circular frames on a background with books, stars, and apples. The top person is wearing glasses; the bottom person has a beard and glasses. There's a pink star between them.

Meet Our Guest(s):

A woman with long brown hair, wearing glasses and a striped shirt, smiles in front of a plain light blue background, radiating warmth and a sense of community relationship.

Patti Lloyd

Patti is a licensed social worker and elementary teacher now serving as the Meade River School counselor. Patti has a bachelor of arts degree in social work, a bachelor of science degree in elementary education, and 18 years of teaching experience. Patti was a social worker in Idaho prior to teaching, and is certified as an alcohol and chemical addictions counselor. She previously taught early childhood education and kindergarten. She is on the Board of Trustees of Ilisagvik College (the only tribal college in Alaska) and has worked for the North Slope Borough School District for 27 years. Patti is happy living in this beautiful place and loves the strong Inupiat culture surrounding her.

A middle-aged man with glasses, a bald head, and a short gray beard, wearing a blue collared shirt, smiling at the camera against a light gray background, reflecting warmth and strong community relationships.

Rod Lloyd

Rodney Lloyd is a primary elementary teacher with a bachelor of science degree in elementary education and a master of arts degree in language and literature with specialization in reading instruction and intervention. Rod has certifications in math recovery and is working towards a master’s degree in elementary math instruction. Rod has 30 years of teaching experience and was selected as NSBSD Teacher of the Year for 2013 and 2024. He has been teaching a Kindergarten/first grade combination class but works with students of all ages. He will be working in an intervention role at Meade River School for the 2024-25 school year. Rod is also the current presidentMeade River School, School Advisory Committee (SAC) president. Rod loves living in the Arctic and learning from the cultural members he considers close friends.

Meet our host, Ana Torres.

Ana has been an educator for 30 years, working in both the K–8 and higher education sectors. She served as an administrator and instructor at various public and private colleges and universities and as a bilingual and dual language teacher, dual language math and reading interventionist, dual language instructional coach, assistant principal, and principal in K–8 schools. Ana is currently the Senior Biliteracy and Multilingual Product Specialist on Amplify’s product specialist team, and delivers literacy and biliteracy presentations across the nation. Ana’s passion and advocacy for biliteracy and multiculturalism has led her to educate leaders, teachers, and parents about the positive impact of bilingualism and biliteracy in our world.

A woman with long dark hair and hoop earrings smiles at the camera while wearing a black blazer, standing outdoors—ready to discuss classroom challenges or share insights on her teacher podcast.
A man with short, closely-cropped hair and a trimmed beard smiles at the camera against a light gray background, ready to inspire diverse learners in the math classroom.

Meet our Classroom Insider, Eric Cross.

Eric Cross is a middle school science teacher who hopes to someday be a lifelong educator, like the guests on Beyond My Years! In each episode, Eric connects with host Ana Torres to discuss her guests’ best insights gleaned from their long and rewarding careers in the classroom. Then, Eric talks about bringing some of their wisdom into his current classroom and busy life.

Quotes

“Even though they’re coming to me at five and six years old, they are coming with a lot of rich knowledge that I don’t have. And then if I remain open and work with them, I’ve got a lot to learn.”

—Rod Lloyd

“The people that have lived there for 10,000 years; they know how to live in the Arctic. There’s architectural or archaeological evidence of 10,000 years of continued occupation of that land. So they have a lot to teach us. They’re experts there.”

—Rod Lloyd

“I wish I could go back and tell myself, ‘Don’t be so concerned with what you’re teaching but how you’re teaching it.’ Really get into the community.”

—Rod Lloyd

“We’ve just got to be quiet enough, long enough to hear what our students are saying—or not saying.”

—Patti Lloyd

“When you do make a mistake, ‘cause you’re going to make cultural mistakes, we have to kind of own up to it and then ask for advice on how to fix it or how to not make that mistake again.”

—Rod Lloyd

“Enjoy it. Enjoy the kids. Take time to enjoy your job. I know teaching now is a very high-pressure situation. There is so much pressure on us and so much to do, but we can’t forget to take that time and enjoy it because if you enjoy it, your kids will enjoy it.”

—Rod Lloyd

“Teachers are taking care of the world. So now teachers take care of you.”

—Patti Lloyd